Author: admin
Key Components for Setting Up an HPC Cluster
Head Node (Controller)
Compute Nodes
Networking
Storage
Authentication
Scheduler
Resource Management
Parallel File System (Optional)
Interconnect Libraries
Monitoring and Debugging Tools
How to configure Slurm Controller Node on Ubuntu 22.04
How to setup HPC-Slurm Controller Node
Refer to Key Components for HPC Cluster Setup; for which pieces you need to setup.
This guide provides step-by-step instructions for setting up the Slurm controller daemon (`slurmctld`) on Ubuntu 22.04. It also includes common errors encountered during the setup process and how to resolve them.
Step 1: Install Prerequisites
To begin, install the required dependencies for Slurm and its components:
sudo apt update && sudo apt upgrade -y
sudo apt install -y munge libmunge-dev libmunge2 build-essential man-db mariadb-server mariadb-client libmariadb-dev python3 python3-pip chrony
Step 2: Configure Munge (Authentication for slurm)
Munge is required for authentication within the Slurm cluster.
1. Generate a Munge key on the controller node:
sudo create-munge-key
2. Copy the key to all compute nodes:
scp /etc/munge/munge.key user@node:/etc/munge/
3. Start the Munge service:
sudo systemctl enable –now munge
Step 3: Install Slurm
1. Download and compile Slurm:
wget https://download.schedmd.com/slurm/slurm-23.02.4.tar.bz2
tar -xvjf slurm-23.02.4.tar.bz2
cd slurm-23.02.4
./configure –prefix=/usr/local/slurm –sysconfdir=/etc/slurm
make -j$(nproc)
sudo make install
2. Create necessary directories and set permissions:
sudo mkdir -p /etc/slurm /var/spool/slurm /var/log/slurm
sudo chown slurm: /var/spool/slurm /var/log/slurm
3. Add the Slurm user:
sudo useradd -m slurm
Step 4: Configure Slurm; more complex configs contact Nick Tailor
1. Generate a basic `slurm.conf` using the configurator tool at
https://slurm.schedmd.com/configurator.html. Save the configuration to `/etc/slurm/slurm.conf`.
# Basic Slurm Configuration
ClusterName=my_cluster
ControlMachine=slurmctld # Replace with your control node’s hostname
# BackupController=backup-slurmctld # Uncomment and replace if you have a backup controller
# Authentication
AuthType=auth/munge
CryptoType=crypto/munge
# Logging
SlurmdLogFile=/var/log/slurm/slurmd.log
SlurmctldLogFile=/var/log/slurm/slurmctld.log
SlurmctldDebug=info
SlurmdDebug=info
# Slurm User
SlurmUser=slurm
StateSaveLocation=/var/spool/slurm
SlurmdSpoolDir=/var/spool/slurmd
# Scheduler
SchedulerType=sched/backfill
SchedulerParameters=bf_continue
# Accounting
AccountingStorageType=accounting_storage/none
JobAcctGatherType=jobacct_gather/linux
# Compute Nodes
NodeName=node[1-2] CPUs=4 RealMemory=8192 State=UNKNOWN
PartitionName=debug Nodes=node[1-2] Default=YES MaxTime=INFINITE State=UP
2. Distribute `slurm.conf` to all compute nodes:
scp /etc/slurm/slurm.conf user@node:/etc/slurm/
3. Restart Slurm services:
sudo systemctl restart slurmctld
sudo systemctl restart slurmd
Troubleshooting Common Errors
root@slrmcltd:~# tail /var/log/slurm/slurmctld.log
[2024-12-06T11:57:25.428] error: High latency for 1000 calls to gettimeofday(): 20012 microseconds
[2024-12-06T11:57:25.431] fatal: mkdir(/var/spool/slurm): Permission denied
[2024-12-06T11:58:34.862] error: High latency for 1000 calls to gettimeofday(): 20029 microseconds
[2024-12-06T11:58:34.864] fatal: mkdir(/var/spool/slurm): Permission denied
[2024-12-06T11:59:38.843] error: High latency for 1000 calls to gettimeofday(): 18842 microseconds
[2024-12-06T11:59:38.847] fatal: mkdir(/var/spool/slurm): Permission denied
Error: Permission Denied for /var/spool/slurm
This error occurs when the `slurm` user does not have the correct permissions to access the directory.
Fix:
sudo mkdir -p /var/spool/slurm
sudo chown -R slurm: /var/spool/slurm
sudo chmod -R 755 /var/spool/slurm
Error: Temporary Failure in Name Resolution
Slurm could not resolve the hostname `slurmctld`. This can be fixed by updating `/etc/hosts`:
1. Edit `/etc/hosts` and add the following:
127.0.0.1 slurmctld
192.168.20.8 slurmctld
2. Verify the hostname matches `ControlMachine` in `/etc/slurm/slurm.conf`.
3. Restart networking and test hostname resolution:
sudo systemctl restart systemd-networkd
ping slurmctld
Error: High Latency for gettimeofday()
Dec 06 11:57:25 slrmcltd.home systemd[1]: Started Slurm controller daemon.
Dec 06 11:57:25 slrmcltd.home slurmctld[2619]: slurmctld: error: High latency for 1000 calls to gettimeofday(): 20012 microseconds
Dec 06 11:57:25 slrmcltd.home systemd[1]: slurmctld.service: Main process exited, code=exited, status=1/FAILURE
Dec 06 11:57:25 slrmcltd.home systemd[1]: slurmctld.service: Failed with result ‘exit-code’.
This warning typically indicates timing issues in the system.
Fixes:
1. Install and configure `chrony` for time synchronization:
sudo apt install chrony
sudo systemctl enable –now chrony
chronyc tracking
timedatectl
2. For virtualized environments, optimize the clocksource:
sudo echo tsc > /sys/devices/system/clocksource/clocksource0/current_clocksource
3. Disable high-precision timing in `slurm.conf` (optional):
HighPrecisionTimer=NO
sudo systemctl restart slurmctld
Step 5: Verify and Test the Setup
1. Validate the configuration:
scontrol reconfigure
– no errors mean its working. If this doesn’t work check the connection between nodes
update your /etc/hosts to have the hosts all listed across the all machines and nodes.
2. Check node and partition status:
sinfo
root@slrmcltd:/etc/slurm# sinfo
PARTITION AVAIL TIMELIMIT NODES STATE NODELIST
debug* up infinite 1 idle* node1
3. Monitor logs for errors:
sudo tail -f /var/log/slurm/slurmctld.log
Written By: Nick Tailor
Mastering Podman: A Comprehensive Guide with Detailed Command Examples
Mastering Podman on Ubuntu: A Comprehensive Guide with Detailed Command Examples
Podman has become a popular alternative to Docker due to its flexibility, security, and rootless operation capabilities. This guide will walk you through the installation process and various advanced usage scenarios of Podman on Ubuntu, providing detailed examples for each command.
Table of Contents
1. How to Install Podman
To get started with Podman on Ubuntu, follow these steps:
Update Package Index
Before installing any new software, it’s a good idea to update your package index to ensure you’re getting the latest version of Podman:
sudo apt update
Install Podman
With your package index updated, you can now install Podman. This command will download and install Podman and any necessary dependencies:
sudo apt install podman -y
Example Output:
kotlin
Reading package lists… Done
Building dependency tree
Reading state information… Done
The following additional packages will be installed:
…
After this operation, X MB of additional disk space will be used.
Do you want to continue? [Y/n] y
…
Setting up podman (4.0.2) …
Verifying Installation
After installation, verify that Podman is installed correctly:
podman –version
Example Output:
podman version 4.0.2
2. How to Search for Images
Before running a container, you may need to find an appropriate image. Podman allows you to search for images in various registries.
Search Docker Hub
To search for images on Docker Hub:
podman search ubuntu
Example Output:
lua
INDEX NAME DESCRIPTION STARS OFFICIAL AUTOMATED
docker.io docker.io/library/ubuntu Ubuntu is a Debian-based Linux operating sys… 12329 [OK]
docker.io docker.io/ubuntu-upstart Upstart is an event-based replacement for the … 108 [OK]
docker.io docker.io/tutum/ubuntu Ubuntu image with SSH access. For the root p… 39
docker.io docker.io/ansible/ubuntu14.04-ansible Ubuntu 14.04 LTS with ansible 9 [OK]
This command will return a list of Ubuntu images available in Docker Hub.
3. How to Run Rootless Containers
One of the key features of Podman is the ability to run containers without needing root privileges, enhancing security.
Running a Rootless Container
As a non-root user, you can run a container like this:
podman run –rm -it ubuntu
Example Output:
ruby
root@d2f56a8d1234:/#
This command runs an Ubuntu container in an interactive shell, without requiring root access on the host system.
Configuring Rootless Environment
Ensure your user is added to the subuid and subgid files for proper UID/GID mapping:
echo “$USER:100000:65536” | sudo tee -a /etc/subuid /etc/subgid
Example Output:
makefile
user:100000:65536
user:100000:65536
4. How to Search for Containers
Once you start using containers, you may need to find specific ones.
Listing All Containers
To list all containers (both running and stopped):
podman ps -a
Example Output:
CONTAINER ID IMAGE COMMAND CREATED STATUS PORTS NAMES
d13c5bcf30fd docker.io/library/ubuntu:latest 3 minutes ago Exited (0) 2 minutes ago confident_mayer
Filtering Containers
You can filter containers by their status, names, or other attributes. For instance, to find running containers:
podman ps –filter status=running
Example Output:
CONTAINER ID IMAGE COMMAND CREATED STATUS PORTS NAMES
No output indicates there are no running containers at the moment.
5. How to Add Ping to Containers
Some minimal Ubuntu images don’t come with ping installed. Here’s how to add it.
Installing Ping in an Ubuntu Container
First, start an Ubuntu container:
podman run -it –cap-add=CAP_NET_RAW ubuntu
Inside the container, install ping (part of the iputils-ping package):
apt update
apt install iputils-ping
Example Output:
mathematica
Get:1 http://archive.ubuntu.com/ubuntu focal InRelease [265 kB]
…
Setting up iputils-ping (3:20190709-3) …
Now you can use ping within the container.
6. How to Expose Ports
Exposing ports is crucial for running services that need to be accessible from outside the container.
Exposing a Port
To expose a port, use the -p flag with the podman run command:
podman run -d -p 8080:80 ubuntu -c “apt update && apt install -y nginx && nginx -g ‘daemon off;'”
Example Output:
54c11dff6a8d9b6f896028f2857c6d74bda60f61ff178165e041e5e2cb0c51c8
This command runs an Ubuntu container, installs Nginx, and exposes port 80 in the container as port 8080 on the host.
Exposing Multiple Ports
You can expose multiple ports by specifying additional -p flags:
podman run -d -p 8080:80 -p 443:443 ubuntu -c “apt update && apt install -y nginx && nginx -g ‘daemon off;'”
Example Output:
wasm
b67f7d89253a4e8f0b5f64dcb9f2f1d542973fbbce73e7cdd6729b35e0d1125c
7. How to Create a Network
Creating a custom network allows you to isolate containers and manage their communication.
Creating a Network
To create a new network:
podman network create mynetwork
Example Output:
mynetwork
This command creates a new network named mynetwork.
Running a Container on a Custom Network
podman run -d –network mynetwork ubuntu -c “apt update && apt install -y nginx && nginx -g ‘daemon off;'”
Example Output:
1e0d2fdb110c8e3b6f2f4f5462d1c9b99e9c47db2b16da6b2de1e4d9275c2a50
This container will now communicate with others on the mynetwork network.
8. How to Connect a Network Between Pods
Podman allows you to manage pods, which are groups of containers sharing the same network namespace.
Creating a Pod and Adding Containers
podman pod create mypod
podman run -dt –pod mypod ubuntu -c “apt update && apt install -y nginx && nginx -g ‘daemon off;'”
podman run -dt –pod mypod ubuntu -c “apt update && apt install -y redis-server && redis-server”
Example Output:
f04d1c28b030f24f3f7b91f9f68d07fe1e6a2d81caeb60c356c64b3f7f7412c7
8cf540eb8e1b0566c65886c684017d5367f2a167d82d7b3b8c3496cbd763d447
4f3402b31e20a07f545dbf69cb4e1f61290591df124bdaf736de64bc3d40d4b1
Both containers now share the same network namespace and can communicate over the mypod network.
Connecting Pods to a Network
To connect a pod to an existing network:
podman pod create –network mynetwork mypod
Example Output:
f04d1c28b030f24f3f7b91f9f68d07fe1e6a2d81caeb60c356c64b3f7f7412c7
This pod will use the mynetwork network, allowing communication with other containers on that network.
9. How to Inspect a Network
Inspecting a network provides detailed information about the network configuration and connected containers.
Inspecting a Network
Use the podman network inspect command:
podman network inspect mynetwork
Example Output:
json
[
{
“name”: “mynetwork”,
“id”: “3c0d6e2eaf3c4f3b98a71c86f7b35d10b9d4f7b749b929a6d758b3f76cd1f8c6”,
“driver”: “bridge”,
“network_interface”: “cni-podman0”,
“created”: “2024-08-12T08:45:24.903716327Z”,
“subnets”: [
{
“subnet”: “10.88.1.0/24”,
“gateway”: “10.88.1.1”
}
],
“ipv6_enabled”: false,
“internal”: false,
“dns_enabled”: true,
“network_dns_servers”: [
“8.8.8.8”
]
}
]
This command will display detailed JSON output, including network interfaces, IP ranges, and connected containers.
10. How to Add a Static Address
Assigning a static IP address can be necessary for consistent network configurations.
Assigning a Static IP
When running a container, you can assign it a static IP address within a custom network:
podman run -d –network mynetwork –ip 10.88.1.100 ubuntu -c “apt update && apt install -y nginx && nginx -g ‘daemon off;'”
Example Output:
f05c2f18e41b4ef3a76a7b2349db20c10d9f2ff09f8c676eb08e9dc92f87c216
Ensure that the IP address is within the subnet range of your custom network.
11. How to Log On to a Container with
Accessing a container’s shell is often necessary for debugging or managing running applications.
Starting a Container with
If the container image includes , you can start it directly:
podman run -it ubuntu
Example Output:
ruby
root@e87b469f2e45:/#
Accessing a Running Container
To access an already running container:
podman exec -it <container_id>
Replace <container_id> with the actual ID or name of the container.
Example Output:
ruby
root@d2f56a8d1234:/#
How to renable the tempurl in latest Cpanel
As some of you have noticed the new cpanel by default has a bunch of new default settings that nobody likes.
FTPserver is not configured out of the box.
TempURL is disabled for security reasons. Under certain conditions, a user can attack another user’s account if they access a malicious script through a mod_userdir URL.
So they removed it by default.
They did not provide instructions for people who need it. You can easily enable it BUT php wont work on the temp url unless you do the following
remove below: and by remove I mean you need to recompile easyapache 4 the following changes.
mod_ruid2
mod_passenger
mod_mpm_itk
mod_proxy_fcgi
mod_fcgid
Install
Mod_suexec
mod_suphp
Then go into Apache_mode_user dir tweak and enable it and exclude default host only.
It wont save the setting in the portal, but the configuration is updated. If you go back and look it will look like the settings didnt take. Looks like a bug in cpanel they need to fix on their front end.
Then PHP will work again on the tempurl.
How to integrate VROPS with Ansible
Automating VMware vRealize Operations (vROps) with Ansible
In the world of IT operations, automation is the key to efficiency and consistency. VMware’s vRealize Operations (vROps) provides powerful monitoring and management capabilities for virtualized environments. Integrating vROps with Ansible, an open-source automation tool, can take your infrastructure management to the next level. In this blog post, we’ll explore how to achieve this integration and demonstrate its benefits with a practical example.
What is vRealize Operations (vROps)?
vRealize Operations (vROps) is a comprehensive monitoring and analytics solution from VMware. It helps IT administrators manage the performance, capacity, and overall health of their virtual environments. Key features of vROps include:
Why Integrate vROps with Ansible?
Integrating vROps with Ansible allows you to automate routine tasks, enforce consistent configurations, and rapidly respond to changes or issues in your virtual environment. This integration enables you to:
Setting Up the Integration
Prerequisites
Before you start, ensure you have:
Step-by-Step Guide
Step 1: Configure API Access in vROps
First, ensure you have the necessary API access in vROps. You’ll need:
Step 2: Install Ansible
If you haven’t installed Ansible yet, you can do so by following these commands:
sh
sudo apt update
sudo apt install ansible
Step 3: Create an Ansible Playbook
Create an Ansible playbook to interact with vROps. Below is an example playbook that retrieves the status of vROps resources.
Note: to use the other api end points you will need to acquire the token and set it as a fact to pass later.
Example
—
—
If you want to acquire the auth token:
—
– name: Authenticate with vROps and Check vROps Status
hosts: localhost
vars:
vrops_host: “your-vrops-host”
vrops_username: “your-username”
vrops_password: “your-password”
tasks:
– name: Authenticate with vROps
uri:
url: “https://{{ vrops_host }}/suite-api/api/auth/token/acquire”
method: POST
body_format: json
body:
username: “{{ vrops_username }}”
password: “{{ vrops_password }}”
headers:
Content-Type: “application/json“
validate_certs: no
register: auth_response
– name: Fail if authentication failed
fail:
msg: “Authentication with vROps failed: {{ auth_response.json }}”
when: auth_response.status != 200
– name: Set auth token as fact
set_fact:
auth_token: “{{ auth_response.json.token }}”
– name: Get vROps status
uri:
url: “https://{{ vrops_host }}/suite-api/api/resources”
method: GET
headers:
Authorization: “vRealizeOpsToken {{ auth_token }}”
Content-Type: “application/json“
validate_certs: no
register: vrops_response
– name: Display vROps status
debug:
msg: “vROps response: {{ vrops_response.json }}”
Save this playbook to a file, for example, check_vrops_status.yml.
Step 4: Define Variables
Create a variables file to store your vROps credentials and host information.
Save it as vars.yml:
vrops_host: your-vrops-host
vrops_username: your-username
vrops_password: your-password
Step 5: Run the Playbook
Execute the playbook using the following command:
sh
ansible-playbook -e @vars.yml check_vrops_status.yml
This above command runs the playbook and retrieves the status of vROps resources, displaying the results if you used the first example.
Here are some of the key API functions you can use:
The Authentication to use the endpoints listed below, you will need to acquire the auth token and set it as a fact to pass to other tasks inside ansible to use with the various endpoints below.
Resource Management
Metrics and Data
Alerts and Notifications
Policies and Configurations
Dashboards and Reports
Capacity and Utilization
Additional Functionalities
These are just a few examples of the many functions available through the vROps REST API.
How to Power Up or Power Down multiple instances in OCI using CLI with Ansible
Now the reason why you would probably want this is over terraform is because terraform is more suited for infrastructure orchestration and not really suited to deal with the instances once they are up and running.
If you have scaled servers out in OCI powering servers up and down in bulk currently is not available. If you are doing a migration or using a staging environment that you need need to use the machine when building or doing troubleshooting.
Then having a way to power up/down multiple machines at once is convenient.
Install the OCI collections if you don’t have it already.
Linux/macOS
curl -L https://raw.githubusercontent.com/oracle/oci-ansible-collection/master/scripts/install.sh | bash -s — —verbose
ansible-galaxy collection list – Will list the collections installed
# /path/to/ansible/collections
Collection Version
——————- ——-
amazon.aws 1.4.0
ansible.builtin 1.3.0
ansible.posix 1.3.0
oracle.oci 2.10.0
Once you have it installed you need to test the OCI client is working
oci iam compartment list –all (this will list out the compartment ID list for your instances.
Compartments in OCI are a way to organise infrastructure and control access to those resources. This is great for if you have contractors coming and you only want them to have access to certain things not everything.
Now there are two ways you can your instance names.
Bash Script to get the instances names from OCI
compartment_id=“ocid1.compartment.oc1..insert compartment ID here“
# Explicitly define the availability domains based on your provided data
availability_domains=(“zcLB:US-CHICAGO-1-AD-1” “zcLB:US-CHICAGO-1-AD-2” “zcLB:US-CHICAGO-1-AD-3”)
# For each availability domain, list the instances
for ad in “${availability_domains[@]}”; do
# List instances within the specific AD and compartment, extracting the “id” field
oci compute instance list –compartment-id $compartment_id –availability-domain $ad –query “data[].id” –raw-output > instance_ids.txt
# Clean up the instance IDs (removing brackets, quotes, etc.)
sed –i ‘s/\[//g’ instance_ids.txt
sed –i ‘s/\]//g’ instance_ids.txt
sed –i ‘s/”//g’ instance_ids.txt
sed –i ‘s/,//g’ instance_ids.txt
# Read each instance ID from instance_ids.txt
while read -r instance_id; do
# Get instance VNIC information
instance_info=$(oci compute instance list-vnics –instance-id “$instance_id“)
# Extract the required fields and print them
display_name=$(echo “$instance_info“ | jq -r ‘.data[0].”display-name”‘)
public_ip=$(echo “$instance_info“ | jq -r ‘.data[0].”public-ip“‘)
private_ip=$(echo “$instance_info“ | jq -r ‘.data[0].”private-ip“‘)
echo “Availability Domain: $ad“
echo “Display Name: $display_name“
echo “Public IP: $public_ip“
echo “Private IP: $private_ip“
echo “—————————————–“
done < instance_ids.txt
done
The output of the script when piped in to a file will look like
Instance.names
Availability Domain: zcLB:US-CHICAGO-1-AD-1
Display Name: Instance1
Public IP: 192.0.2.1
Private IP: 10.0.0.1
—————————————–
Availability Domain: zcLB:US-CHICAGO-1-AD-1
Display Name: Instance2
Public IP: 192.0.2.2
Private IP: 10.0.0.2
—————————————–
…
You can now grep this file for the name of the servers you want to power on or off quickly
Now we have an ansible playbook that can power on or power off the instance by name provided by the OCI client
Ansible playbook to power on or off multiple instances via OCI CLI
—
– name: Control OCI Instance Power State based on Instance Names
hosts: localhost
vars:
instance_names_to_stop:
– instance1
# Add more instance names here if you wish to stop them…
instance_names_to_start:
# List the instance names you wish to start here…
# Example:
– Instance2
tasks:
– name: Fetch all instance details in the compartment
command:
cmd: “oci compute instance list –compartment-id ocid1.compartment.oc1..aaaaaaaak7jc7tn2su2oqzmrbujpr5wmnuucj4mwj4o4g7rqlzemy4yvxrza –output json“
register: oci_output
– set_fact:
instances: “{{ oci_output.stdout | from_json }}”
– name: Extract relevant information
set_fact:
clean_instances: “{{ clean_instances | default([]) + [{ ‘name’: item[‘display-name’], ‘id’: item.id, ‘state’: item[‘lifecycle-state’] }] }}”
loop: “{{ instances.data }}”
when: “‘display-name’ in item and ‘id’ in item and ‘lifecycle-state’ in item”
– name: Filter out instances to stop
set_fact:
instances_to_stop: “{{ instances_to_stop | default([]) + [item] }}”
loop: “{{ clean_instances }}”
when: “item.name in instance_names_to_stop and item.state == ‘RUNNING'”
– name: Filter out instances to start
set_fact:
instances_to_start: “{{ instances_to_start | default([]) + [item] }}”
loop: “{{ clean_instances }}”
when: “item.name in instance_names_to_start and item.state == ‘STOPPED'”
– name: Filter out instances to stop
set_fact:
instances_to_stop: “{{ clean_instances | selectattr(‘name’, ‘in’, instance_names_to_stop) | selectattr(‘state’, ‘equalto‘, ‘RUNNING’) | list }}”
– name: Filter out instances to start
set_fact:
instances_to_start: “{{ clean_instances | selectattr(‘name’, ‘in’, instance_names_to_start) | selectattr(‘state’, ‘equalto‘, ‘STOPPED’) | list }}”
– name: Display instances to stop (you can remove this debug task later)
debug:
var: instances_to_stop
– name: Display instances to start (you can remove this debug task later)
debug:
var: instances_to_start
– name: Power off instances
command:
cmd: “oci compute instance action —action STOP –instance-id {{ item.id }}”
loop: “{{ instances_to_stop }}”
when: instances_to_stop | length > 0
register: state
# – debug:
# var: state
– name: Power on instances
command:
cmd: “oci compute instance action —action START –instance-id {{ item.id }}”
loop: “{{ instances_to_start }}”
when: instances_to_start | length > 0
The output will look like
PLAY [Control OCI Instance Power State based on Instance Names] **********************************************************************************
TASK [Gathering Facts] ***************************************************************************************************************************
ok: [localhost]
TASK [Fetch all instance details in the compartment] *********************************************************************************************
changed: [localhost]
TASK [Parse the OCI CLI output] ******************************************************************************************************************
ok: [localhost]
TASK [Extract relevant information] **************************************************************************************************************
ok: [localhost] => (item={‘display-name’: ‘Instance1’, ‘id’: ‘ocid1.instance.oc1..exampleuniqueID1’, ‘lifecycle-state’: ‘STOPPED’})
ok: [localhost] => (item={‘display-name’: ‘Instance2’, ‘id’: ‘ocid1.instance.oc1..exampleuniqueID2’, ‘lifecycle-state’: ‘RUNNING’})
TASK [Filter out instances to stop] **************************************************************************************************************
ok: [localhost]
TASK [Filter out instances to start] *************************************************************************************************************
ok: [localhost]
TASK [Display instances to stop (you can remove this debug task later)] **************************************************************************
ok: [localhost] => {
“instances_to_stop“: [
{
“name”: “Instance2”,
“id”: “ocid1.instance.oc1..exampleuniqueID2″,
“state”: “RUNNING”
}
]
}
TASK [Display instances to start (you can remove this debug task later)] *************************************************************************
ok: [localhost] => {
“instances_to_start“: [
{
“name”: “Instance1”,
“id”: “ocid1.instance.oc1..exampleuniqueID1″,
“state”: “STOPPED”
}
]
}
TASK [Power off instances] ***********************************************************************************************************************
changed: [localhost] => (item={‘name’: ‘Instance2’, ‘id’: ‘ocid1.instance.oc1..exampleuniqueID2’, ‘state’: ‘RUNNING’})
TASK [Power on instances] ************************************************************************************************************************
changed: [localhost] => (item={‘name’: ‘Instance1’, ‘id’: ‘ocid1.instance.oc1..exampleuniqueID1’, ‘state’: ‘STOPPED’})
PLAY RECAP ****************************************************************************************************************************************
localhost : ok=9 changed=3 unreachable=0 failed=0 skipped=0 rescued=0 ignored=0
How to Deploy Another VPC in AWS with Scalable EC2’s for HA using Terraform
So we are going to do this a bit different than the other post. As the other post is just deploying one instance in an existing VPC.
This one is more fun. The structure we will use this time will allow you to scale your ec2 instances very cleanly. If you are using git repos to push out changes. Then having a main.tf for your instance is much simpler to manage at scale.
File structure:
terraform-project/
├── main.tf <– Your main configuration file
├── variables.tf <– Variables file that has the inputs to pass
├── outputs.tf <– Outputs file
├── security_group.tf <– File containing security group rules
└── modules/
└── instance/
├── main.tf <- this file contains your ec2 instances
└── variables.tf <- variable file that defines we will pass for the module in main.tf to use
Explaining the process:
Main.tf
provider “aws“ {
region = “us-west-2”
}
resource “aws_key_pair“ “my-nick-test-key” {
key_name = “my-nick-test-key”
public_key = file(“${path.module}/terraform-aws-key.pub”)
}
resource “aws_vpc“ “vpc2” {
cidr_block = “10.0.0.0/16”
}
resource “aws_subnet“ “newsubnet“ {
vpc_id = aws_vpc.vpc2.id
cidr_block = “10.0.1.0/24”
map_public_ip_on_launch = true
}
module “web_server“ {
source = “./module/instance”
ami_id = var.ami_id
instance_type = var.instance_type
key_name = var.key_name_instance
subnet_id = aws_subnet.newsubnet.id
instance_count = 2 // Specify the number of instances you want
security_group_id = aws_security_group.newcpanel.id
}
Variables.tf
variable “ami_id“ {
description = “The AMI ID for the instance”
default = “ami-0913c47048d853921” // Amazon Linux 2 AMI ID
}
variable “instance_type“ {
description = “The instance type for the instance”
default = “t2.micro“
}
variable “key_name_instance“ {
description = “The key pair name for the instance”
default = “my-nick-test-key”
}
Security_group.tf
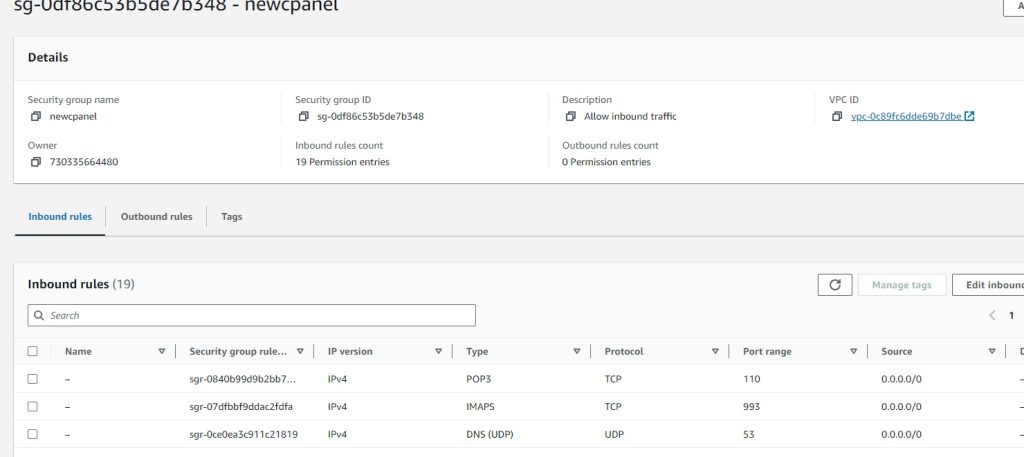
resource “aws_security_group“ “newcpanel“ {
name = “newcpanel“
description = “Allow inbound traffic”
vpc_id = aws_vpc.vpc2.id
// POP3 TCP 110
ingress {
from_port = 110
to_port = 110
protocol = “tcp“
cidr_blocks = [“0.0.0.0/0”]
}
// Custom TCP 20
ingress {
from_port = 20
to_port = 20
protocol = “tcp“
cidr_blocks = [“0.0.0.0/0”]
}
// Custom TCP 587
ingress {
from_port = 587
to_port = 587
protocol = “tcp“
cidr_blocks = [“0.0.0.0/0”]
}
// DNS (TCP) TCP 53
ingress {
from_port = 53
to_port = 53
protocol = “tcp“
cidr_blocks = [“0.0.0.0/0”]
}
// SMTPS TCP 465
ingress {
from_port = 465
to_port = 465
protocol = “tcp“
cidr_blocks = [“0.0.0.0/0”]
}
// HTTPS TCP 443
ingress {
from_port = 443
to_port = 443
protocol = “tcp“
cidr_blocks = [“0.0.0.0/0”]
}
// DNS (UDP) UDP 53
ingress {
from_port = 53
to_port = 53
protocol = “udp“
cidr_blocks = [“0.0.0.0/0”]
}
// IMAP TCP 143
ingress {
from_port = 143
to_port = 143
protocol = “tcp“
cidr_blocks = [“0.0.0.0/0”]
}
// IMAPS TCP 993
ingress {
from_port = 993
to_port = 993
protocol = “tcp“
cidr_blocks = [“0.0.0.0/0”]
}
// Custom TCP 21
ingress {
from_port = 21
to_port = 21
protocol = “tcp“
cidr_blocks = [“0.0.0.0/0”]
}
// Custom TCP 2086
ingress {
from_port = 2086
to_port = 2086
protocol = “tcp“
cidr_blocks = [“0.0.0.0/0”]
}
// Custom TCP 2096
ingress {
from_port = 2096
to_port = 2096
protocol = “tcp“
cidr_blocks = [“0.0.0.0/0”]
}
// HTTP TCP 80
ingress {
from_port = 80
to_port = 80
protocol = “tcp“
cidr_blocks = [“0.0.0.0/0”]
}
// SSH TCP 22
ingress {
from_port = 22
to_port = 22
protocol = “tcp“
cidr_blocks = [“0.0.0.0/0”]
}
// POP3S TCP 995
ingress {
from_port = 995
to_port = 995
protocol = “tcp“
cidr_blocks = [“0.0.0.0/0”]
}
// Custom TCP 2083
ingress {
from_port = 2083
to_port = 2083
protocol = “tcp“
cidr_blocks = [“0.0.0.0/0”]
}
// Custom TCP 2087
ingress {
from_port = 2087
to_port = 2087
protocol = “tcp“
cidr_blocks = [“0.0.0.0/0”]
}
// Custom TCP 2095
ingress {
from_port = 2095
to_port = 2095
protocol = “tcp“
cidr_blocks = [“0.0.0.0/0”]
}
// Custom TCP 2082
ingress {
from_port = 2082
to_port = 2082
protocol = “tcp“
cidr_blocks = [“0.0.0.0/0”]
}
}
output “newcpanel_sg_id“ {
value = aws_security_group.newcpanel.id
description = “The ID of the security group ‘newcpanel‘”
}
Outputs.tf
output “public_ips“ {
value = module.web_server.public_ips
description = “List of public IP addresses for the instances.”
}
Okay so now we want to create the scalable ec2
We create a modules/instance directory and inside here define the instances as resources
modules/instance/main.tf
resource “aws_instance“ “Tailor-Server” {
count = var.instance_count // Control the number of instances with a variable
ami = var.ami_id
instance_type = var.instance_type
subnet_id = var.subnet_id
key_name = var.key_name
vpc_security_group_ids = [var.security_group_id]
tags = {
Name = format(“Tailor-Server%02d”, count.index + 1) // Naming instances with a sequential number
}
root_block_device {
volume_type = “gp2”
volume_size = 30
delete_on_termination = true
}
}
Modules/instance/variables.tf
Each variable serves as an input that can be set externally when the module is called, allowing for flexibility and reusability of the module across different environments or scenarios.
So here we defining it as a list of items we need to pass for the module to work. We will later provide the actual parameter to pass to the variables being called in the main.tf
Cheat sheet:
ami_id: Specifies the Amazon Machine Image (AMI) ID that will be used to launch the EC2 instances. The AMI determines the operating system and software configurations that will be loaded onto the instances when they are created.
instance_type: Determines the type of EC2 instance to launch. This affects the computing resources available to the instance (CPU, memory, etc.).
Type: It is expected to be a string that matches one of AWS’s predefined instance types (e.g., t2.micro, m5.large).
key_name: Specifies the name of the key pair to be used for SSH access to the EC2 instances. This key should already exist in the AWS account.
subnet_id: Identifies the subnet within which the EC2 instances will be launched. The subnet is part of a specific VPC (Virtual Private Cloud).
instance_names: A list of names to be assigned to the instances. This helps in identifying the instances within the AWS console or when querying using the AWS CLI.
security_group_Id: Specifies the ID of the security group to attach to the EC2 instances. Security groups act as a virtual firewall for your instances to control inbound and outbound traffic.
variable “ami_id“ {}
variable “instance_type“ {}
variable “key_name“ {}
variable “subnet_id“ {}
variable “instance_names“ {
type = list(string)
description = “List of names for the instances to create.”
}
variable “security_group_id“ {
description = “Security group ID to assign to the instance”
type = string
}
variable “instance_count“ {
description = “The number of instances to create”
type = number
default = 1 // Default to one instance if not specified
}
Time to deploy your code: I didnt bother showing the plan here just the apply
my-terraform-vpc$ terraform apply
Do you want to perform these actions?
Terraform will perform the actions described above.
Only ‘yes’ will be accepted to approve.
Enter a value: yes
aws_subnet.newsubnet: Destroying… [id=subnet-016181a8999a58cb4]
aws_subnet.newsubnet: Destruction complete after 1s
aws_subnet.newsubnet: Creating…
aws_subnet.newsubnet: Still creating… [10s elapsed]
aws_subnet.newsubnet: Creation complete after 11s [id=subnet-0a5914443d2944510]
module.web_server.aws_instance.Tailor-Server[1]: Creating…
module.web_server.aws_instance.Tailor-Server[0]: Creating…
module.web_server.aws_instance.Tailor-Server[1]: Still creating… [10s elapsed]
module.web_server.aws_instance.Tailor-Server[0]: Still creating… [10s elapsed]
module.web_server.aws_instance.Tailor-Server[0]: Still creating… [20s elapsed]
module.web_server.aws_instance.Tailor-Server[1]: Still creating… [20s elapsed]
module.web_server.aws_instance.Tailor-Server[1]: Still creating… [30s elapsed]
module.web_server.aws_instance.Tailor-Server[0]: Still creating… [30s elapsed]
module.web_server.aws_instance.Tailor-Server[0]: Still creating… [40s elapsed]
module.web_server.aws_instance.Tailor-Server[1]: Still creating… [40s elapsed]
module.web_server.aws_instance.Tailor-Server[1]: Still creating… [50s elapsed]
module.web_server.aws_instance.Tailor-Server[0]: Still creating… [50s elapsed]
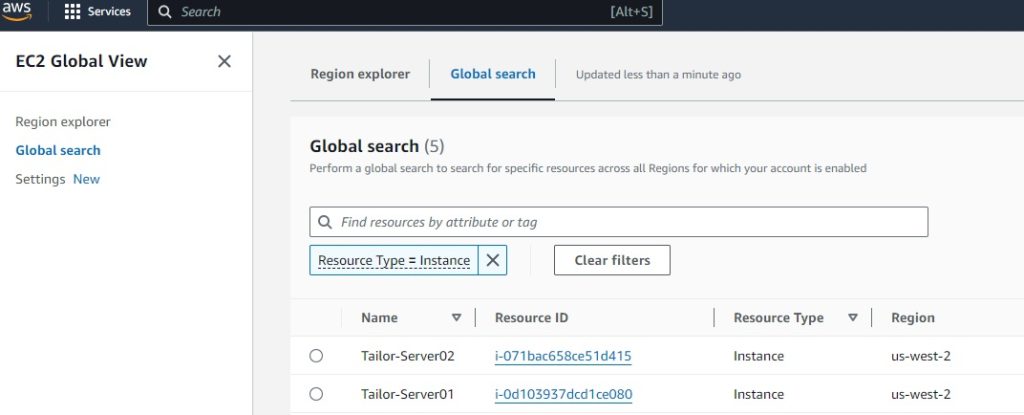
module.web_server.aws_instance.Tailor-Server[0]: Creation complete after 52s [id=i-0d103937dcd1ce080]
module.web_server.aws_instance.Tailor-Server[1]: Still creating… [1m0s elapsed]
module.web_server.aws_instance.Tailor-Server[1]: Still creating… [1m10s elapsed]
module.web_server.aws_instance.Tailor-Server[1]: Creation complete after 1m12s [id=i-071bac658ce51d415]
Apply complete! Resources: 3 added, 0 changed, 1 destroyed.
Outputs:
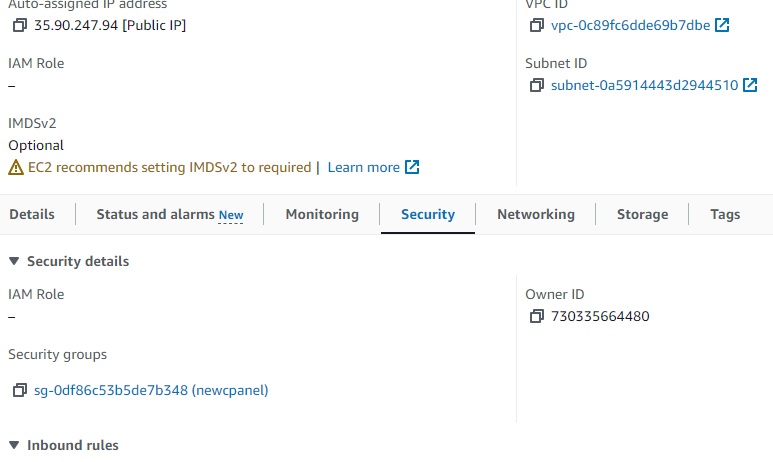
newcpanel_sg_id = “sg-0df86c53b5de7b348”
public_ips = [
“34.219.34.165”,
“35.90.247.94”,
]
Results:
VPC successful:

EC2 successful:
Security-Groups:

Key Pairs:

Ec2 assigned SG group:
How to deploy an EC2 instance in AWS with Terraform
- How to install terraform
- How to configure your aws cli
- How to steup your file structure
- How to deploy your instance
- You must have an AWS account already setup
- You have an existing VPC
- You have existing security groups
Depending on which machine you like to use. I use varied distros for fun.
For this we will use Ubuntu 22.04
How to install terraform
- Once you are logged into your linux jump box or whatever you choose to manage.
wget -O- https://apt.releases.hashicorp.com/gpg | sudo gpg –dearmor -o /usr/share/keyrings/hashicorp-archive-keyring.gpg
echo “deb [signed-by=/usr/share/keyrings/hashicorp-archive-keyring.gpg] https://apt.releases.hashicorp.com $(lsb_release -cs) main” | sudo tee /etc/apt/sources.list.d/hashicorp.list
sudo apt update && sudo apt install terraform
ThanosJumpBox:~/myterraform$ terraform -v
Terraform v1.8.2
on linux_amd64
+ provider registry.terraform.io/hashicorp/aws v5.47.
- Okay next you want to install the awscli
sudo apt update
sudo apt install awscli
2. Okay Now you need to go into your aws and create a user and aws cli key
- Log into your aws console
- Go to IAM
- Under users create a user called Terrform-thanos

Next you want to either create a group or add it to an existing. To make things easy for now we are going to add it administrator group

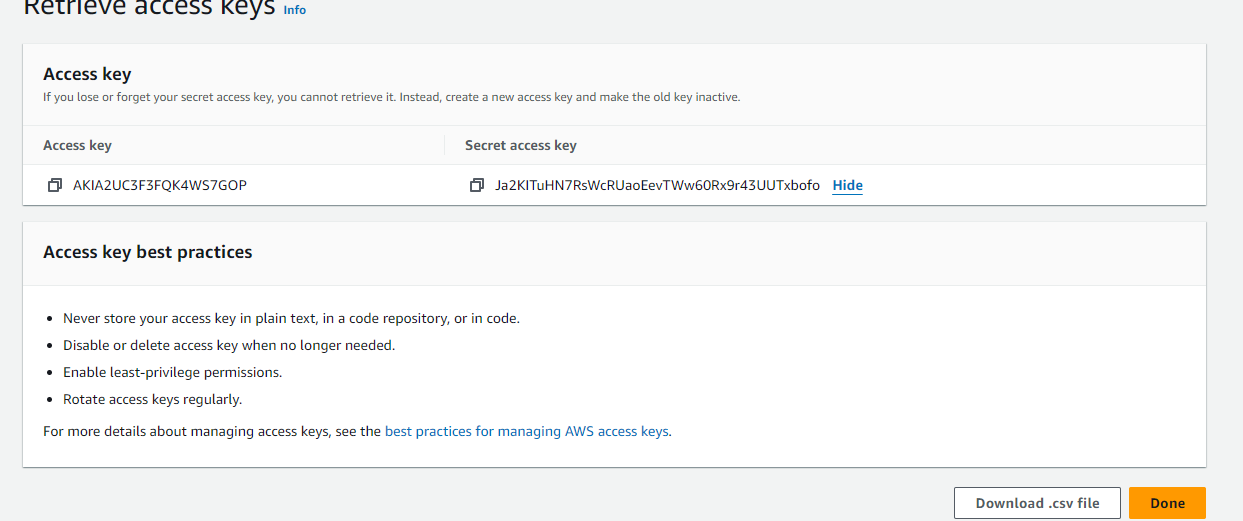
Next click on the new user and create the ACCESS KEY

Next select the use case for the key

Once you create the ACCESS-KEY you will see the key and secret
Copy these to a text pad and save them somewhere safe.
Next you we going to create the RSA key pair
- Go under EC2 Dashboard
- Then Network & ecurity
- Then Key Pairs
- Create a new key pair and give it a name

Now configure your Terrform to use the credentials
AWS Access Key ID [****************RKFE]:
AWS Secret Access Key [****************aute]:
Default region name [us-west-1]:
Default output format [None]:
So a good terraform file structure to use in work environment would be
my-terraform-project/
├── main.tf
├── variables.tf
├── outputs.tf
├── provider.tf
├── modules/
│ ├── vpc/
│ │ ├── main.tf
│ │ ├── variables.tf
│ │ └── outputs.tf
│ └── ec2/
│ ├── main.tf
│ ├── variables.tf
│ └── outputs.tf
├── environments/
│ ├── dev/
│ │ ├── main.tf
│ │ ├── variables.tf
│ │ └── outputs.tf
│ ├── prod/
│ │ ├── main.tf
│ │ ├── variables.tf
│ │ └── outputs.tf
├── terraform.tfstate
├── terraform.tfvars
└── .gitignore
That said for the purposes of this post we will keep it simple. I will be adding separate posts to deploy vpc’s, autoscaling groups, security groups etc.
This would also be very easy to display if you VSC to connect to your
linux machine
|
mkdir myterraform cd myterraform touch main.tf outputs.tf variables.tf |
So we are going to create an Instance as follows
Main.tf
provider “aws” {
region = var.region
}
resource “aws_instance” “my_instance” {
ami = “ami-0827b6c5b977c020e“ # Use a valid AMI ID for your region
instance_type = “t2.micro“ # Free Tier eligible instance type
key_name = “” # Ensure this key pair is already created in your AWS account
subnet_id = “subnet-0e80683fe32a75513“ # Ensure this is a valid subnet in your VPC
vpc_security_group_ids = [“sg-0db2bfe3f6898d033“] # Ensure this is a valid security group ID
tags = {
Name = “thanos-lives”
}
root_block_device {
volume_type = “gp2“ # General Purpose SSD, which is included in the Free Tier
volume_size = 30 # Maximum size covered by the Free Tier
}
Outputs.tf
output “instance_ip_addr” {
value = aws_instance.my_instance.public_ip
description = “The public IP address of the EC2 instance.”
}
output “instance_id” {
value = aws_instance.my_instance.id
description = “The ID of the EC2 instance.”
}
output “first_security_group_id” {
value = tolist(aws_instance.my_instance.vpc_security_group_ids)[0]
description = “The first Security Group ID associated with the EC2 instance.”
}
Variables.tf
variable “region” {
description = “The AWS region to create resources in.”
default = “us-west-1”
}
variable “ami_id” {
description = “The AMI ID to use for the server.”
}
Terraform.tfsvars
region = “us-west-1”
ami_id = “ami-0827b6c5b977c020e“ # Replace with your chosen AMI ID
Deploying your code:
Initializing the backend…
Initializing provider plugins…
– Reusing previous version of hashicorp/aws from the dependency lock file
– Using previously-installed hashicorp/aws v5.47.0
Terraform has been successfully initialized!
You may now begin working with Terraform. Try running “terraform plan” to see
any changes that are required for your infrastructure. All Terraform commands
should now work.
If you ever set or change modules or backend configuration for Terraform,
rerun this command to reinitialize your working directory. If you forget, other
commands will detect it and remind you to do so if necessary.
thanosjumpbox:~/my-terraform$ terraform$
thanosjumpbox:~/my-terraform$ terraform$ terraform plan
Terraform used the selected providers to generate the following execution plan. Resource actions are indicated with the following symbols:
+ create
Terraform will perform the following actions:
# aws_instance.my_instance will be created
+ resource “aws_instance” “my_instance” {
+ ami = “ami-0827b6c5b977c020e”
+ arn = (known after apply)
+ associate_public_ip_address = (known after apply)
+ availability_zone = (known after apply)
+ cpu_core_count = (known after apply)
+ cpu_threads_per_core = (known after apply)
+ disable_api_stop = (known after apply)
+ disable_api_termination = (known after apply)
+ ebs_optimized = (known after apply)
+ get_password_data = false
+ host_id = (known after apply)
+ host_resource_group_arn = (known after apply)
+ iam_instance_profile = (known after apply)
+ id = (known after apply)
+ instance_initiated_shutdown_behavior = (known after apply)
+ instance_lifecycle = (known after apply)
+ instance_state = (known after apply)
+ instance_type = “t2.micro“
+ ipv6_address_count = (known after apply)
+ ipv6_addresses = (known after apply)
+ key_name = “nicktailor-aws”
+ monitoring = (known after apply)
+ outpost_arn = (known after apply)
+ password_data = (known after apply)
+ placement_group = (known after apply)
+ placement_partition_number = (known after apply)
+ primary_network_interface_id = (known after apply)
+ private_dns = (known after apply)
+ private_ip = (known after apply)
+ public_dns = (known after apply)
+ public_ip = (known after apply)
+ secondary_private_ips = (known after apply)
+ security_groups = (known after apply)
+ source_dest_check = true
+ spot_instance_request_id = (known after apply)
+ subnet_id = “subnet-0e80683fe32a75513”
+ tags = {
+ “Name” = “Thanos-lives”
}
+ tags_all = {
+ “Name” = “Thanos-lives”
}
+ tenancy = (known after apply)
+ user_data = (known after apply)
+ user_data_base64 = (known after apply)
+ user_data_replace_on_change = false
+ vpc_security_group_ids = [
+ “sg-0db2bfe3f6898d033”,
]
+ root_block_device {
+ delete_on_termination = true
+ device_name = (known after apply)
+ encrypted = (known after apply)
+ iops = (known after apply)
+ kms_key_id = (known after apply)
+ tags_all = (known after apply)
+ throughput = (known after apply)
+ volume_id = (known after apply)
+ volume_size = 30
+ volume_type = “gp2”
}
}
Plan: 1 to add, 0 to change, 0 to destroy.
Changes to Outputs:
+ first_security_group_id = “sg-0db2bfe3f6898d033”
+ instance_id = (known after apply)
+ instance_ip_addr = (known after apply)
─────────────────────────────────────────────────────────────────────────────────────────────────────────────────────────────────────────────
Note: You didn’t use the -out option to save this plan, so Terraform can’t guarantee to take exactly these actions if you run “terraform
apply” now.
Terraform used the selected providers to generate the following execution plan. Resource actions are indicated with the following symbols:
+ create
Terraform will perform the following actions:
# aws_instance.my_instance will be created
+ resource “aws_instance” “my_instance” {
+ ami = “ami-0827b6c5b977c020e”
+ arn = (known after apply)
+ associate_public_ip_address = (known after apply)
+ availability_zone = (known after apply)
+ cpu_core_count = (known after apply)
+ cpu_threads_per_core = (known after apply)
+ disable_api_stop = (known after apply)
+ disable_api_termination = (known after apply)
+ ebs_optimized = (known after apply)
+ get_password_data = false
+ host_id = (known after apply)
+ host_resource_group_arn = (known after apply)
+ iam_instance_profile = (known after apply)
+ id = (known after apply)
+ instance_initiated_shutdown_behavior = (known after apply)
+ instance_lifecycle = (known after apply)
+ instance_state = (known after apply)
+ instance_type = “t2.micro“
+ ipv6_address_count = (known after apply)
+ ipv6_addresses = (known after apply)
+ key_name = “nicktailor-aws”
+ monitoring = (known after apply)
+ outpost_arn = (known after apply)
+ password_data = (known after apply)
+ placement_group = (known after apply)
+ placement_partition_number = (known after apply)
+ primary_network_interface_id = (known after apply)
+ private_dns = (known after apply)
+ private_ip = (known after apply)
+ public_dns = (known after apply)
+ public_ip = (known after apply)
+ secondary_private_ips = (known after apply)
+ security_groups = (known after apply)
+ source_dest_check = true
+ spot_instance_request_id = (known after apply)
+ subnet_id = “subnet-0e80683fe32a75513”
+ tags = {
+ “Name” = “Thanos-lives”
}
+ tags_all = {
+ “Name” = “Thanos-lives”
}
+ tenancy = (known after apply)
+ user_data = (known after apply)
+ user_data_base64 = (known after apply)
+ user_data_replace_on_change = false
+ vpc_security_group_ids = [
+ “sg-0db2bfe3f6898d033”,
]
+ root_block_device {
+ delete_on_termination = true
+ device_name = (known after apply)
+ encrypted = (known after apply)
+ iops = (known after apply)
+ kms_key_id = (known after apply)
+ tags_all = (known after apply)
+ throughput = (known after apply)
+ volume_id = (known after apply)
+ volume_size = 30
+ volume_type = “gp2”
}
}
Plan: 1 to add, 0 to change, 0 to destroy.
Changes to Outputs:
+ first_security_group_id = “sg-0db2bfe3f6898d033”
+ instance_id = (known after apply)
+ instance_ip_addr = (known after apply)
Do you want to perform these actions?
Terraform will perform the actions described above.
Only ‘yes’ will be accepted to approve.
Enter a value: yes
aws_instance.my_instance: Creating…
aws_instance.my_instance: Still creating… [10s elapsed]
aws_instance.my_instance: Still creating… [20s elapsed]
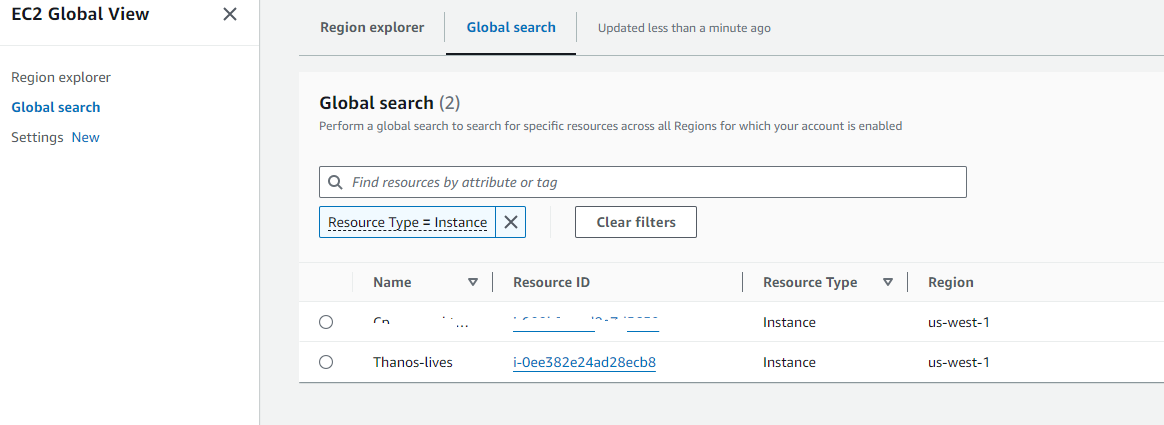
aws_instance.my_instance: Creation complete after 22s [id=i-0ee382e24ad28ecb8]
Apply complete! Resources: 1 added, 0 changed, 0 destroyed.
Outputs:
first_security_group_id = “sg-0db2bfe3f6898d033”
instance_id = “i-0ee382e24ad28ecb8”
instance_ip_addr = “50.18.90.217”
Result:
TightVNC Security Hole
Virtual Network Computing (VNC) is a graphical desktop-sharing system that uses the Remote Frame Buffer protocol (RFB) to remotely control another computer. It transmits the keyboard and mouse input from one computer to another, relaying the graphical-screen updates, over a network.[1]
VNC servers work on a variety of platforms, allowing you to share screens and keyboards between Windows, Mac, Linux, and Raspberry Pi devices. RDP server is proprietary and only works with one operating system. VNC vs RDP performance. RDP provides a better and faster remote connection.
There are a number of reasons why people use it.
There are a few VNC tools out there.
RealVNC
UltraVNC – Best one to use.
Tight-VNC – Security Hole
Tight-VNC has their encryption algorithm hardcoded into its software and appears they have NOT updated its encryption standards in years.
DES Encryption used
# This is hardcoded in VNC applications like TightVNC.
$magicKey = [byte[]]@(0xE8, 0x4A, 0xD6, 0x60, 0xC4, 0x72, 0x1A, 0xE0)
$ansi = [System.Text.Encoding]::GetEncoding(
[System.Globalization.CultureInfo]::CurrentCulture.TextInfo.ANSICodePage)
$pass = [System.Net.NetworkCredential]::new(”, $Password).Password
$byteCount = $ansi.GetByteCount($pass)
if ($byteCount –gt 8) {
$err = [System.Management.Automation.ErrorRecord]::new(
[ArgumentException]‘Password must not exceed 8 characters’,
‘PasswordTooLong‘,
[System.Management.Automation.ErrorCategory]::InvalidArgument,
$null)
$PSCmdlet.WriteError($err)
return
}
$toEncrypt = [byte[]]::new(8)
$null = $ansi.GetBytes($pass, 0, $pass.Length, $toEncrypt, 0)
$des = $encryptor = $null
try {
$des = [System.Security.Cryptography.DES]::Create()
$des.Padding = ‘None’
$encryptor = $des.CreateEncryptor($magicKey, [byte[]]::new(8))
$data = [byte[]]::new(8)
$null = $encryptor.TransformBlock($toEncrypt, 0, $toEncrypt.Length, $data, 0)
, $data
}
finally {
if ($encryptor) { $encryptor.Dispose() }
if ($des) { $des.Dispose() }
}
}
What this means is…IF you are using admin credentials on your machine while using Tight-VNC a hacker that is way better than I… Could gain access to your infrastructure by simply glimpsing the windows registry. Im sure there ways to exploit it.
I will demonstrate:
Now you can install Tight-vnc manually or via chocolatey. I used chocolatey and this from a public available repo.

Now lets set the password by right clicking tightvnc icon in the bottom corner and setting the password to an 8 character password, by clicking on change primary password and typing in whatever you like
‘Suck3r00’

Now lets open powershell without administrator privileges. Lets say I got in remotely and chocolatey is there and I want to check to see if tight-vnc is there.
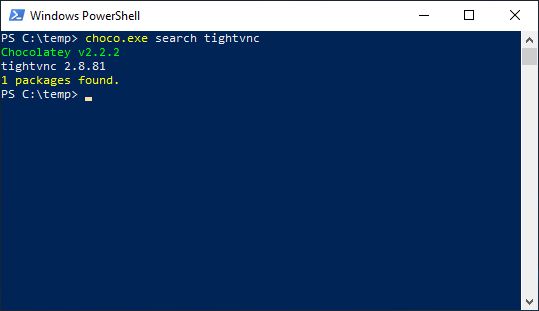
As you can see I find this without administrator privilege.
Now lets say I was able to view the registry and get the encrypted value for tight-vnc; all I need to do is see for a few seconds.

Now there are tools online where you can convert that hexadecimal to binary decimal values long before AI was around. But since I love GPT im going to ask it to convert that for me
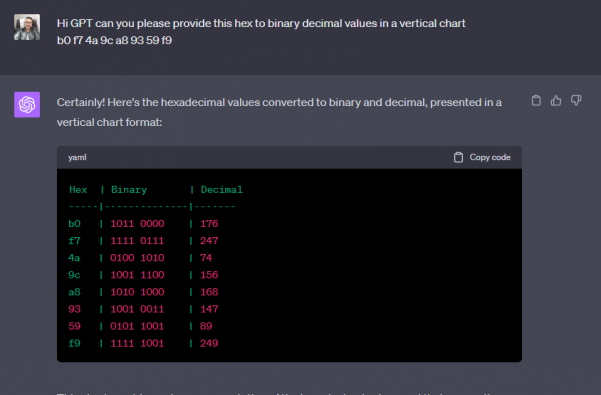
I have script that didn’t take long to put together from digging around for about an hour online. Which im obviously not going to share, BUT if I can do it……someone with skills could do pretty easy. A professional hacker NO SWEAT.

As you can see if you have rolled this out how dangerous it is.
Having said that I have also written an Ansible Role which will purge tightvnc from your infrastructure and deploy ultravnc which will use encryption and AD authentication. Which the other two currently do NOT do.
Hope you enjoyed getting P0WNed.
How to Deploy VM’s in Hyper-V with Ansible
Thought it would be fun to do…..
If you can find another public repo that has it working online. Please send me a message so I can kick myself.
How to use this role: ansible-hyperv repo is set to private you must request access
Example file: hosts.dev, hosts.staging, hosts.prod
Note: If there is no group simply list the server outside grouping, the –limit flag will pick it
up.
Descriptions:
Operational Use:
Descriptions:
Operational Use:
passed parameters: example: inventory/host_vars/testmachine.nicktailor.com
vms:
– type: testserver
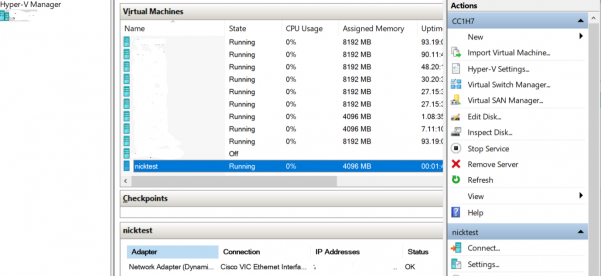
name: “nicktest“
cpu: 2
memory: 4096MB
network:
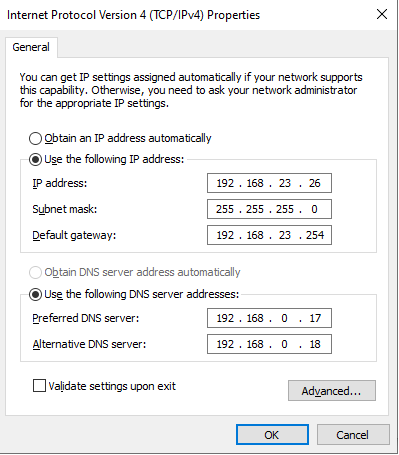
ip: 192.168.23.26
netmask: 255.255.255.0
gateway: 192.168.23.254
dns: 192.168.0.17,192.168.0.18
# network_switch: ‘External Virtual Switch’
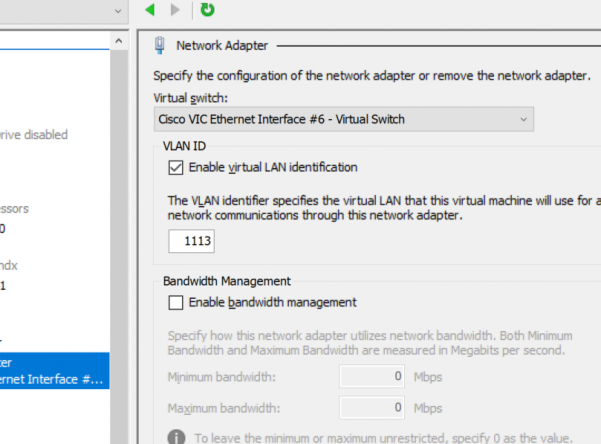
network_switch: ‘Cisco VIC Ethernet Interface #6 – Virtual Switch’
vlanid: 1113
# source-image
src_vhd: ‘Z:\volumes\devops\devopssysprep\devopssysprep.vhdx‘
# destination will be created in Z:\\volumes\servername\servername.vhdx by default
# to change the paths you need to update the prov_vm.yml’s first three task paths
Running your playbook:
Example: of ansible/createvm.yml
—
– name: Provision VM
hosts: hypervdev.nicktailor.com
gather_facts: no
tasks:
– import_tasks: roles/ansible-hyperv/tasks/prov_vm.yml
Command:
ansible-playbook –i inventory/dev/hosts createvm.yml ––limit=’testmachine1.nicktailor.com‘
Successful example run of the book:
[ntailor@ansible-home ~]$ ansible-playbook –i inventory/hosts createvm.yml –limit=’testmachine1.nicktailor.com‘
PLAY [Provision VM] ****************************************************************************************************************************************************************
TASK [Create directory structure] **************************************************************************************************************************************************
ok: [testmachine1.nicktailor.com] => (item={‘type’: ‘testservers‘, ‘name’: ‘nicktest‘, ‘cpu‘: 2, ‘memory’: ‘4096MB’, ‘network’: {‘ip‘: ‘192.168.23.36’, ‘netmask’: ‘255.255.255.0’, ‘gateway’: ‘192.168.23.254’, ‘dns‘: ‘192.168.0.17,192.168.0.18‘}, ‘network_switch‘: ‘Cisco VIC Ethernet Interface #6 – Virtual Switch’, ‘vlanid‘: 1113, ‘src_vhd‘: ‘C:\\volumes\\devops\\devopssysprep\\devopssysprep.vhdx‘})
TASK [Check whether vhdx already exists] *******************************************************************************************************************************************
ok: [testmachine1.nicktailor.com] => (item={‘type’: ‘testservers‘, ‘name’: ‘nicktest‘, ‘cpu‘: 2, ‘memory’: ‘4096MB’, ‘network’: {‘ip‘: ‘192.168.23.36’, ‘netmask’: ‘255.255.255.0’, ‘gateway’: ‘192.168.23.254’, ‘dns‘: ‘192.168.0.17,192.168.0.18‘}, ‘network_switch‘: ‘Cisco VIC Ethernet Interface #6 – Virtual Switch’, ‘vlanid‘: 1113, ‘src_vhd‘: ‘C:\\volumes\\devops\\devopssysprep\\devopssysprep.vhdx‘})
TASK [Clone vhdx] ******************************************************************************************************************************************************************
changed: [testmachine1.nicktailor.com] => (item={‘changed’: False, ‘invocation’: {‘module_args‘: {‘path’: ‘Z:\\\\volumes\\\\devops\\nicktest\\nicktest.vhdx‘, ‘checksum_algorithm‘: ‘sha1’, ‘get_checksum‘: False, ‘follow’: False, ‘get_md5’: False}}, ‘stat’: {‘exists’: False}, ‘failed’: False, ‘item’: {‘type’: ‘testservers‘, ‘name’: ‘nicktest‘, ‘cpu‘: 2, ‘memory’: ‘4096MB’, ‘network’: {‘ip‘: ‘192.168.23.36’, ‘netmask’: ‘255.255.255.0’, ‘gateway’: ‘192.168.23.254’, ‘dns‘: ‘192.168.0.17,192.168.0.18‘}, ‘network_switch‘: ‘Cisco VIC Ethernet Interface #6 – Virtual Switch’, ‘vlanid‘: 1113, ‘src_vhd‘: ‘C:\\volumes\\devops\\devopssysprep\\devopssysprep.vhdx‘}, ‘ansible_loop_var‘: ‘item’})
TASK [set_fact] ********************************************************************************************************************************************************************
ok: [testmachine1.nicktailor.com]
TASK [debug] ***********************************************************************************************************************************************************************
ok: [testmachine1.nicktailor.com] => {
“path_folder“: “Z:\\\\volumes\\\\devops\\nicktest\\nicktest.vhdx”
}
TASK [set_fact] ********************************************************************************************************************************************************************
ok: [testmachine1.nicktailor.com]
TASK [debug] ***********************************************************************************************************************************************************************
ok: [testmachine1.nicktailor.com] => {
“page_folder“: “Z:\\\\volumes\\\\devops\\nicktest”
}
TASK [Create VMs] ******************************************************************************************************************************************************************
changed: [testmachine1.nicktailor.com] => (item={‘type’: ‘testservers‘, ‘name’: ‘nicktest‘, ‘cpu‘: 2, ‘memory’: ‘4096MB’, ‘network’: {‘ip‘: ‘192.168.23.36’, ‘netmask’: ‘255.255.255.0’, ‘gateway’: ‘192.168.23.254’, ‘dns‘: ‘192.168.0.17,192.168.0.18‘}, ‘network_switch‘: ‘Cisco VIC Ethernet Interface #6 – Virtual Switch’, ‘vlanid‘: 1113, ‘src_vhd‘: ‘C:\\volumes\\devops\\devopssysprep\\devopssysprep.vhdx‘})
TASK [Set SmartPaging File Location for new Virtual Machine to use destination image path] *****************************************************************************************
changed: [testmachine1.nicktailor.com] => (item={‘type’: ‘testservers‘, ‘name’: ‘nicktest‘, ‘cpu‘: 2, ‘memory’: ‘4096MB’, ‘network’: {‘ip‘: ‘192.168.23.36’, ‘netmask’: ‘255.255.255.0’, ‘gateway’: ‘192.168.23.254’, ‘dns‘: ‘192.168.0.17,192.168.0.18‘}, ‘network_switch‘: ‘Cisco VIC Ethernet Interface #6 – Virtual Switch’, ‘vlanid‘: 1113, ‘src_vhd‘: ‘C:\\volumes\\devops\\devopssysprep\\devopssysprep.vhdx‘})
TASK [Set Network VlanID] **********************************************************************************************************************************************************
changed: [testmachine1.nicktailor.com] => (item={‘type’: ‘testservers‘, ‘name’: ‘nicktest‘, ‘cpu‘: 2, ‘memory’: ‘4096MB’, ‘network’: {‘ip‘: ‘192.168.23.36’, ‘netmask’: ‘255.255.255.0’, ‘gateway’: ‘192.168.23.254’, ‘dns‘: ‘192.168.0.17,192.168.0.18‘}, ‘network_switch‘: ‘Cisco VIC Ethernet Interface #6 – Virtual Switch’, ‘vlanid‘: 1113, ‘src_vhd‘: ‘C:\\volumes\\devops\\devopssysprep\\devopssysprep.vhdx‘})
TASK [Configure VMs IP] ************************************************************************************************************************************************************
changed: [testmachine1.nicktailor.com] => (item={‘type’: ‘testservers‘, ‘name’: ‘nicktest‘, ‘cpu‘: 2, ‘memory’: ‘4096MB’, ‘network’: {‘ip‘: ‘192.168.23.36’, ‘netmask’: ‘255.255.255.0’, ‘gateway’: ‘192.168.23.254’, ‘dns‘: ‘192.168.0.17,192.168.0.18‘}, ‘network_switch‘: ‘Cisco VIC Ethernet Interface #6 – Virtual Switch’, ‘vlanid‘: 1113, ‘src_vhd‘: ‘C:\\volumes\\devops\\devopssysprep\\devopssysprep.vhdx‘})
TASK [add_host] ********************************************************************************************************************************************************************
changed: [testmachine1.nicktailor.com] => (item={‘changed’: True, ‘failed’: False, ‘item’: {‘type’: ‘testservers‘, ‘name’: ‘nicktest‘, ‘cpu‘: 2, ‘memory’: ‘4096MB’, ‘network’: {‘ip‘: ‘192.168.23.36’, ‘netmask’: ‘255.255.255.0’, ‘gateway’: ‘192.168.23.254’, ‘dns‘: ‘192.168.0.17,192.168.0.18‘}, ‘network_switch‘: ‘Cisco VIC Ethernet Interface #6 – Virtual Switch’, ‘vlanid‘: 1113, ‘src_vhd‘: ‘C:\\volumes\\devops\\devopssysprep\\devopssysprep.vhdx‘}, ‘ansible_loop_var‘: ‘item’})
TASK [Poweron VMs] *****************************************************************************************************************************************************************
changed: [testmachine1.nicktailor.com] => (item={‘type’: ‘testservers‘, ‘name’: ‘nicktest‘, ‘cpu‘: 2, ‘memory’: ‘4096MB’, ‘network’: {‘ip‘: ‘192.168.23.36’, ‘netmask’: ‘255.255.255.0’, ‘gateway’: ‘192.168.23.254’, ‘dns‘: ‘192.168.0.17,192.168.0.18‘}, ‘network_switch‘: ‘Cisco VIC Ethernet Interface #6 – Virtual Switch’, ‘vlanid‘: 1113, ‘src_vhd‘: ‘C:\\volumes\\devops\\devopssysprep\\devopssysprep.vhdx‘})
TASK [Wait for VM to be running] ***************************************************************************************************************************************************
ok: [testmachine1.nicktailor.com -> localhost] => (item={‘type’: ‘testservers‘, ‘name’: ‘nicktest‘, ‘cpu‘: 2, ‘memory’: ‘4096MB’, ‘network’: {‘ip‘: ‘192.168.23.36’, ‘netmask’: ‘255.255.255.0’, ‘gateway’: ‘192.168.23.254’, ‘dns‘: ‘192.168.0.17,192.168.0.18‘}, ‘network_switch‘: ‘Cisco VIC Ethernet Interface #6 – Virtual Switch’, ‘vlanid‘: 1113, ‘src_vhd‘: ‘C:\\volumes\\devops\\devopssysprep\\devopssysprep.vhdx‘})
TASK [debug] ***********************************************************************************************************************************************************************
ok: [testmachine1.nicktailor.com] => {
“wait”: {
“changed”: false,
“msg“: “All items completed”,
“results”: [
{
“ansible_loop_var“: “item”,
“changed”: false,
“elapsed”: 82,
“failed”: false,
“invocation”: {
“module_args“: {
“active_connection_states“: [
“ESTABLISHED”,
“FIN_WAIT1”,
“FIN_WAIT2”,
“SYN_RECV”,
“SYN_SENT”,
“TIME_WAIT”
],
“connect_timeout“: 5,
“delay”: 0,
“exclude_hosts“: null,
“host”: “192.168.23.36”,
“msg“: null,
“path”: null,
“port”: 5986,
“search_regex“: null,
“sleep”: 1,
“state”: “started”,
“timeout”: 100
}
},
“item”: {
“cpu“: 2,
“memory”: “4096MB”,
“name”: “nicktest“,
“network”: {
“dns“: “192.168.0.17,192.168.0.18“,
“gateway”: “192.168.23.254”,
“ip“: “192.168.23.36”,
“netmask”: “255.255.255.0”
},
“network_switch“: “Cisco VIC Ethernet Interface #6 – Virtual Switch”,
“src_vhd“: “C:\\volumes\\devops\\devopssysprep\\devopssysprep.vhdx”,
“type”: “testservers“,
“vlanid“: 1113
},
“match_groupdict“: {},
“match_groups“: [],
“path”: null,
“port”: 5986,
“search_regex“: null,
“state”: “started”
}
]
}
}
PLAY RECAP *************************************************************************************************************************************************************************
testmachine1.nicktailor.com : ok=15 changed=7 unreachable=0 failed=0 skipped=0 rescued=0 ignored=0
