Author: admin
How to recover file system corruption on 4T LVM using DDrescue on a VM
How to recover file system corruption on 4T LVM on ubuntu using a VM
In this example we will be fixing a xfs filesystem that failed initial xfs_repair
If this happens don’t panic. We can fix most likely fix it.
Steps to do
Create new physical volume, volume group and logical volume
Now install ddrescue and make image of the corrupted file system on the new logical volume
Make swap size 30gigs – this is needed so when we repair the filesystem it doesn’t time out because it runs out of memory. Which tends to be the problem when trying to repair such large filesystems.
Sample outputs
Create rescue image on new logical volume
◦ ddrescue -d -r3 $oldfilesyetem imagefile.img loglocationpath.logfile
ddrescue -d -r3 /dev/recovery/data /mnt/recovery/recovery.img /mnt/recovery/recoverylog.logfile
Once the file is created we want to repair it using xfs_repair
– agno = 29
– agno = 9
– agno = 10
– agno = 11
– agno = 12
– agno = 13
– agno = 14
– 20:02:48: check for inodes claiming duplicate blocks – 88951488 of 88951488 inodes done
Phase 5 – rebuild AG headers and trees…
– 20:02:57: rebuild AG headers and trees – 41 of 41 allocation groups done
– reset superblock…
Phase 6 – check inode connectivity…
– resetting contents of realtime bitmap and summary inodes
– traversing filesystem …
– traversal finished …
– moving disconnected inodes to lost+found …
Phase 7 – verify and correct link counts…
Done
Written By Nick Tailor
How to add DNS entries from Linux to Windows DNS
If you already have a linux server that is already joined to the domain.
Its really simple to do, provided that you allow dynamic updates to your dns. If your server is not joined to the domain then please check out my how to add linux server to windows domain post.
Now if your deploying a server from a lab environment that isnt already joined to the domain, you can use this script to achieve it. Since you need DNS already created in windows DNS inorder to join a new server to your domain this helps automate that process.
What it will do is find the ip of the origin server, you can manually enter the hostname into the script or set it up as a argument to enter upon running the script. I just plug it in, and when its done running, it will have created the forward and reverse records for the new server by adding dns through a server that was already joined.
http://www.nicktailor.com/files/dnsaddwindowsscript (actual script)
#!/bin/sh
#This part will find the ip of the server
ADDR=`/sbin/ifconfig eth0 | grep ‘inet addr’ | awk ‘{print $2}’ | sed -e s/.*://`
#This part will provide the reverse arpa record based on the ip of the server grabbed from above.
rr=$(printf %s “$ADDR.” | tac -s.)in-addr.arpa
#This is just a hostname I plugged in because I was too lazy to have the server host itself. You can change this if you want.
HOST=`testnick.nicktailor.com`
#This portion of the script will connect to a server via ssh and run the dnsupdate through a server already joined to the domain, and add the records to the windows dns server.
ssh -qt SOMEHOST echo -e “server 192.168.1.10\nupdate add $HOST 600 A $ADDR\nsend\n” | nsupdate -v
ssh -qt SOMEHOST echo -e “server 192.168.1.10\nupdate add $rr 86400 PTR $HOST\nsend\n” | nsupdate -v
If all goes well you should be able to dig the results
dig any @nameserver testnick.nicktailor.com
Results:
; <<>> DiG 9.8.2rc1-RedHat-9.8.2-0.47.rc1.el6 <<>> any @192.168.1.10 testnick.nicktailor.com
; (1 server found)
;; global options: +cmd
;; Got answer:
;; ->>HEADER<<- opcode: QUERY, status: NOERROR, id: 51960
;; flags: qr aa rd ra; QUERY: 1, ANSWER: 1, AUTHORITY: 0, ADDITIONAL: 0
;; QUESTION SECTION:
;testnick.nicktailor.com. IN ANY
;; ANSWER SECTION:
testnick.nicktailor.com. 600 IN A 192.168.1.10
;; Query time: 0 msec
;; SERVER: 10.18.2.12#53(10.18.2.12)
;; WHEN: Fri Dec 2 13:51:13 2016
;; MSG SIZE rcvd: 61
dig any @nameserver 10.1.168.192.in-addr.arpa
Results:
; <<>> DiG 9.8.2rc1-RedHat-9.8.2-0.47.rc1.el6 <<>> any @10.1.168.192.in-addr.arpa
; (1 server found)
;; global options: +cmd
;; Got answer:
;; ->>HEADER<<- opcode: QUERY, status: NOERROR, id: 42354
;; flags: qr aa rd ra; QUERY: 1, ANSWER: 1, AUTHORITY: 0, ADDITIONAL: 0
;; QUESTION SECTION:
;10.1.168.192.in-addr.arpaa. IN ANY
;; ANSWER SECTION:
10.1.168.192.in-addr.arpa. 3600 IN PTR testnick.nicktailor.com.
;; Query time: 0 msec
;; SERVER: 10.18.2.12#53(10.18.2.12)
;; WHEN: Fri Dec 2 14:39:41 2016
;; MSG SIZE rcvd: 85
Written by Nick Tailor
How to automate your RedHat Satellite 5.x Channel Cloning
- In order for the scripts to work without sending your password to “ps” you will need to setup a config for spacecmd
Credential File
Spacecmd can be configured with a credentials file so you are not prompted for a username/password each time. This allows for easier scripting.
- Create a hidden spacecmd directory in your home. Lock down permissions.
mkdir ~/.spacecmd
chmod 700 ~/.spacecmd
- Create a config file in the directory and give proper permissions.
touch ~/.spacecmd/config
chmod 600 ~/.spacecmd/config
- Edit the config file and fill in the header, Spacewalk server fqdn, username, and password.
vim ~/.spacecmd/config

[spacecmd]
server=spacewalk.nicktailor.com
username=usernamehere
password=passwordhere
Clone scripts
http://www.nicktailor.com/files/clonechannel.redhat7.sh
http://www.nicktailor.com/files/clonechannel.redhat6.sh
http://www.nicktailor.com/files/clonechannel.redhat5.sh
REDHAT 7 (EXAMPLE)
#!/bin/bash
spacewalkServer=spacewalk.nicktailor.com
defaultOrgAdmin=USER
read -p “Enter to Continue”
How to RDP to VNC and authenticate using AD (OpenSuSe)
For this we will be setting up VNC server and XRDP which allow you to use windows remote desktop terminal services client to connect to your linux desktop as you would any windows machine with centralized authentication using Active directory.
XRDP is a wonderful Remote Desktop protocol application that allows you to RDP to your servers/workstations from any Windows machine, MAC running an RDP app or even Linux using an RDP app such as Remmina.
Virtual Network Computing (VNC) is a graphical desktop sharing system that uses the Remote Frame Buffer protocol (RFB) to remotely control another computer. Essentially the Linux version of windows RDP.
Now since there was no xrdp package in the opensuse repository it was a bit of dirty install to get it all working.
1. First you will need to install VNC Server using yast2
- Yast2 –I tigervnc
- Chkconfig vnc on
- Vncpasswd <enter>
- Type your vncpasswd twice
- systemctl start vnc (/usr/bin/vncserver)
Should like below
New ‘X’ desktop is bvanhm01:1
Starting applications specified in /root/.vnc/xstartup
Log file is /root/.vnc/nicktailor.1:1.log
Now we want to install xrdp. Since Opensuse doesn’t come with a built in repository or rpm that has xrdp lalready compiled to use. We will have to make this setup just a little dirty and compile our own xrdp and then configure it to work the VNC. Im not 100% sure if there is one, however when I looked for one I didn’t see one so I chose this route which worked out. However it is a bit of a dirty setup
First we need to download xrdp source
- Create a directory to store it the source files
- cp xrdp-v0.6.1.tar.gz /home/xrdp
- tar –zxvf /home/xrdp/xrdp-v0.6.1.tar.gz
- zypper install git autoconf automake libtool make gcc gcc-c++ libX11-devel libXfixes-devel libXrandr-devel fuse-devel patch flex bison intltool libxslt-tools perl-libxml-perl font-util libxml2-devel openssl-devel pam-devel python-libxml2 xorg-11
- You will also want to enable remote desktop services inside opensuse
- Now you want to install xrdp
- change to the xrdp directory and run
- ./bootstrap
- ./configure
- make
- then as root
- make install
2. Once the application is installed you will need to add the library files so the system can read it
- vi /etc/ld.so.conf
- add the following lines(32bit & 64bit):
- /usr/local/lib64/xrdp
- /usr/local/lib/xrdp
- save the file
- next run ldconfig so the system pick the libraries directories up.
- Make sure your /etc/xrdp/xrdp.ini has the following
[globals]
bitmap_cache=yes
bitmap_compression=yes
port=3389
crypt_level=high
channel_code=1
[xrdp1]
name=sesman-Xvnc
lib=libvnc.so
username=ask
password=ask
ip=127.0.0.1
port=-1
- Your start up script for xrdp lives inside /home/xrdp/xrdp-v0.6.1/instfiles/xrdp.sh
- cd in /etc/init.d/
- You can create a symlink inside /etc/init.d/
- ln -s /home/xrdp/xrdp-v0.6.1/instfiles/xrdp.sh xrdp.sh
- Now I added the start up script to /etc/rc.d/boot.local so that it would start up on reboots
- Add this line
- /home/xrdp/xrdp-v0.6.1/instfiles/xrdp.sh start
- Add this line
For the next portion please ensure you opensuse is already added to AD and authenticating against AD. If not please refer to my earlier blog post on how to add opensuse to Active Directory. If you did everything correctly your pam.d authentication will be using pam_winbind to authenticate against AD and the following includes will use that authentication process for xrdp to get to VNC
- Now in order to get xrdp to use AD authentication you will need to update the /etc/pam.d/xrdp-sesman
#%PAM-1.0
auth include common-auth
account include common-account
password include common-password
session include common-session
ISSUES YOU CAN RUN INTO WITH GNOME
- So now you should be in theory be able to use remote desktop provided there is no firewall preventing you from connecting to the machine, connect using your AD credentials through rdp from a windows desktop. There is small catch. If your using gnome it MAY not work. What might happen is you will initially connect and then as soon as you get a screen lock, the login screen will be hammering away with you unable to type your password in to gain access to your session again
- You might see something like this in your /var/log/messages
2015-08-27T14:15:44.341964-07:00 nicktailor01 gnome-session[10533]: ShellUserVerifier<._userVerifierGot@/usr/share/gnome-
shell/js/gdm/util.js:350
2015-08-27T14:15:44.342139-07:00 nicktailor01 gnome-session[10533]: wrapper@/usr/share/gjs-1.0/lang.js:213
2015-08-27T14:15:44.721076-07:00 bvanhm01 gnome-session[10533]: (gnome-shell:10609): Gjs-WARNING **: JS ERROR: Failed to obtain user
verifier: Gio.DBusError: GDBus.Error:org.freedesktop.DBus.Error.AccessDenied: No session available
2015-08-27T14:15:44.721381-07:00 nicktailor01 gnome-session[10533]: ShellUserVerifier<._userVerifierGot@/usr/share/gnome-
shell/js/gdm/util.js:350
2015-08-27T14:15:44.721553-07:00 nicktailor01 gnome-session[10533]: wrapper@/usr/share/gjs-1.0/lang.js:213
2015-08-27T14:15:45.100944-07:00 nicktailor01 gnome-session[10533]: (gnome-shell:10609): Gjs-WARNING **: JS ERROR: Failed to obtain user
verifier: Gio.DBusError: GDBus.Error:org.freedesktop.DBus.Error.AccessDenied: No session available
- The reason for this appears to be related to a bug with systemd and gnome-shell. I reviewed several online forum cases regarding it, however there was no solid resolution other than downgrading system. Even later updates caused similar issues. Fear not..there is a solution. I found we can simply change the desktop from gnome to a more stable one like XFCE. How do we do this I will show you 🙂
- First install XFCE
- zypper install -t pattern xfce
- Next you want to remove gnome
- zypper rm $(rpm -qa | grep gnome)
Now reboot your machine and you should be able to remote desktop via rdp to your linux machine with no issues from opensusu. I realize this is bit dirty, but it was fun wasn’t it??? 🙂
If you have any questions email nick@nicktailor.com
How to RDP to VNC and authenticate using AD (Redhat 6)
For this we will be setting up VNC server and XRDP which allow you to use windows remote desktop terminal services client to connect to your linux desktop as you would any windows machine with centralized authentication using Active directory.
XRDP is a wonderful Remote Desktop protocol application that allows you to RDP to your servers/workstations from any Windows machine, MAC running an RDP app or even Linux using an RDP app such as Remmina. This was written for the new CentOS 6.5 on 64-bit but should work the same on any 6.x and 5.x Red Hat clone with the correct EPEL repositories.
Virtual Network Computing (VNC) is a graphical desktop sharing system that uses the Remote Frame Buffer protocol (RFB) to remotely control another computer. Essentially the Linux version of windows RDP.
We are going to make them work together so you can RDP from your windows machine to you linux desktop as you would any other windows machine using a windows RDP service. It create an ssh tunnel inside the RDP protocol to get to the vnc server and then authenicate against the active directory domain controller so you dont need to create users individually for vncserver.
First we need to download and install the EPEL repository for your correct version if you do now know what architecture you are using you can verify it with the below command. If the end shows x86_64 then you have a 64-bit install, if it shows i386 then it is a 32-bit install:
|
1
2
|
[root@server ~]# uname -r2.6.32-431.el6.x86_64 |
Once you determine your architecture then you can install the correct EPEL repository with the below commands:
|
1
2
|
wget http://download.fedoraproject.org/pub/epel/6/i386/epel-release-6-8.noarch.rpmrpm -ivh epel-release-6-8.noarch.rpm |
|
1
2
|
wget http://download.fedoraproject.org/pub/epel/6/x86_64/epel-release-6-8.noarch.rpmrpm -ivh epel-release-6-8.noarch.rpm |
You can verify that the EPEL repository is there by running the below command and you should see the EPEL repository listed as you can see here in line #10 which is highlighted:
|
1
2
3
4
5
6
7
8
9
10
11
12
13
|
[root@server ~]# yum repolistLoaded plugins: fastestmirror, refresh-packagekit, securityLoading mirror speeds from cached hostfile * base: mirror.thelinuxfix.com * epel: mirror.cogentco.com * extras: centos.mirror.nac.net * updates: centos.mirror.netriplex.comrepo id repo name statusbase CentOS-6 - Base 6,367epel Extra Packages for Enterprise Linux 6 - x86_64 10,220extras CentOS-6 - Extras 14updates CentOS-6 - Updates 286repolist: 16,887 |
Once you have verified the EPEL repository is installed correctly you need to perform the last few steps below this will install XRDP and Tiger VNC Server for you to connect to. The Front end of XRDP uses the RDP protocol and internally it uses VNC to connect and display the Remote Desktop to you.
|
1
2
3
4
5
|
[root@server ~]# yum install xrdp tigervnc-server[root@server ~]# service vncserver start[root@server ~]# service xrdp start[root@server ~]# chkconfig xrdp on[root@server ~]# chkconfig vncserver on |
- If your vncserver did not start..probably due the /etc/sysconfig/vncserver file. You need at least one user and password configured.
- edit the file /etc/sysconfig/vncserver
- add the following below; adjust the users accordingly and save
VNCSERVERARGS[2]=”-geometry 800×600 -nolisten tcp -localhost”
- Now you su to your the user you created
- su ntailora
- then run vncpasswd
- type a complex password twice
- exit back to root by typing exit
- restart vncserver /etc/init.d/vncserver restart
Now to make it so that xrdp will authenticate against AD when creating a ssh tunnel through the rdp protocol.
NOTE: YOU WILL OF HAVE HAD TO FOLLOW MY EARLIER BLOG POST ON “HOW TO ADD A REDHAT SERVER TO ACTIVE DIRECTORY” FOR THIS PORTION TO WORK.
- we just need edit the pam authentication file that was created when xrdp was installed
- /etc/pam.d/xrdp-sesman
auth include password-auth
account include password-auth
session include password-auth
- Make a back up of the file /etc/pam.d/xrdp-sesman
- cp /etc/pam.d/xrdp-sesman /etc/pam.d/xrdp-sesman.bak
- Now copy your system-auth file over the /etc/pam.d/xrdp-sesman
- cp /etc/pam.d/system-auth /etc/pam.d/xrdp-sesman
It should look something like below. Iv bolded the sections that show the sssd authentication section in the file. Now you should be able to use your Active Directory(AD) credentials to authentication when trying to rdp to your linux desktop.
===================================================
#%PAM-1.0
# This file is auto-generated.
# User changes will be destroyed the next time authconfig is run.
auth required pam_env.so
auth sufficient pam_fprintd.so
auth sufficient pam_unix.so nullok try_first_pass
auth requisite pam_succeed_if.so uid >= 500 quiet
auth sufficient pam_sss.so use_first_pass
auth required pam_deny.so
account required pam_unix.so
account sufficient pam_localuser.so
account sufficient pam_succeed_if.so uid < 500 quiet
account [default=bad success=ok user_unknown=ignore] pam_sss.so
account required pam_permit.so
password requisite pam_cracklib.so try_first_pass retry=3
password sufficient pam_unix.so md5 shadow nullok try_first_pass use_authtok
password sufficient pam_sss.so use_authtok
password required pam_deny.so
session optional pam_keyinit.so revoke
session required pam_limits.so
session optional pam_oddjob_mkhomedir.so skel=/etc/skel
session [success=1 default=ignore] pam_succeed_if.so service in crond quiet use_uid
session required pam_unix.so
session optional pam_sss.so
============================================================
Cheers
If you have any questions email nick@nicktailor.com
How to add Redhat Server 6.0 to Active Directory
We will be using sssd/kerberos/ldap to join the server to a domain in Active directory for SSO(Single Sign On Authentication)
Note: After you have successfully deployed a server using kickstart or manually registered a redhat server to satellite, next we need to join the server to domain controller aka Active Directory
The output will look like something this:
Load smb config files from /etc/samba/smb.conf
Loaded services file OK.
Server role: ROLE_DOMAIN_MEMBER
Press enter to see a dump of your service definitions
[global]
workgroup = NICKSTG
realm = NICKSTG.NICKTAILOR.COM
security = ADS
kerberos method = secrets and keytab
log file = /var/log/
client signing = Yes
idmap config * : backend = tdb
Note: If the nets join fails. It will be due to most likely three reasons.
I ran into the NTP issue. Here is how you fix it.
If your server is not registered to satellite
You will need to have the following files configured as such
/etc/krb5.conf
[logging]
default = FILE:/var/log/krb5libs.log
kdc = FILE:/var/log/krb5kdc.log
admin_server = FILE:/var/log/kadmind.log
[libdefaults]
default_realm = NICKSTG.NICKTAILOR.COM
dns_lookup_realm = false
dns_lookup_kdc = false
ticket_lifetime = 24h
renew_lifetime = 7d
forwardable = true
[realms]
NICKSTG.NICKTAILOR.COM = {
kdc = DC1.NICKTAILOR.COM
admin_server = DC1.NICKTAILOR.COM
}
[domain_realm]
.nickstg.nicktailor.com = = NICKSTG.NICKTAILOR.COM
nickstg.nicktailor.com = = NICKSTG.NICKTAILOR.COM
/etc/oddjobd.conf.d/oddjobd-mkhomedir.conf
<?xml version=”1.0″?>
<!– This configuration file snippet controls the oddjob daemon. It
provides access to mkhomedir functionality via a service named
“com.redhat.oddjob_mkhomedir”, which exposes a single object
(“/”).
The object allows the root user to call any of the standard D-Bus
introspection interface’s methods (these are implemented by
oddjobd itself), and also defines an interface named
“com.redhat.oddjob_mkhomedir”, which provides two methods. –>
<oddjobconfig>
<service name=”com.redhat.oddjob_mkhomedir”>
<object name=”/”>
<interface name=”org.freedesktop.DBus.Introspectable”>
<allow min_uid=”0″ max_uid=”0″/>
<!– <method name=”Introspect”/> –>
</interface>
<interface name=”com.redhat.oddjob_mkhomedir”>
<method name=”mkmyhomedir”>
<helper exec=”/usr/libexec/oddjob/mkhomedir -u 0077″
arguments=”0″
prepend_user_name=”yes”/>
<!– no acl entries -> not allowed for anyone –>
</method>
<method name=”mkhomedirfor”>
<helper exec=”/usr/libexec/oddjob/mkhomedir -u 0077″
arguments=”1″/>
<allow user=”root”/>
</method>
</interface>
</object>
</service>
</oddjobconfig>
================================================================================
/etc/pam.d/password-auth-ac
#%PAM-1.0
# This file is auto-generated.
# User changes will be destroyed the next time authconfig is run.
auth required pam_env.so
auth sufficient pam_unix.so nullok try_first_pass
auth requisite pam_succeed_if.so uid >= 500 quiet
auth sufficient pam_sss.so use_first_pass
auth required pam_deny.so
account required pam_unix.so
account sufficient pam_localuser.so
account sufficient pam_succeed_if.so uid < 500 quiet
account [default=bad success=ok user_unknown=ignore] pam_sss.so
account required pam_permit.so
password requisite pam_cracklib.so try_first_pass retry=3
password sufficient pam_unix.so md5 shadow nullok try_first_pass use_authtok
password sufficient pam_sss.so use_authtok
password required pam_deny.so
session optional pam_keyinit.so revoke
session required pam_limits.so
session optional pam_oddjob_mkhomedir.so skel=/etc/skel
session [success=1 default=ignore] pam_succeed_if.so service in crond quiet use_uid
session required pam_unix.so
session optional pam_sss.so
/etc/pam.d/su
#%PAM-1.0
auth sufficient pam_rootok.so
auth [success=2 default=ignore] pam_succeed_if.so use_uid user ingroup grp_technology_integration_servertech_all
auth [success=1 default=ignore] pam_succeed_if.so use_uid user ingroup wheel
auth required pam_deny.so
auth include system-auth
account sufficient pam_succeed_if.so uid = 0 use_uid quiet
account include system-auth
password include system-auth
session include system-auth
session optional pam_xauth.so
#This line is the last line
/etc/pam.d/system-auth-ac
#%PAM-1.0
# This file is auto-generated.
# User changes will be destroyed the next time authconfig is run.
auth required pam_env.so
auth sufficient pam_fprintd.so
auth sufficient pam_unix.so nullok try_first_pass
auth requisite pam_succeed_if.so uid >= 500 quiet
auth sufficient pam_sss.so use_first_pass
auth required pam_deny.so
account required pam_unix.so
account sufficient pam_localuser.so
account sufficient pam_succeed_if.so uid < 500 quiet
account [default=bad success=ok user_unknown=ignore] pam_sss.so
account required pam_permit.so
password requisite pam_cracklib.so try_first_pass retry=3
password sufficient pam_unix.so md5 shadow nullok try_first_pass use_authtok
password sufficient pam_sss.so use_authtok
password required pam_deny.so
session optional pam_keyinit.so revoke
session required pam_limits.so
session optional pam_oddjob_mkhomedir.so skel=/etc/skel
session [success=1 default=ignore] pam_succeed_if.so service in crond quiet use_uid
session required pam_unix.so
session optional pam_sss.so
/etc/samba/smb.conf
[global]
workgroup = NICKSTG
client signing = yes
client use spnego = yes
kerberos method = secrets and keytab
realm = NICKSTG.NICKTAILOR.COM
security = ads
log file = /var/log/
/etc/sssd/sssd.conf
[sssd]
config_file_version = 2
reconnection_retries = 3
sbus_timeout = 30
services = nss, pam
domains = default, nickstg.nicktailor.com
[nss]
filter_groups = root
filter_users = root,bin,daemon,adm,lp,sync,shutdown,halt,mail,news,uucp,operator,games,gopher,ftp,nobody,vcsa,pcap,ntp,dbus,avahi,rpc,sshd,xfs,rpcuser,nfsnobody,haldaemon,avahi-autoipd,gdm,nscd,oracle, ,deploy,tomcat,jboss,apache,ejabberd,cds,distcache,squid,mailnull,smmsp,backup,bb,clam,obdba,postgres,named,mysql,quova, reconnection_retries = 3
[pam]
reconnection_retries = 3
[domain/nickstg.nicktailor.com]
id_provider = ad
access_provider = simple
cache_credentials = true
#ldap_search_base = OU=NICKSTG-Users,DC=NICKSTG,DC=nicktailor,DC=com
override_homedir = /home/%u
default_shell = /bin/bash
simple_allow_groups = ServerTech_All,Server_Systems_Integration
/etc/sudoers
## /etc/sudoers
## nicktailor sudoers configuration
## Include all configuration from /etc/sudoers.d
## Note: the single # is needed in the line below and is NOT a comment!
#includedir /etc/sudoers.d
##%NICKSTG\\domain\ users ALL = NOPASSWD: ALL
% ServerTech_All ALL = NOPASSWD: ALL
% Server_Systems_Integration ALL = NOPASSWD: ALL
How to deploy servers with KickStart 5.0
- Open up Vcenter and login
- Find the folder you wish to create the new vm
- Right click on the folder and select create a new vm
- Go through and select the VM parameters you require ie(CPU, Memory, HD space, etc)
NOTE: that you should keep the HD space to 50 gigs and thin provision the vm.
- Next you want to edit the VM settings
- Select the CD/DVD option and then boot off a redhat linux 6.6 install dvd.
- Enable the connect on start and conneted check boxes at the top.
- Next you want to select the Network adapter and select the correct Network Label(VLAN) so the server will be able to communicate dependant on which ever ip/network you chose.
- Select the CD/DVD option and then boot off a redhat linux 6.6 install dvd.
Note: You will not be able to kickstart if you do not have the proper vlan for your ip.
- Next Login into satellite
- Click on kickstart on the left pane and then profiles
- Select the button “Advanced options
- Scroll down to network and edit the line as needed.
- –bootproto=static –ip=10.2.10.13 –netmask=255.255.255.0 –gateway=10.2.10.254 –hostname=server1.nicktailor.com –nameserver=10.20.0.17.
Note: You need to do this if you want the server provisioned with ip and hostname post install.
- Scroll down and click update for settings to take effect.
- Next click on System Details and then Paritioning.
- Edit the partitions to the specification required. You in most cases wont need to update this will be a standard template. However for the purposes of documentation its here.
Example of standard partition scheme
part /boot –fstype=ext4 –size=500
part pv.local –size=1000 –grow
volgroup vg_local pv.local
logvol / –fstype ext4 –name=root –vgname=vg_local –size=2048
logvol swap –fstype swap –name=swap –vgname=vg_local –recommended
logvol /tmp –fstype ext4 –name=tmp –vgname=vg_local –size=1024
logvol /usr –fstype ext4 –name=usr –vgname=vg_local –size=4096
logvol /home –fstype ext4 –name=home –vgname=vg_local –size=2048
logvol /var –fstype ext4 –name=var –vgname=vg_local –size=4096 –grow
logvol /var/log –fstype ext4 –name=log –vgname=vg_local –size=2048 –grow
logvol /var/log/audit –fstype ext4 –name=audit –vgname=vg_local –size 1024
logvol /opt –fstype ext4 –name=opt –vgname=vg_local –size=4096 –grow
- Once you have the desired setting, select “Update Paritions”
4. Next Select Software
5. You can add or remove any necessary or un-necessary packages.
By using the (-) before the package name it will remove it from the base install. If you simply type in the package name it will ensure its added to the base install.
The packages indicated below are an example of how you
@ Base
@X Window System
@Desktop
@fonts
python-dmidecode
python-ethtool
rhn-check
rhn-client-tools
rhn-setup
rhncfg-actions
rhncfg-client
yum-rhn-plugin
sssd
6. Select update packages once you have chosen your base packages
7. Now boot up the vm, once your cd/image is booted you should see a grub line, before it boots into the install, follow the steps below.
8. At the grub line issue the following command. (Update the ip according to above step as needed. If you are using DHCP then you just need the url without the additional parameters.
linux ks=http://satellite.nicktailor.com/ks/cfg/org/5/label/Kickstartname ip=10.0.12.99 netmask=255.255.255.0 gateway=10.0.12.254 nameserver=10.20.0.17
9. Your VM at this point should go through without any user interaction and install and reboot with a functional OS.
Note: Since you have kickstarted your server using satellite, it will automatically be registered to satellite server, saving you the hassel of doing it after the fact.
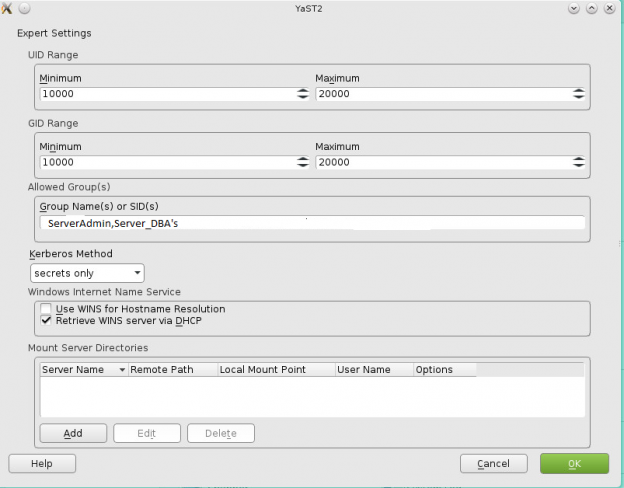
How to join a OpenSuse Host to Active Directory
nameserver 192.168.0.10
nameserver 192.168.0.11
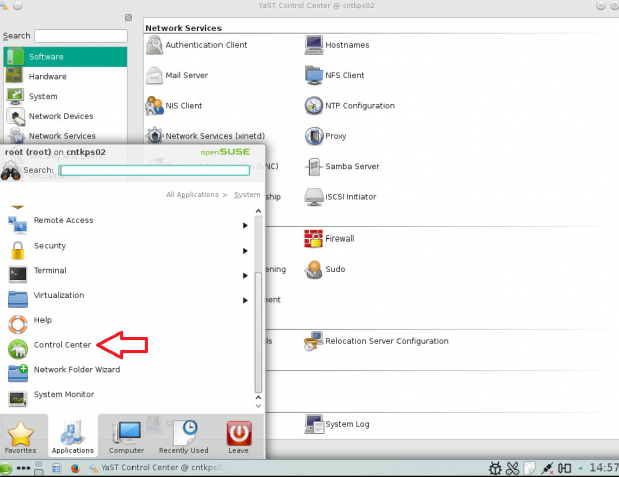
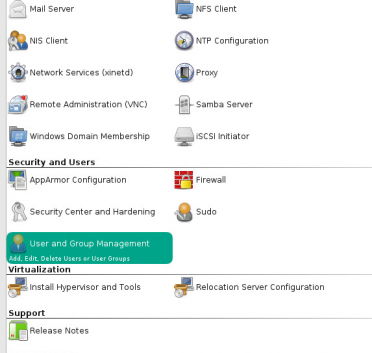
Note: Prior to running these steps you will need to ensure that you have administrator account for the domain controller and have properly setup the dns for the Desktop / Server in Active Directory
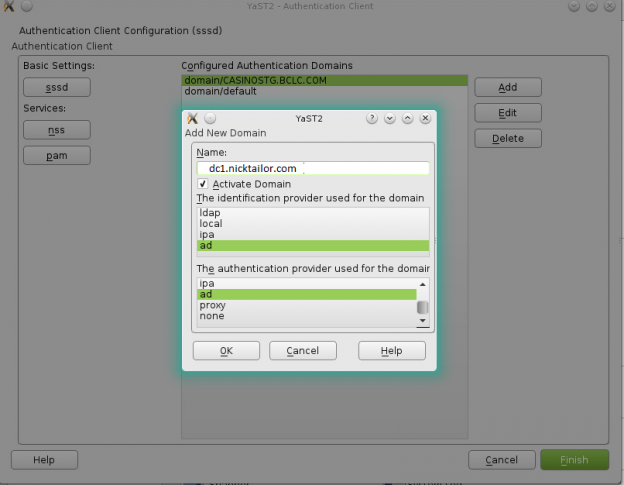
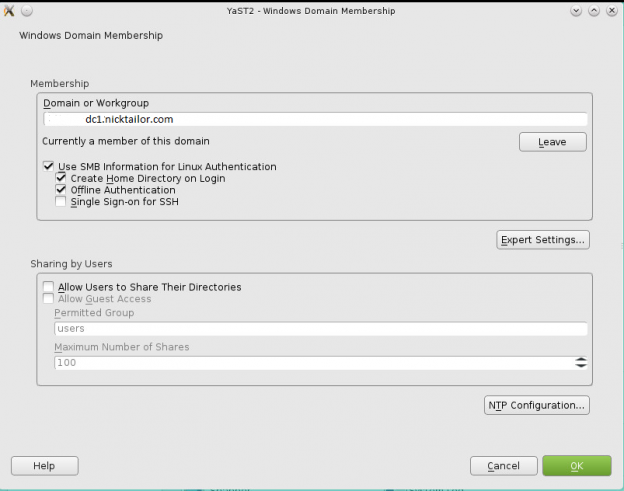
How to do a full volume heal with glusterfs
How to fix a split-brain fully
If you nodes get out of sync and you know which node is the correct one.
So if you want node 2 to match Node 1
Follow the following setps:
- gluster volume stop $volumename
- /etc/init.d/glusterfsd stop
- rm -rf /mnt/lv_glusterfs/brick/*
- /etc/init.d/glusterfsd start
- “gluster volume start $volumename force”
- “gluster volume heal $volumename full”
You should see a successful output, and you will start to see the “/mnt/lv_glusterfs/brick/” directory now match node a
Finally you can run.
- gluster volume heal $volumename info split-brain (this will show if there are any splitbrains)
- gluster volume heal $volumename info heal-failed (this will show you files that failed the heal)
Cheers
How to setup GlusterFS Server/Client
Gluster setup Server/client on both nodes
On both machines:
- wget http://www.nicktailor.com/files/redhat6/glusterfs-3.4.0-8.el6.x86_64.rpm
- wget http://www.nicktailor.com/files/redhat6/glusterfs-fuse-3.4.0-8.el6.x86_64.rpm
- wget http://www.nicktailor.com/files/redhat6/glusterfs-server-3.4.0-8.el6.x86_64.rpm
- wget http://www.nicktailor.com/files/redhat6/glusterfs-libs-3.4.0-8.el6.x86_64.rpm
- wget http://www.nicktailor.com/files/redhat6/glusterfs-cli-3.4.0-8.el6.x86_64.rpm
Install GlusterFS Server and Client - yum localinstall -y gluster*.rpm
- yum install fuse
We want to use LVM for the glusterfs, so if we need to increase the size of the volume in future we can do so relatively easily. Repeat these steps on both nodes.
Create your physical volume
- pvcreate /dev/sdb
Create your volume
- vgcreate vg_gluster /dev/sdb
Create the logical volume
- lvcreate -l100%VG -n lv_gluster vg_gluster
Format your volume
- mkfs.ext3 /dev/vg_gluster/lv_gluster
Make the directory for your glusterfs
- mkdir -p /mnt/lv_gluster
Mount the logical volume to your destination
- mount /dev/vg_gluster/lv_gluster /mnt/lv_gluster
Create your brick
- mkdir -p /mnt/lv_gluster/brick
Add to your fstab if you wish for it to automount upon reboots
- echo “” >> /etc/fstab
- echo “/dev/vg_glusterfs/lv_gluster /mnt/lv_gluster ext3 defaults 0 0” >> /etc/fstab
- service glusterd start
- chkconfig glusterd on
Now from server1.nicktailor.com:
Test to ensure you can contact your second node
- gluster peer probe server2.nicktailor.com
Create glusterfs volume name and replication between both nodes
- gluster volume create $volumename replica 2 transport tcp
server1.nicktailor.com:/mnt/lv_gluster/brick server2.nicktailor.com:/mnt/lv_gluster/brick
Start the glusterfs volume
- gluster volume start $volumename
Now on server1.nicktailor.com:
Now we need to make the glusterfs directory from which everything will write to and replicate from.
NOTE: You will not be able to mount the storage unless your glusterfs volume is started
- mkdir /storage
- mount -t glusterfs server1.nicktailor.com:/sftp /storage
Add to these lines for automounting upon reboots
- echo “” >> /etc/fstab
- echo “glusterfs server1.nicktailor.com:/sftp /storage glusterfs defaults,_netdev 0 0” >> /etc/fstab
- echo “” >> /etc/rc.local
- echo “grep -v ‘^\s*#’ /etc/fstab | awk ‘{if (\$3 == \”glusterfs\”) print \$2}’ | xargs mount” >> /etc/rc.local
- echo “mount -t glusterfs server1.nicktailor.com:/sftp /storage” >> /etc/rc.local
Now on server2.nicktailor.com do the following after you install the glusterfs and setup the volume group and start the glusterfs service
- mkdir /storage
- mount -t glusterfs server2.nicktailor.com:/sftp /storage
- echo “” >> /etc/fstab
- echo ” server2.nicktailor.com:/sftp /storage glusterfs defaults 0 0″ >> /etc/fstab (if this doesnt automount use the mount -t line at the bottom in /etc/rc.local instead)
- echo “” >> /etc/rc.local
- echo “grep -v ‘^\s*#’ /etc/fstab | awk ‘{if (\$3 == \”glusterfs\”) print \$2}’ | xargs mount” >> /etc/rc.local
- echo “mount -t glusterfs server2.nicktailor.com:/sftp /storage” >> /etc/rc.local
CheersNick Tailor
If you have questions email nick@nicktailor.com and I will try to answer as soon as I can.
