
Author: admin
How to create snapshots with Ansible (VMware)
Okay, so lots of folks ask me about this, and there are a number of ways you can do this.
But if you’re using vmware and redhat satellite for central patch management for your redhat environment.
Then depending on how you patch your systems. If you snapshot every group prior to patching. Then this post will be perfect for you.
Patching Processes:
– (these are not in this post) part 2
Note: There is a step to change the content view of all your hosts and cleaning your yum repos on all the hosts. I have not written a post on this step yet, but you should obviously automate that. I will eventually get around to including it, when I have some time.
Pre-requisites: Assumed.
Step by Step:
b.mkdir -p /etc/ansible/roles/create-snapshot/defaults
2.Now you want to create a task for the snapshots.
d.Create a file called main.yml
3.Add the following code and save the file
– name: Login into vCenter and get cookies
delegate_to: localhost
uri:
url: https://{{ vcenter_host }}/rest/com/vmware/cis/session
force_basic_auth: yes
validate_certs: no
method: POST
user: ‘{{ vcenter_username }}’
password: ‘{{ vcenter_password }}’
register: login
Note: Okay so what we want to do is find the virtual machine in vsphere by name and then grab its folder value and pass it as a variable so you don’t need to define it statically in your host_var. The main reason is, say you deployed a vm and months later moved it to another folder, your code will likely have the origin folder which would be annoying, and the ansible documentation doesn’t really cover this approach, you basically figure it out as you do it. So im going to save you all time. Here is how you do it. The below will gather vm_facts based on the inventory_hostname
– name: Find Guest’s Folder using name
vmware_guest_find:
hostname: “{{ vcenter_host }}”
username: “{{ vcenter_username }}”
password: “{{ vcenter_password }}”
validate_certs: no
name: “{{ inventory_hostname }}”
delegate_to: localhost
ignore_errors: true
register: vm_facts
Note: It will than gather those facts and find the folder value. You then register the facts to a variable “vm_facts” Now it will spit out what it finds when you do –vvvv when you do your play. From there you can see the folder setting. You now want to set that that folder setting as its own variable that you can pass to another task as indicated below.
ok: [ansible-server] => {
“changed”: false,
“folders”: [
“/SysUnix/Teststuff“
],
“invocation”: {
“module_args“: {
“datacenter“: null,
“hostname”: “vmware.nicktailor.com“,
“name”: “ ansible-server“,
“password”: “VALUE_SPECIFIED_IN_NO_LOG_PARAMETER”,
“port”: 443,
“proxy_host“: null,
“proxy_port“: null,
“use_instance_uuid“: false,
“username”: “admin“,
“uuid“: null,
“validate_certs“: false
}
}
}
– name: “vm_folder – setting folder value”
set_fact:
folder : “{{ vm_facts.folders }}”
Note: So you can see that the facts has a sub fact called “folders”. We want to pass that by setting that value as its own variable by making it a fact. Ansible way to set variables is setting facts. So we make that value above into a variable “vm_facts.folders” and then pass that into the next task where it asks for folders. This will get around the having to provide the exact folder the vm_resides to create snapshotting for an array of hosts.
– name: Create Snapshot
vmware_guest_snapshot:
hostname: “{{ vcenter_host }}”
username: “{{ vcenter_username }}”
password: “{{ vcenter_password }}”
datacenter: “{{ vcenter_dc }}”
validate_certs: no
name: “{{ inventory_hostname }}”
state: present
snapshot_name: “Ansible Managed Snapshot”
folder: “‘{{ vm_facts.folders }}'”
description: “This snapshot is created by Ansible Playbook”
delegate_to: localhost
Note: You will likely have a group_var from you vmdeploy role that you can use for here.
vcenter_username: admin
vcenter_password: should be vault encrypted variable
vcenter_host: vmware.nicktailor.com
vcenter_dc: London
/etc/ansible/inventory/TEST/hosts
Run your playbook: from /etc/ansible
Playbook log:
[root@ansible–server]# ansible-playbook –i inventory/TEST/hosts justcreatevmsnap.yml –ask-vault-pass –limit=’nicktest1‘
Vault password:
PLAY [all] **********************************************************************************************************************************
TASK [create_snapshot : Login into vCenter and get cookies] *********************************************************************************
ok: [nicktest1]
TASK [create_snapshot : Find Guest’s Folder using name] *************************************************************************************
ok: [nicktest1]
TASK [create_snapshot : vm_folder – setting folder value] ***********************************************************************************
ok: [nicktest1]
TASK [create_snapshot : Create Snapshot] ****************************************************************************************************
ok: [nicktest1]
PLAY RECAP **********************************************************************************************************************************
nicktest1 : ok=4 changed=0 unreachable=0 failed=0 skipped=0 rescued=0 ignored=0
Note: This uses the snapshot name to create. If another snapshot exists with a different name it will ignore it entirely. If you pass snapshot variable with another name and run the book again, it will create another snapshot. The same applies to removing snapshots, it will remove based on the name. We will cover that in my post to remove snapshots.
How to Create a New Host in Foreman with Ansible
Okay…this one was quite difficult to find online. Seems like the ansible documentation for the foreman module was seriously lacking or not kept up to date by anyone. I searched for awhile to see if anyone had an actual working model of it.
Not even in the ansible chat rooms did anyone know….which was weak.
So I spent some time getting this to work smoothly, and you will probably not find anywhere else on the web on how to do this. If you do show me….so I can kick myself.
Lets get dangerous then. 😊
Step by step:
Foreman – Already setup and your “computer resource” is hooked in (VMware)
Note: The compute profile(vmware) when hooked in, will also trigger a new vm creation in vsphere prepped to do DHCP. You can combine variables from vmware_guest module and this module as they require similar variables to be passed. To setup a one stop shop to deploy in foreman and vmware with just using ansible. Iv done this already…..
Special notes: The foreman I had setup did not have organisation or location configured. This caused the module to not function properly and I had to contact one of the developers who helped me patch the code so I didn’t require them to be configured or defined. Which I will show you all how to do.
Ansible – Assuming you have it setup and working with python 2.7 not sure this module will work with python 3. Havent tried that yet…..
Module – TheForeman Collection
Note: You can find the locations of these certs on foreman server. You will to copy them over to ansible for the callback to work properly. However, it is not needed to complete the host creation, you likely just see an error at the end of the play.
[callback_foreman]
url = ‘http://foreman-1.tdr.corp-apps.com’
ssl_cert = /etc/foreman-proxy/ssl-cert.pem
ssl_key = /etc/foreman-proxy/ssl-pvt.pem
verify_certs = /etc/foreman-proxy/ssl-ca
Okay once installed you. If you look at the ansible documentation on how to manage hosts using this module…from redhat.
It utterly useless…and will not work if you try to use the examples below.
https://people.redhat.com/evgeni/fam-antsibull/plugins/host_module.html
– name: “Create a host”
host:
username: “admin”
password: “changeme“
server_url: “https://foreman.example.com”
name: “new_host“
hostgroup: my_hostgroup
state: present
The fix was to avoid trying to touch a specific resource that is only available when you have Org/Loc enabled.
diff –git plugins/module_utils/foreman_helper.py plugins/module_utils/foreman_helper.py
index 432c76df..c9a3abda 100644
— plugins/module_utils/foreman_helper.py
+++ plugins/module_utils/foreman_helper.py
@@ -396,8 +396,9 @@ class ForemanAnsibleModule(AnsibleModule):
_host_update = next(x for x in _host_methods if x[‘name’] == ‘update’)
for param in [‘location_id‘, ‘organization_id‘]:
– _host_update_taxonomy_param = next(x for x in _host_update[‘params’] if x[‘name’] == param)
– _host_update[‘params’].remove(_host_update_taxonomy_param)
+ _host_update_taxonomy_param = next((x for x in _host_update[‘params’] if x[‘name’] == param), None)
+ if _host_update_taxonomy_param is not None:
+ _host_update[‘params’].remove(_host_update_taxonomy_param)
@_check_patch_needed(fixed_version=’2.0.0′)
def _patch_templates_resource_name(self):
Trick: with ansible you can write some of the code and run the playbook and if there are missing variables it will tell you what they are.
fatal: [testnick1]: FAILED! => {
“changed”: false,
“invocation”: {
“module_args“: {
“activation_keys“: null,
“architecture”: null,
“build”: null,
“comment”: null,
“compute_attributes“: null,
“compute_profile“: null,
“compute_resource“: null,
“config_groups“: null,
“content_source“: null,
“content_view“: null,
“domain”: null,
“enabled”: null,
“environment”: null,
“hostgroup“: “my_hostgroup“,
“image”: null,
“interfaces_attributes“: null,
“ip“: null,
“kickstart_repository“: null,
“lifecycle_environment“: null,
“location”: null,
“mac”: null,
“managed”: null,
“medium”: null,
“name”: “testnick1”,
“openscap_proxy“: null,
“operatingsystem“: null,
“organization”: null,
“owner”: null,
“owner_group“: null,
“parameters”: null,
“password”: “VALUE_SPECIFIED_IN_NO_LOG_PARAMETER”,
“provision_method“: null,
“ptable“: null,
“puppet_ca_proxy“: null,
“puppet_proxy“: null,
“puppetclasses“: null,
“pxe_loader“: null,
“realm”: null,
“root_pass“: null,
“server_url“: “http://foreman-1.nictailor.com/”,
“state”: “present”,
“subnet”: null,
“subnet6”: null,
“username”: “ntailor“,
“validate_certs“: true
}
},
“msg“: “The hostname must be FQDN”
}
PLAY RECAP ************************************************************************************************************************************************************************
testnick1 : ok=0 changed=0 unreachable=0 failed=1 skipped=0 rescued=0 ignored=0
Create a Host: This code is what you need for this module to work.
– name: “Create a host”
theforeman.foreman.host:
username: “{{ foreman_user }}”
password: “{{ vcenter_password }}”
server_url: “{{ server_url }}”
name: “{{ inventory_hostname }}”
hostgroup: “{{ host_group }}”
managed: no
build: no
compute_profile: “{{ compute_profile }}”
compute_resource: “{{ computer_resource }}”
compute_attributes:
cpus: “{{ vm_cpu_count }}”
memory_mb: “{{ vm_memory }}”
interfaces_attributes:
– type: “interface”
primary: true
compute_attributes:
name: nic1
network: “{{ vm_vlan_name }}”
interface: “{{ vm_interface }}”
subnet: “{{ vm_subnet }}”
ip: “{{ vm_ip }}”
domain: “{{ domain }}”
provision: yes
operatingsystem: “{{ operating_system }}”
medium: “{{ medium }}”
architecture: x86_64
pxe_loader: PXELinux BIOS
puppet_ca_proxy: “{{ puppet_ca_proxy }}”
puppet_proxy: “{{ puppet_proxy }}”
root_pass: “{{ root_pass }}”
environment: tdr
# ptable: Centos – LVM – / , swap
ptable: “{{ ptable }}”
# owner: unix
state: present
validate_certs: false
delegate_to: localhost
– name: “Switch host on”
theforeman.foreman.host_power:
username: “{{ foreman_user }}”
password: “{{ foreman_password }}”
server_url: “{{ server_url }}”
hostname: “{{ inventory_hostname }}”
state: on
validate_certs: false
delegate_to: localhost
Note: You can find all these variables inside foreman GUI with a bit of digging.
foreman_user: Reptilianfilth
foreman_password: { generally want a ansible vault password }
compute_profile: vmware
computer_resource: vcenter.nic.internal
domain: nic.internal
medium: 7.8-CentOS
puppet_ca_proxy: puppet-2.nic.internal
puppet_proxy: puppet-2.nic.internal
#VM creation variables
vm_network: niccorp-192.168.65_corp
vm_interface: VMXNET3
vm_subnet: 192.168.65.0
vm_ip: 192.168.65.103
domain: nic.internal
managed: no
host_group: Base-Server/Centos-7.8.2003
operating_system: Centos 7.8.2003
ptable: Centos – LVM – / , swap
root_pass: changemetwiceaday
medium: 7.8-CentOS
Special Note: Now if you wanted to have it so you can use foreman module or vmware_guest module combining the variables names between the modules.
You can do as below. You will need to ensure the variables match but it works. You can get around having to rely on DHCP with this.
#VM creation variables foreman and vmware together
vm_vlan_name: nic_192.168.44_db_stor2
vm_datastore: esx_nicrcorp
vm_dvswitch: VDS-nic-Corporate
vm_interface: VMXNET3
vm_subnet: 192.1268.44.0
vm_ip: 192.168.44.14
vm_netmask: 255.255.255.0
vm_gateway: 192.168.44.254
vm_dns_servers: [192.168.1.1]
vm_dns_suffix: nic.internal
vm_cpu_count: 4
vm_memory: 16384
vm_state: poweredon
vm_connected: true
domain: tdr.internal
managed: no
host_group: Base-Server/Centos-7.8.2003
operating_system: Centos 7.8.2003
ptable: Centos – LVM – / , swap
root_pass: changemetwiceaday
medium: 7.8-CentOS
Before you to start one last thing. If you remember in the defaults we outlined
compute_profile: vmware
(this is the foreman profile it will use, so whatever defaults you have set for network and disksize here is what will be used to trigger foreman to create a host in vcenter, so it good to go check this in foreman first.)
Run playbook: from /etc/ansible
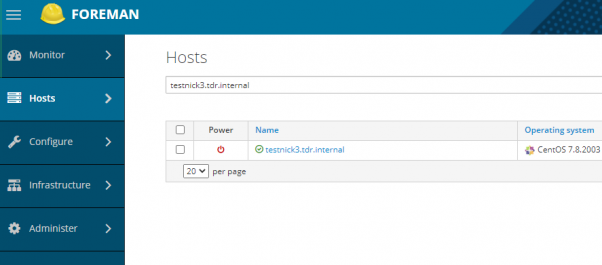
[root@nick ansible]# ansible-playbook –i inventory/TDR/hosts foremancreatehost.yml –ask-vault-pass –limit ‘testnick3.tdr.internal’
Vault password:
PLAY [all] **********************************************************************************************************************************************
TASK [ansible-provision-foreman : Create a host] ********************************************************************************************************
changed: [testnick3.tdr.internal]
PLAY RECAP *******************************************************************************************************************************************************************************
testnick3.tdr.internal : ok=1 changed=1 unreachable=0 failed=0 skipped=0 rescued=0 ignored=0
403 Client Error: Forbidden for url: http://foreman-1.nic.corp.com/api/v2/reports (if you see this, just ignore it) Its just callback report.
HOW TO CHECK CPU, MEMORY, & DISKS THRESHHOLDS on an ARRAY of HOSTS.
So I was tinkering around as usual. I thought this will come in handy for other engineers
If you a large cluster of servers that can suddenly over night loose all its MEM,CPU,DISK due to the nature of your businesses. Its difficult to monitor that from a GUI and on an array of hosts more often than not.
Cloud Scenario……
Say you find a node that is dying because too many clients are using resources and you need migrate instances off to another node, only you don’t know which nodes have the needed resources without having to go look at all the nodes individually.
This tends be every engineers pain point. So I decide to come up with quick easy solution for emergency situations, where you don’t have time to sifting through alert systems that only show you data on a per host basis, that tend to load very slowly.
This bash script will check the CPU, MEM, DISK MOUNTS (including NFS) and tell which ones are okay and which ones are
CPU – calculated by the = 100MaxThrottle – Cpu-idle = CPU-usage
note: it also creates a log /opt/cpu.log on each host
MEM – calculate by Total Mem / Used Memory * 100 = Percentage of Used Memory
note: it also creates a log /opt/mem.log on each host
Disk – Any mount that reaches the warn threshold… COMPLAIN
Now, itemised the bash script so you can just comment out item you don’t want to use at the bottom of the script if you wanted to say just check CPU/MEM
#Written By Nick Tailor
#!/bin/bash
now=`date -u -d”+8 hour” +’%Y-%m-%d %H:%M:%S’`
#cpu use threshold
cpu_warn=’75’
#disk use threshold
disk_warn=’80’
#—cpu
item_cpu () {
cpu_idle=`top -b -n 1 | grep Cpu | awk ‘{print $8}’|cut -f 1 -d “.”`
cpu_use=`expr 100 – $cpu_idle`
echo “now current cpu utilization rate of $cpu_use $(hostname) as on $(date)” >> /opt/cpu.log
if [ $cpu_use -gt $cpu_warn ]
then
echo “cpu warning!!! $cpu_use Currently HIGH $(hostname)”
else
echo “cpu ok!!! $cpu_use% use Currently LOW $(hostname)”
fi
}
#—mem
item_mem () {
#MB units
LOAD=’80.00′
mem_free_read=`free -h | grep “Mem” | awk ‘{print $4+$6}’`
MEM_LOAD=`free -t | awk ‘FNR == 2 {printf(“%.2f%”), $3/$2*100}’`
echo “Now the current memory space remaining ${mem_free_read} GB $(hostname) as on $(date)” >> /opt/mem.log
if [[ $MEM_LOAD > $LOAD ]]
then
echo “$MEM_LOAD not good!! MEM USEAGE is HIGH – Free-MEM-${mem_free_read}GB $(hostname)”
else
echo “$MEM_LOAD ok!! MEM USAGE is beLOW 80% – Free-MEM-${mem_free_read}GB $(hostname)”
fi
}
#—disk
item_disk () {
df -H | grep -vE ‘^Filesystem|tmpfs|cdrom’ | awk ‘{ print $5 ” ” $1 }’ | while read output;
do
echo $output
usep=$(echo $output | awk ‘{ print $1}’ | cut -d’%’ -f1 )
partition=$(echo $output | awk ‘{ print $2 }’ )
if [ $usep -ge $disk_warn ]; then
echo “AHH SHIT!, MOVE SOME VOLUMES IDIOT…. \”$partition ($usep%)\” on $(hostname) as on $(date)”
fi
done
}
item_cpu
item_mem
#item_disk – This is so you can comment out whole sections of the script without having to do the whole section by individual lines.
Now the cool part.
Now if you have a centrally managed jump host that allows you to get out from your estate. Ideally you would want to setup ssh keys on the hosts and ensure you have sudo permissions on the those hosts.
We want to loop this script through an array of hosts and have it run and then report back all the findings in once place. This is extremely handy if your in resource crunch.
This assumes you have SSH KEYS SETUP & SUDO for your user setup.
Create the script
Next
Server1
Server2
Server3
Server4
Run your forloop with ssh keys and sudo already setup.
Logfile – cpumem.status.DEV – will be the log file that has all the info
Output:
cpu ok!!! 3% use Currently dev1.nicktailor.com
17.07% ok!! MEM USAGE is beLOW 80% – Free-MEM-312.7GB dev1.nicktailor.com
5% /dev/mapper/VolGroup00-root
3% /dev/sda2
5% /dev/sda1
1% /dev/mapper/VolGroup00-var_log
72% 192.168.1.101:/data_1
28% 192.168.1.102:/data_2
80% 192.168.1.103:/data_3
AHH SHIT!, MOVE SOME VOLUMES IDIOT…. “192.168.1.104:/data4 (80%)” on dev1.nicktailor.com as on Fri Apr 30 11:55:16 EDT 2021
Okay so now I’m gonna show you a dirty way to do it, because im just dirty. So say your in horrible place that doesn’t use keys, because they’re waiting to be hacked by password. 😛
DIRTY WAY – So this assumes you have sudo permissions on the hosts.
Note: I do not recommend doing this way if you are a newb. Doing it this way will basically log your password in the bash history and if you don’t know how to clean up after yourself, well………………….you’re going to get owned.
I’m only showing you this because some cyber security “folks” believe that not using keys is easier to deal with in some parallel realities iv visited… You can do the exact same thing above, without keys. But leave massive trail behind you. Hence why you should use secure keys with passwords.
Not Recommended for Newbies:
Forloop AND passing your ssh password inside it.
Log file – cpumem.status.DEV – will be the log file that has all the info
Output:
cpu ok!!! 3% use Currently dev1.nicktailor.com
17.07% ok!! MEM USAGE is beLOW 80% – Free-MEM-312.7GB dev1.nicktailor.com
5% /dev/mapper/VolGroup00-root
3% /dev/sda2
5% /dev/sda1
1% /dev/mapper/VolGroup00-var_log
72% 192.168.1.101:/data_1
28% 192.168.1.102:/data_2
80% 192.168.1.103:/data_3
AHH SHIT!, MOVE SOME VOLUMES IDIOT…. “192.168.1.104:/data4 (80%)” on dev1.nicktailor.com as on Fri Apr 30 11:55:16 EDT 2021
How to deploy Open-AKC(Authorized Key Chain)
What is OpenAKC?
OpenAKC is an open-source authentication gateway, dynamic SSH key manager, and privileged access management tool for Linux. It completely rethinks how SSH trust is managed across an estate.
As a centralised trust management platform, OpenAKC allows the authorized_keys mechanism on hosts to be completely disabled. SSH trust across your entire estate can be managed centrally by systems administration or information security staff, with rich control and monitoring features. Users and application developers can no longer add or remove trust relationships on their own, effectively enforcing any whitelist or approval process you want.
As a practical jump host solution, OpenAKC replaces the dubious mechanisms many of us have seen in production: shared private keys, dodgy sudo wrappers, and insecure AD-to-SSH bridges. It acts as a drop-in upgrade by migrating users to personal keys with self-service key management, enforcing passphrases, and providing full audit trails.
🤔 The Problems Everyone Thinks About But Never Solves
- Root access auditing – How do you give admins root while logging every keystroke per user?
- IAM without domain-joining – Joining every server to AD exposes user accounts, group memberships, and home directories to attackers who gain access.
- Uncontrolled root – Once someone sudos to root, there is zero control on what that root user can do. Multiple concurrent root sessions make logs useless.
- Limiting root capabilities – What if you could give admins root but prevent them from touching files you deem too sensitive?
- Eliminating password auth entirely – No more user/pass login vectors across the estate.
- Faster than LDAP/SSSD – Deploy this across multiple distros faster than traditional directory integration.
✅ OpenAKC solves all of these. This architecture takes a few steps to understand, but from a security standpoint it trumps anything most organisations are currently running.
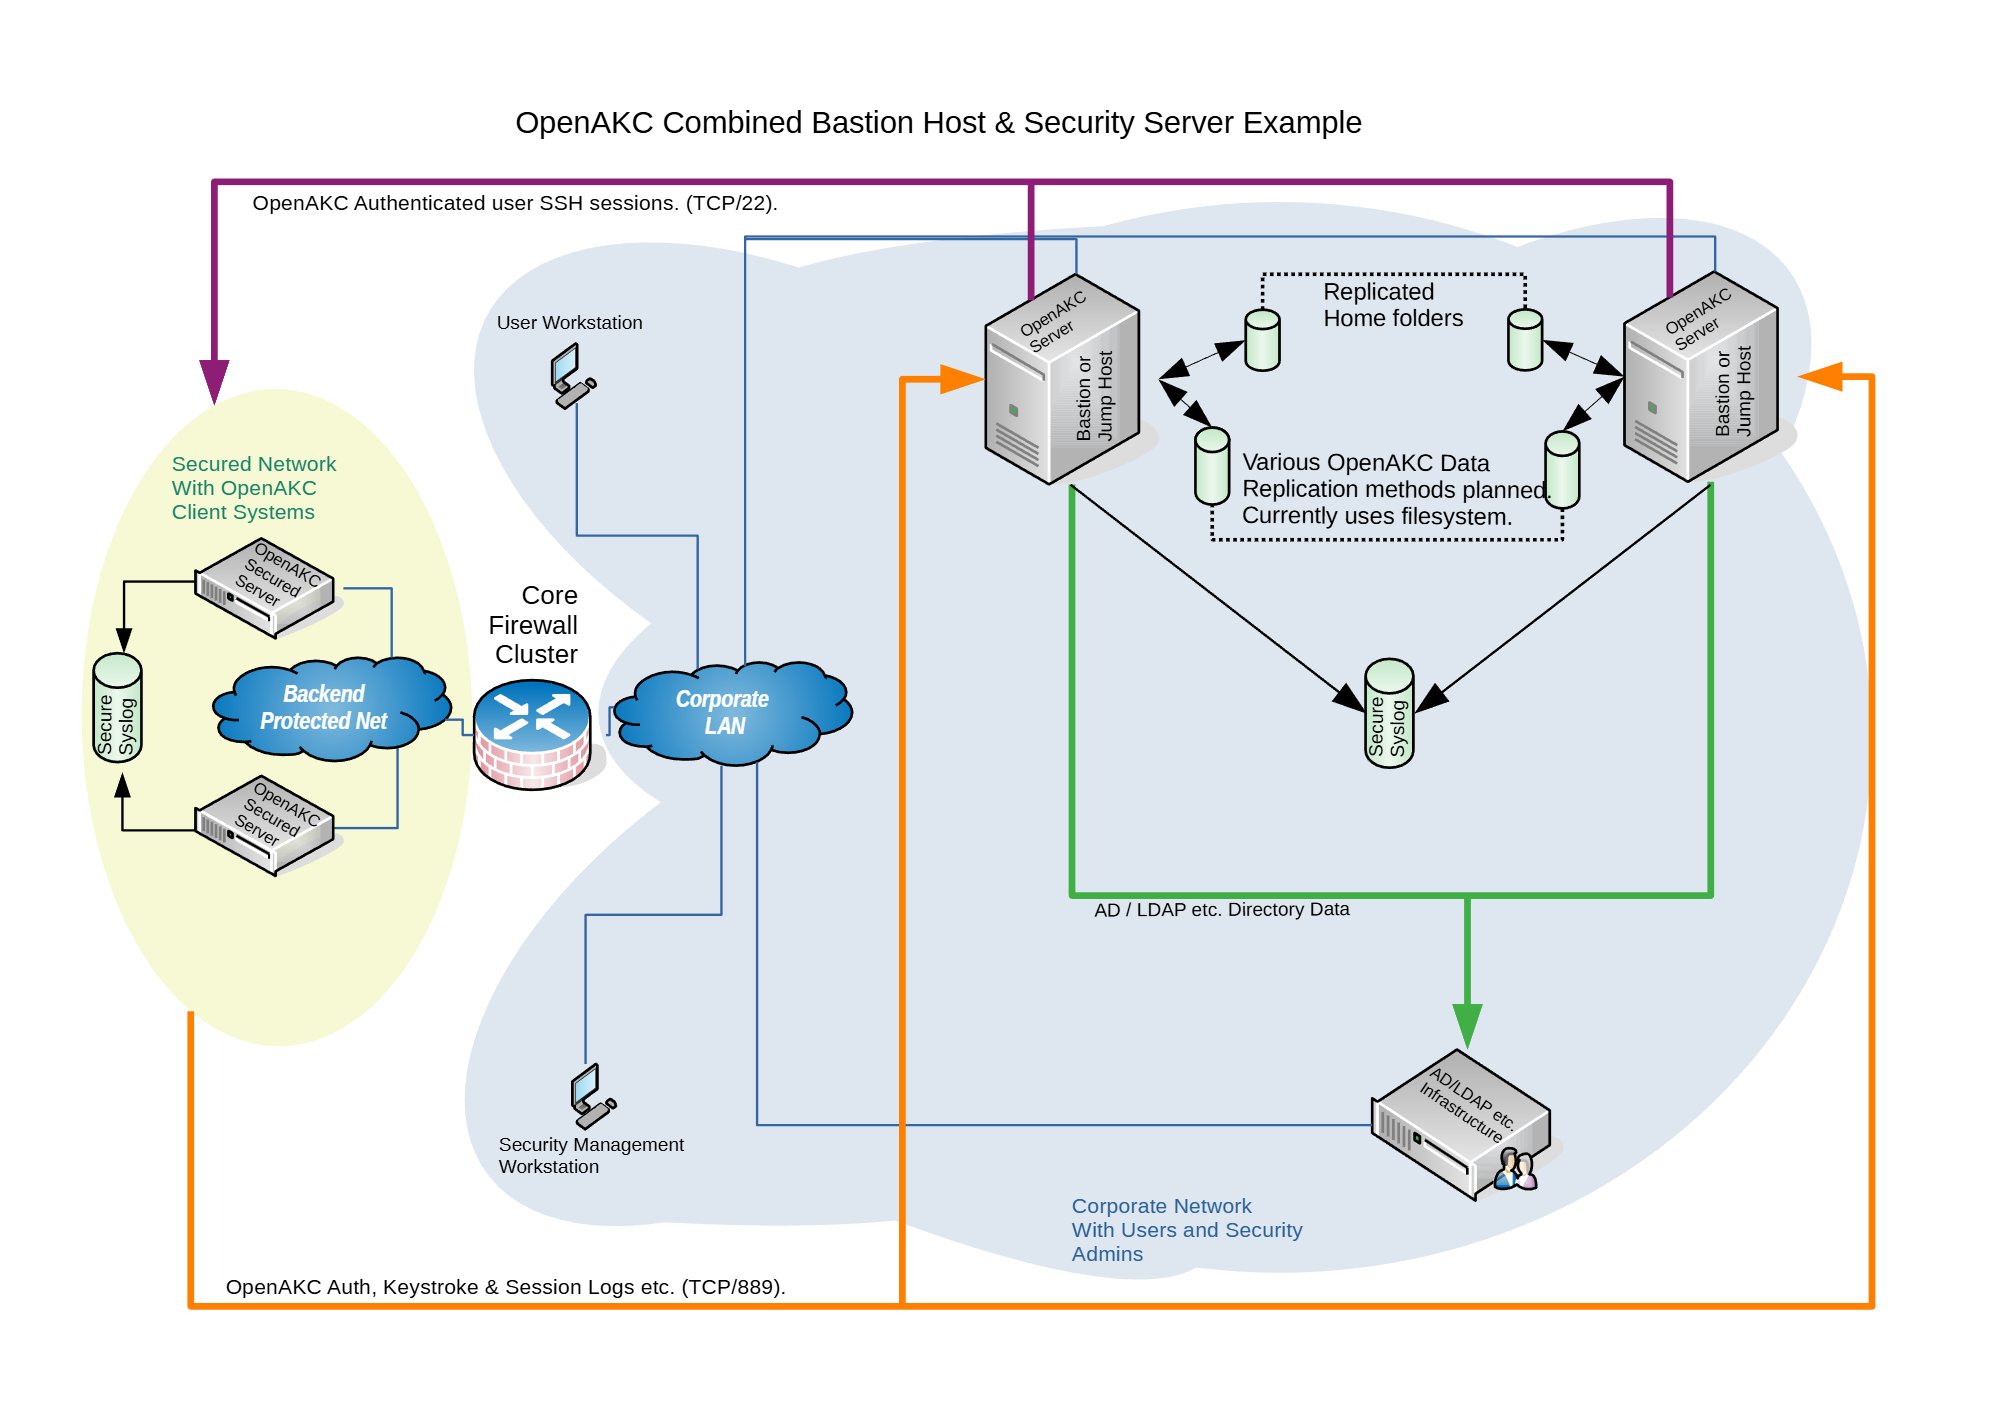
Architecture Options
OpenAKC supports two deployment architectures depending on the size of your team and estate. Both can be scaled out for redundancy.

OpenAKC Architecture Overview (source: netlore.github.io/OpenAKC)

✨ Special Features
Practical Deployment Guide
This walkthrough covers the segregated architecture (separate jump host and security server). We are deploying on CentOS 7.
⚠️ Prerequisites: Two CentOS 7 machines deployed. Active Directory configured with a user in a Linux group. Disable firewalld and selinux on your machines before proceeding.
⚠️ The original repo source code does not support newer OS’s. I have updated all the code to work with newer versions and written automations to deploy it for any environment
👤 Adding New Users
Once the infrastructure is in place, onboarding a new user takes about 60 seconds:
Add user to AD and the appropriate Linux group
SSH to the jump host and generate keys:
ssh-keygen -t rsa
Register with OpenAKC:
openakc register
Done. The user can now SSH to any machine in the estate.
OpenAKC in Action

Live demo of OpenAKC authentication and session management
This is how you set up SSH security properly. No more blind trust, no more unaudited root, no more domain-joined attack surfaces.
Special thanks to James for teaching me this while @ LSE and for the innovation behind this project.
How to add a custom tomcat installation to SystemD with ansible.
Okay so say you have a custom install of tomcat and java, which is what a lot of people do because java update and tomcat updates can bring things down. So things need to be tested before updates and standard patch cycles can end up affecting the environment.
But you want to handle the startup and stopping via systemd to be able to get status outputs and let system handle the service on reboots. This is how to do it slick.
Ansible Setup:
Role:
Setup the new role:
Main.yml
===========================================
Note: this will install the redhat tomcat version of tomcat. Do not worry we are not going to be using this tomcat. This is just so redhat automatically setups all the needed services and locations. We will then update the SystemD config for tomcat to use the custom version.
– name: Install the latest version of tomcat
package:
name: tomcat
state: latest
Note: This symlink is important as tomcat default install by redhat is inside /opt/tomcat. Update the src to the custom location of your tomcat
– name: Create symbolic link for “tomcat” in /opt
file:
src: /custom/install/tomcat
path: /opt/tomcat
force: yes
state: link
Note: This will enable tomcat to start up on reboot
– name: Enable tomcat service on startup
shell: systemctl enable tomcat
Note: This is the tomcat systemd service file that systemd uses for the default install. We are going to empty.
– name: Null tomcat.service file
shell: “>/etc/systemd/system/tomcat.service“
Note: We are now going to add our custom block for tomcat into the tomcat.service file we just emptied above using the blockinfle module. This means that this whole section will also be managed by ansible as well. Make sure you adjust the java_home if your java isn’t location inside tomcat. Along with the user,group,umask for to your custom tomcat.
– name: Edit tomcat.service for systemd
blockinfile:
dest: /etc/systemd/system/tomcat.service
insertafter:
block: |
[Unit]
Description=Apache Tomcat Web Application Container
After=syslog.target network.target
[Service]
Type=forking
Environment=JAVA_HOME=/opt/tomcat
Environment=CATALINA_PID=/opt/tomcat/temp/tomcat.pid
Environment=CATALINA_HOME=/opt/tomcat
Environment=CATALINA_BASE=/opt/tomcat
Environment=’CATALINA_OPTS=-Xms512M -Xmx1024M -server –XX:+UseParallelGC‘
Environment=’JAVA_OPTS=-Djava.awt.headless=true –Djava.security.egd=file:/dev/./urandom‘
ExecStart=/opt/tomcat/bin/startup.sh
ExecStop=/bin/kill -15 $MAINPID
User=tomcat
Group=tomcat
UMask=
RestartSec=10
Restart=always
[Install]
WantedBy=multi-user.target
Note: This will then reload the custom tomcat via systemd
– name: Start tomcat service with Systemd
systemd:
name: tomcat
daemon_reload: yes
Note: This will then check to see if the new tomcat is service running and out to the ansible playbook log.
– name: get service facts
service_facts:
– name: Check to see if tomcat is running
debug:
var: ansible_facts.services[“tomcat.service“]
Ansibe playbook log:
[root@nickansible]# ansible-playbook –i inventory/DEV/hosts justtomcatrole.yml –limit ‘nicktestvm‘ -k
SSH password:
PLAY [all] ************************************************************************************************************************************************************************************************
TASK [AddTomCatSystemD : Create symbolic link for “tomcat” in /opt] ***************************************************************************************************************************************
changed: nicktestvm]
TASK [AddTomCatSystemD : Enable tomcat service on startup] ************************************************************************************************************************************************
changed: nicktestvm]
TASK [AddTomCatSystemD : Null tomcat.service file] ********************************************************************************************************************************************************
changed: nicktestvm]
TASK [AddTomCatSystemD : Edit tomcat.service for systemd] *************************************************************************************************************************************************
changed: nicktestvm]
TASK [AddTomCatSystemD : Start tomcat service with Systemd] ***********************************************************************************************************************************************
ok: nicktestvm]
TASK [AddTomCatSystemD : get service facts] ***************************************************************************************************************************************************************
ok: nicktestvm]
TASK [AddTomCatSystemD : Check to see if tomcat is running] ***********************************************************************************************************************************************
ok: nicktestvm] => {
“ansible_facts.services[\”tomcat.service\”]”: {
“name”: “tomcat.service“,
“source”: “systemd“,
“state”: “running”,
“status”: “enabled”
}
}
PLAY RECAP ************************************************************************************************************************************************************************************************
nicktestvm : ok=7 changed=4 unreachable=0 failed=0 skipped=0 rescued=0 ignored=0
==========================
[root@nicktestvm ~]# cat /etc/systemd/system/tomcat.service
# BEGIN ANSIBLE MANAGED BLOCK
[Unit]
Description=Apache Tomcat Web Application Container
After=syslog.target network.target
[Service]
Type=forking
Environment=JAVA_HOME=/opt/tomcat
Environment=CATALINA_PID=/opt/tomcat/temp/tomcat.pid
Environment=CATALINA_HOME=/opt/tomcat
Environment=CATALINA_BASE=/opt/tomcat
Environment=’CATALINA_OPTS=-Xms512M -Xmx1024M -server -XX:+UseParallelGC’
Environment=’JAVA_OPTS=-Djava.awt.headless=true -Djava.security.egd=file:/dev/./urandom’
ExecStart=/opt/tomcat/bin/startup.sh
ExecStop=/bin/kill -15 $MAINPID
User=tomcat
Group=tomcat
UMask=0028
RestartSec=10
Restart=always
[Install]
WantedBy=multi-user.target
# END ANSIBLE MANAGED BLOCK
SystemD Status:
root@nicktestvm ~]# systemctl status tomcat
● tomcat.service – Apache Tomcat Web Application Container
Loaded: loaded (/etc/systemd/system/tomcat.service; enabled; vendor preset: disabled)
Active: active (running) since Thu 2020-12-24 05:11:21 GMT; 21h ago
Process: 6333 ExecStop=/bin/kill -15 $MAINPID (code=exited, status=0/SUCCESS)
Process: 6353 ExecStart=/opt/tomcat/bin/startup.sh (code=exited, status=0/SUCCESS)
Main PID: 6363 (java)
CGroup: /system.slice/tomcat.service
└─6363 /usr/local/java/java -Djava.util.logging.config.file=/opt/tomcat/conf/logging.properties -Djava.util.logging.manager=org.apache.juli.ClassLoaderLogManager -server -Xms1…
Dec 24 05:11:21 nicktestvm systemd[1]: Starting Apache Tomcat Web Application Container…
Dec 24 05:11:21 nicktestvm startup.sh[6353]: Existing PID file found during start.
Dec 24 05:11:21 nicktestvm startup.sh[6353]: Removing/clearing stale PID file.
Dec 24 05:11:21 nicktestvm systemd[1]: Started Apache Tomcat Web Application Container.
How to generate new Network UUID’s with Ansible
Okay some of you might have deployed linux vm’s from clone templates using ansible by way of the vmware_guest module.
Now everybody goes about it differently, and from what I read online…. It would seem that lots of people over complicate the generation of the UUID with over complicated code to generate the UUID.
At the end of the day all a UUID is….is JUST A “UNIQUE IDENTIFIER”. It serves no other function other than being another form of labelling the network interface on the vm. There is no need to over complicate the creation of a UUID. This is also provided you defined UUID’s on your deployments.
Why…would you want to do this? Well if you cloned from a template. The new clone with have the same network UUID on every new machine you create. Now this wont impact your infrastructure in anyway, other than you *might* get duplicate UUID warning at some point. However, it can be problematic when doing backups, restores, migrations, and monitoring in some cases.
Ansible Setup:
Role :
–
Note: This just runs the ‘uuidgen’ command on the linux vm and then registers the result into a variable that is passed to the next task.
– name: Generate new UUID
shell: uuidgen
register: new_uuid_result
– debug:
var: new_uuid_result
Note: This updates the network file on redhat and adds the UUID line with the newly generated UUID and shows a log of the new UUID that was added. This section will also be outlined in the file as managed by ansible
– name: Add New UUID to network config
blockinfile:
dest: /etc/sysconfig/network-scripts/ifcfg-ens192
insertafter: NAME=”ens192″
block: |
UUID=”{{ new_uuid_result[‘stdout‘] }}”
register: filecontents
– debug: msg=”{{ filecontents }}”
Ansible playbook run:
vi createnewUUID.yml
– hosts: all
gather_facts: no
roles:
– role: CreateNewNetworkUUID
Ansible playbook run:
Note: this run the role against all your hosts defined in inventory/DEV/hosts via ssh. You will need to know the root/pass for your ssh connection to be able to carry out the tasks.
Ansible playbook log:
SSH password:
PLAY [all] ****************************************************************************************************************************************************************************************************
TASK [CreateNewUUID : Generate new UUID] **********************************************************************************************************************************************************************
changed: [nicktestvm]
TASK [CreateNewUUID : debug] **********************************************************************************************************************************************************************************
ok: [nicktestvm] => {
“new_uuid_result“: {
“ansible_facts“: {
“discovered_interpreter_python“: “/usr/bin/python”
},
“changed”: true,
“cmd“: “uuidgen“,
“delta”: “0:00:00.010810”,
“end”: “2020-12-21 20:13:36.614154”,
“failed”: false,
“rc“: 0,
“start”: “2020-12-21 20:13:36.603344”,
“stderr”: “”,
“stderr_lines“: [],
“stdout“: “49242349-5168-4713-bcb6-a53840b2e1d6”,
“stdout_lines“: [
“49242349-5168-4713-bcb6-a53840b2e1d6”
]
}
}
TASK [CreateNewUUID : Add New UUID to network config] *********************************************************************************************************************************************************
changed: [nicktestvm]
TASK [CreateNewUUID : debug] **********************************************************************************************************************************************************************************
ok: [nicktestvm] => {
“new_uuid_result.stdout“: “49242349-5168-4713-bcb6-a53840b2e1d6”
}
PLAY RECAP ****************************************************************************************************************************************************************************************************
nicktestvm : ok=4 changed=2 unreachable=0 failed=0 skipped=0 rescued=0 ignored=0
Nicktestvm:
[root@nicktestvm ~]$ cat /etc/sysconfig/network-scripts/ifcfg-ens192
TYPE=”Ethernet”
PROXY_METHOD=”none”
BROWSER_ONLY=”no”
BOOTPROTO=”none”
DEFROUTE=”yes”
IPV4_FAILURE_FATAL=”no”
IPV6INIT=”yes”
IPV6_AUTOCONF=”yes”
IPV6_DEFROUTE=”yes”
IPV6_FAILURE_FATAL=”no”
IPV6_ADDR_GEN_MODE=”stable-privacy”
NAME=”ens192″
# BEGIN ANSIBLE MANAGED BLOCK
UUID=”49242349-5168-4713-bcb6-a53840b2e1d6″
# END ANSIBLE MANAGED BLOCK
DEVICE=”ens192″
ONBOOT=”yes”
IPADDR=”192.168.1.69″
PREFIX=”24″
GATEWAY=”192.168.1.254″
DNS1=”8.8.8.1″
DNS2=”8.8.8.2″
DOMAIN=”nicktailor.co.uk”
IPV6_PRIVACY=”no”
How to deploy Vmware VM’s using Ansible from Cloned Templates
QUICK OVERVIEW OF WHAT ANSIBLE IS..
Ansible is a radically simple IT automation engine that automates cloud provisioning, configuration management, application deployment, intra-service orchestration, and many other IT needs.
Designed for multi-tier deployments since day one, Ansible models your IT infrastructure by describing how all of your systems inter-relate, rather than just managing one system at a time.
It uses no agents and no additional custom security infrastructure, so it’s easy to deploy – and most importantly, it uses a very simple language (YAML, in the form of Ansible Playbooks) that allow you to describe your automation jobs in a way that approaches plain English.
On this page, we’ll give you a really quick overview so you can see things in context. For more detail, hop over to docs.ansible.com.
EFFICIENT ARCHITECTURE
Ansible works by connecting to your nodes and pushing out small programs, called “Ansible modules” to them. These programs are written to be resource models of the desired state of the system. Ansible then executes these modules (over SSH by default), and removes them when finished.
Your library of modules can reside on any machine, and there are no servers, daemons, or databases required. Typically you’ll work with your favorite terminal program, a text editor, and probably a version control system to keep track of changes to your content.
Example power on and off a vm, or connect or disconnect network, etc.
For the purposes of this post we are are going to dive into using “vmware_guest” module by way of using http api authentication session & cookies. There are many other python modules which you can search in the ansible documentation and or ansible-galaxy
https://docs.ansible.com/ansible/latest/collections/community/vmware/index.html
Now it definitely helps to be able to code in python or at least be able to read python code, however completely not necessary. Anyone with basic understanding of bash scripting can learn ansible. I could teach a newbie ansible in a couple days. Sharing is caring.
Anyone who says otherwise……don’t hire them.
Ansible Setup:
Pre-Module install Steps:
Requirements
The below requirements are needed on the host that executes this module.
Note: Now on centos its not available out of the box
Centos 7 PIP install:
Install PyVmomi:
It will look like…..
[root@nick roles]# pip install –upgrade pyvmomi
Collecting pyvmomi
Downloading https://files.pythonhosted.org/packages/ba/69/4e8bfd6b0aae49382e1ab9e3ce7de9ea6318eac007b3076e6006dbe5a7cd/pyvmomi-7.0.1.tar.gz (584kB)
100% |████████████████████████████████| 593kB 861kB/s
Cache entry deserialization failed, entry ignored
Collecting requests>=2.3.0 (from pyvmomi)
Downloading https://files.pythonhosted.org/packages/29/c1/24814557f1d22c56d50280771a17307e6bf87b70727d975fd6b2ce6b014a/requests-2.25.1-py2.py3-none-any.whl (61kB)
100% |████████████████████████████████| 61kB 3.5MB/s
Collecting six>=1.7.3 (from pyvmomi)
Downloading https://files.pythonhosted.org/packages/ee/ff/48bde5c0f013094d729fe4b0316ba2a24774b3ff1c52d924a8a4cb04078a/six-1.15.0-py2.py3-none-any.whl
Cache entry deserialization failed, entry ignored
Collecting certifi>=2017.4.17 (from requests>=2.3.0->pyvmomi)
Downloading https://files.pythonhosted.org/packages/5e/a0/5f06e1e1d463903cf0c0eebeb751791119ed7a4b3737fdc9a77f1cdfb51f/certifi-2020.12.5-py2.py3-none-any.whl (147kB)
100% |████████████████████████████████| 153kB 6.5MB/s
Cache entry deserialization failed, entry ignored
Collecting urllib3<1.27,>=1.21.1 (from requests>=2.3.0->pyvmomi)
Downloading https://files.pythonhosted.org/packages/f5/71/45d36a8df68f3ebb098d6861b2c017f3d094538c0fb98fa61d4dc43e69b9/urllib3-1.26.2-py2.py3-none-any.whl (136kB)
100% |████████████████████████████████| 143kB 6.9MB/s
Cache entry deserialization failed, entry ignored
Collecting idna<3,>=2.5 (from requests>=2.3.0->pyvmomi)
Downloading https://files.pythonhosted.org/packages/a2/38/928ddce2273eaa564f6f50de919327bf3a00f091b5baba8dfa9460f3a8a8/idna-2.10-py2.py3-none-any.whl (58kB)
100% |████████████████████████████████| 61kB 4.4MB/s
Cache entry deserialization failed, entry ignored
Collecting chardet<5,>=3.0.2 (from requests>=2.3.0->pyvmomi)
Downloading https://files.pythonhosted.org/packages/19/c7/fa589626997dd07bd87d9269342ccb74b1720384a4d739a1872bd84fbe68/chardet-4.0.0-py2.py3-none-any.whl (178kB)
100% |████████████████████████████████| 184kB 3.5MB/s
Installing collected packages: certifi, urllib3, idna, chardet, requests, six, pyvmomi
Found existing installation: certifi 2018.4.16
Uninstalling certifi-2018.4.16:
Successfully uninstalled certifi-2018.4.16
Found existing installation: urllib3 1.22
Uninstalling urllib3-1.22:
Successfully uninstalled urllib3-1.22
Found existing installation: idna 2.6
Uninstalling idna-2.6:
Successfully uninstalled idna-2.6
Found existing installation: chardet 3.0.4
Uninstalling chardet-3.0.4:
Successfully uninstalled chardet-3.0.4
Found existing installation: requests 2.18.4
Uninstalling requests-2.18.4:
Successfully uninstalled requests-2.18.4
Found existing installation: six 1.9.0
Uninstalling six-1.9.0:
Successfully uninstalled six-1.9.0
Running setup.py install for pyvmomi … done
Successfully installed certifi-2020.12.5 chardet-4.0.0 idna-2.10 pyvmomi-7.0.1 requests-2.25.1 six-1.15.0 urllib3-1.26.2
You are using pip version 10.0.1, however version 20.3.3 is available.
You should consider upgrading via the ‘pip install –upgrade pip’ command.
(You noticed this at the bottom)
A lot of the time you need to upgrade pip for the modules to install as python is always evolving at a fast pace
So run
[root@nick roles]# pip install –upgrade pip
Collecting pip
Downloading https://files.pythonhosted.org/packages/54/eb/4a3642e971f404d69d4f6fa3885559d67562801b99d7592487f1ecc4e017/pip-20.3.3-py2.py3-none-any.whl (1.5MB)
100% |████████████████████████████████| 1.5MB 799kB/s
Installing collected packages: pip
Found existing installation: pip 8.1.2
Uninstalling pip-8.1.2:
Successfully uninstalled pip-8.1.2
Successfully installed pip-10.0.1
You get the idea……
Vpshere – Pre-requistes for this to work:
You will need a vmware user who has api access permission for the following items. If the user you have setup in vcenter is unable to see these items. This module will fail. You do not need a user with full admin privileges, which is what a lot of documentation says online cryptically. I have tested this and confirmed that is not the case. Obivously, its way better to just give admin privileges to the user and trust the people you hire and use ansible vault to hide the credentials. Which we will get into later….
You can also check these parameters in your code by validating using assertions to see if they are all working with your user prior to moving on the next task.
– vSphere API configuration
– VM details
– vcenter_host
– cluster
– datacenter
– folder
– vm_disk_size
– vm_cpu_count
– vm_memory
– vm_vlan
– vm_vlan_name
– vm_dvswitch
– vm_datatstore
–vmware tools and or open_vm_tools must installed the clone template (super important)
Okay so now were on setting up the vmware_guest module using yaml code.
Setting vmware_guest module on ansible:
Now what I like to do is set everything up as a role in ansible to call in your playbooks, it keeps things cleaner and its much easier to find spacing mistakes in your code when writing in yaml. Lots of NBTo aid in checking for mistakes. But ultimately its experience. I’m a bit of both but I tend just pop a vi open and just write and much in there
Note: Now we do most of our work in this directory. Your primary yaml file is always called “main.yml” Your playbooks always look for this file when trying to call python modules.
Setting up the yaml:
1. First stage of the yaml is use the http login to the vcenter host and successfully authenticate and then grab those session cookies to carry out the next set of tasks which utilise the vmware_guest module.
– name: Login into vCenter and get cookies
delegate_to: localhost
uri:
url: https://{{ vcenter_host }}/rest/com/vmware/cis/session
force_basic_auth: yes
validate_certs: no
method: POST
user: ‘{{ vcenter_username }}’
password: ‘{{ vcenter_password }}’
register: login
2. Okay so this where we are now actually calling the vmware_guest module in yaml. You can see that the code has a lot of areas that are variablelised. These variable are passed in a couple of ways. You need to pass the defaults through the defaults directory we created earlier, and the second is host specific variables which will be under your host_vars directory under your inventory structure, which we will get into later.
Note: Now remember this is code to deploy from an existing cloned template you have sitting on datastore somewhere in your environment. The process to deploy a vm using kickstart using DHCP that’s bit different to setup I wrote this to help out those people who cant see the wisdom and efficiency of having DHCP’d deployments
You will be passing these variables
– name: Create a VM
vmware_guest:
hostname: “{{ vcenter_host }}”
username: “{{ vcenter_username }}”
password: “{{ vcenter_password }}”
validate_certs: False
cluster: “{{ vcenter_cluster }}”
datacenter: “{{ vcenter_dc }}”
Note: name: This will be the name of the new vm created. Keep in mind the vm host will also be setup with a shortname for the hostname of the server not the FQDN. You can probably fix this using vmshell or I used a completely separate role to setup the network for physical machines which uses jinja templates and inside the role I passed the new name as a variable. But that’s for another post
name: “{{ inventory_hostname }}”
folder: “{{ vm_folder }}”
template: “{{ VMTemplate }}”
state: “{{ vm_state }}”
Note: guest_id: this is what kind of OS will the VM Run, almost every hypervisor asks that prior to creating a vm. You can find the list online.
guest_id: “{{ vm_guest_id }}”
Note: disk: this section you could technically pass it through as a variable in your host_vars on the specific hosts, but since were using a template. I kept these parameters static here inside the role.
disk:
– size_gb: 80
type: thin
datastore: “{{ vm_datastore }}”
– size_gb: 100
type: thin
datastore: “{{ vm_datastore }}”
hardware:
memory_mb: “{{ vm_memory }}”
num_cpus: “{{ vm_cpu_count }}”
scsi: paravirtual
Note: Customization: This section is very important because without it your dns in /etc/resolv.conf will not be configured correctly. A lot of people have a hell of time with this on the net, as the parsing of this in yaml is bit tricky, and people resort to using vm_guest_file to update the /etc/resolv.conf, which sucks because now you need the root/pass via ssh. My way will work
customization:
dns_servers: “{{ vm_dns_servers }}”
dns_suffix: “{{ vm_dns_suffix }}”
Note: networks: This section is the section which will use vmware-tools or open_vm_tools to update the network config on host after powering on the vm, but before the OS is booted, provided you said to power it on in your host_var file. This section helps people get around the issue of having no DHCP and having to deploy each server using the same static address on a dedicated vlan. This section will go and update the vm network parameters and the template vm will deploy on a whatever vlan, with different ip, gateway, netmask. It will also register a new mac address to the vm, so you don’t end up with vm’s with duplicate mac-addresses. Lastly, it will update /etc/hosts with the new ip and shortname of the server
networks:
– name: “{{ vm_vlan_name }}”
type: static
dvswitch_name: “{{ vm_dvswitch }}”
ip: “{{ vm_ip }}”
netmask: “{{ vm_netmask }}”
gateway: “{{ vm_gateway }}”
start_connected: “{{ vm_connected }}”
# wait_for_ip_address: yes (this is if you are using DHCP)
delegate_to: localhost
register: vm_deploy
Note: This section is just spits out verbose information on the how the build went and the mac-address of the vm. This hand to pay attention to so you can ensure your template mac and your new vm don’t have duplicate macs. If you do. You will need to go into vshere find the VM. Remove the network and readd it manually, to register a new mac
– debug:
var: vm_deploy.instance.hw_eth0.macaddress
– debug:
var: deploy_vm
– debug:
var: mac
Not: Its easier to put all your defaults here and then comment out the ones you want to pass through your host_vars specific files after you got it working the way you want.
—
vm_disks: 100
vm_cpu_count: 2
vm_state: present
vm_memory: 2048
#vm_datastore: vmfs-datastore1234
vcenter_username: BruceWayne
vcenter_password: ( you will put ansible_vault encrypted variable here, for now just put in your password for testing)
vm_dvswitch: DvSwitch
vcenter_cluster: ProdCluster
vcenter_host: vcenter.nicktailor.com
vcenter_dc: London
#vm_folder: /Production/Unix/
#vm_vlan_name: VM76123
vm_guest_id: rhel7_64Guest
#VMTemplate: redhat-template2020
Ansible Hosts and Inventory:
Okay so this is where everyone handles things uniquely. I personally like to take the approach of creating inventory based on environment. Its logical and the best way to manage hosts in very large infrastructures.
So if you have DEV/STAGING/PRODUCTION as your environments. Then I would set it up as such
1. Inside your /etc/ansible directory create the following
For the purposes of this post we are just going to
create one group
=====================================
[All]
nicktestvm.nicktailor.com ansible_host=192.168.1.200
=====================================
Note: ansible_host=(ip) This is used when you want to override dns of the host and tell ansible. Do not resolve the dns this host only connect to this ip. You don’t need this here, however if your’re using ‘a’ static address to deploy vm’s initially and not using vmwre_tools to configure the network, and went with SSH after for configuration of the host. Then it will need to know which host to connect to setup the network. So I just like to have there in case I want to temporary tell ansible look here for this server.
Note: You can see all the variables that were in the role and defaults are now being passed through here for this specific host. It has to be done in this fashion for it all work correctly. If you pass all this through the role may crap out on you.
#vm_requirements
vm_ip: 192.168.1.86
vm_netmask: 255.255.255.0
vm_gateway: 192.168.1.1
vm_vlan_name: VM76123
VMTemplate: redhat-template2020
vm_folder: /Production/Unix
vm_state: poweredon
vm_connected: true
vm_datastore: vmfs-datastore1234
note: vm_dns_servers: this section is very important. This was the only way I could get the dns server to parse and update the /etc/resolv.conf properly. If you list them out individually as one lineers. It seems to be a bug and will simply empty out the file, which will leave your vm unable to resolve dns.
vm_dns_servers: [8.8.8.1, 8.8.8.2]
vm_dns_suffix: nicktailor.co.uk
Setting Ansible Vault and Encrypted variables:
there a couple of ways to do this you can do it via file, or via prompt. I’m going to show you how to do it via file.
Note: the –-name is the variable you want to pass in your code. So whatever you call that has to be there.
ansible-vault encrypt_string –vault-id 1@vault.pass.txt ‘vcenter-password-here’ –name ‘vcenter_password‘
vcenter_password: !vault |
$ANSIBLE_VAULT;1.2;AES256;1
31623638366337643437633065623538663565336232333863303763336364396438663032363364
3665376363663839306165663435356365643965343364310a313832393261363466393237666666
36666437626563386366653938383565663361646333333732336439356633616231653639626465
3130656134383365320a323032366238303366336562653865663130333963316237393839373830
65396139323739323266643961653766333633366638336435613933373966643561
Encryption successful
vcenter_password: !vault |
$ANSIBLE_VAULT;1.2;AES256;1
31623638366337643437633065623538663565336232333863303763336364396438663032363364
3665376363663839306165663435356365643965343364310a313832393261363466393237666666
36666437626563386366653938383565663361646333333732336439356633616231653639626465
3130656134383365320a323032366238303366336562653865663130333963316237393839373830
65396139323739323266643961653766333633366638336435613933373966643561
- • You should also store the vault password somewhere offsite in some password database and delete the vault.pass.txt file you created.
Deploy VM with ansible:
– hosts: all
gather_facts: no
roles:
– role: ansible-vmware-deploy
Note: Important thing to remember when deploying linux machines from a template is that all your machines will have the same ‘Network’ UUID as the template machine. If you define these…. You will need to write some code to fix that up after the VM is deployed and powered up. Check out the link below on how to do that.
https://www.nicktailor.com/?p=1177
Special Note: if you attempt to deploy multiple hosts at the same time. This will deploy 5 clones in parallel at a time and not one by one. Which will reduce deployment time significantly. I didnt bother to see if i could override this….:)
Output log of successful automated ansible deploy:
[root@nickansible]# ansible-playbook –i inventory/DEV/hosts standard_build.yml –ask-vault –limit ‘nicktestvm‘
Vault password: (paste password here in your shell window)
PLAY [all] ****************************************************************************************************************************************************************************************************
TASK [ansible-vmware-deploy : Validate Project Requirements] **********************************************************************************************************************************************
ok
TASK [ansible-vmware-deploy : Login into vCenter and get cookies] *****************************************************************************************************************************************
ok: [nicktestvm]
TASK [ansible-vmware-deploy : Create a VM] ****************************************************************************************************************************************************************
changed: [nicktestvm]
TASK [ansible-vmware-deploy : debug] **********************************************************************************************************************************************************************
ok: [nicktestvm] => {
“vm_deploy.instance.hw_eth0.macaddress”: “00:40:51:53:11:a6”
}
nicktestvm : ok=4 changed=1 unreachable=0 failed=0 skipped=0 rescued=0 ignored=0
How to check if ports are open on an array of servers
Okay now there is a whole bunch of ways you can do this. This is just the way I played around with to save myself a bunch of time, using NCAT. Also previously known as NETCAT.
1.Ensure your Jumphost can ssh to all your newely deployed machines. Either you will use a root password or ssh key of some sort.
Note (ensure you have this install on all the new servers)
portcheckscriptnick.sh – this will check to see if your new server can talk to all the hosts below and check to see if those ports are up or down on each
============================
#!/bin/bash
host=”nick1 nick2 nick3 nick4″
for host in $host; do
for port in 22 53 67 68
do
if ncat -z $host $port
then
echo port $port $host is up
else
echo port $port $host is down
fi
done
done
========================================
Example:
Server1
Server2
Server3
Server4
6.Run the following below check the servers and see if each server can communicate with the hosts and ports necessary. If you see the are down. Then you will need to check the firewalls to see why the host is unable to communicate.
• for HOST in $(cat server.txt) ; do ssh root@$HOST “bash -s” < portcheckscriptnick.sh ; echo $HOST ; done 2>&1 | tee -a port.status
Note: the file port.status will be created on the jump host and you can simply look through to see if any ports were down on whichever hosts.
This is what the script looks like on one host if its working properly
[root@nick ~]# ./portcheckscriptnick.sh
port 22 192.168.1.11 is up
port 53 192.168.1.11 is down
port 67 192.168.1.11 is down
port 68 192.168.1.11 is down
This is what it will look like when you run against your array of new hosts from your jumpbox
[root@nick ~]# for HOST in $(cat servers.txt) ; do ssh root@$HOST “bash -s” < portcheckscriptnick.sh ; echo $HOST ; done
root@192.168.1.11’s password:
port 22 nick1 is up
port 53 nick1 is down
port 67 nick1 is down
port 68 nick1 is down
port 22 nick2 is up
port 53 nick2 is down
port 67 nick2 is down
port 68 nick2 is down
How to setup SMTP port redirect with IPTABLES and NAT
RedHat/Centos
Okay its really easy to do. You will need to add the following in /etc/sysctl.conf
Note: these are kernel parameter changes
kernel.sysrq = 1
net.ipv4.tcp_syncookies=1
net/ipv4/ip_forward=1 (important)
net.ipv4.conf.all.route_localnet=1 (important)
net.ipv4.conf.default.send_redirects = 0
net.ipv4.conf.all.send_redirects = 0
It will probably look something like the rules below.
EXAMPLE
# Generated by iptables-save v1.2.8 on Thu July 6 18:50:55 2020
*filter
:INPUT ACCEPT [0:0]
:FORWARD ACCEPT [0:0]
:OUTPUT ACCEPT [2211:2804881]
:RH-Firewall-1-INPUT – [0:0]
-A INPUT -j RH-Firewall-1-INPUT
-A FORWARD -j RH-Firewall-1-INPUT
-A RH-Firewall-1-INPUT -i lo -j ACCEPT
-A RH-Firewall-1-INPUT -p icmp -m icmp –icmp-type 255 -j ACCEPT
-A RH-Firewall-1-INPUT -p esp -j ACCEPT
-A RH-Firewall-1-INPUT -p ah -j ACCEPT
-A RH-Firewall-1-INPUT -m state –state RELATED,ESTABLISHED -j ACCEPT
-A RH-Firewall-1-INPUT -p tcp -m tcp –dport 1025-m state –state NEW -j ACCEPT (make sure to have open)
-A RH-Firewall-1-INPUT -p tcp -m tcp –dport 443 -m state –state NEW -j ACCEPT
-A RH-Firewall-1-INPUT -p tcp -m tcp –dport 8443 -m state –state NEW -j ACCEPT
-A RH-Firewall-1-INPUT -p tcp -m tcp –dport 25 -m state –state NEW -j ACCEPT (make sure to have open)
-A RH-Firewall-1-INPUT -p tcp -m tcp –dport 80 -m state –state NEW -j ACCEPT
-A RH-Firewall-1-INPUT -p tcp -m tcp –dport 21 -m state –state NEW -j ACCEPT
-A RH-Firewall-1-INPUT -p tcp -m tcp –dport 22 -m state –state NEW -j ACCEPT
-A RH-Firewall-1-INPUT -p tcp -m tcp –dport 106 -m state –state NEW -j ACCEPT
-A RH-Firewall-1-INPUT -p tcp -m tcp –dport 143 -m state –state NEW -j ACCEPT
-A RH-Firewall-1-INPUT -p tcp -m tcp –dport 465 -m state –state NEW -j ACCEPT
-A RH-Firewall-1-INPUT -p tcp -m tcp –dport 993 -m state –state NEW -j ACCEPT
-A RH-Firewall-1-INPUT -p tcp -m tcp –dport 995 -m state –state NEW -j ACCEPT
-A RH-Firewall-1-INPUT -p tcp -m tcp –dport 8222 -m state –state NEW -j ACCEPT
-A RH-Firewall-1-INPUT -j REJECT –reject-with icmp-host-prohibited
COMMIT
#ADD this section with another Commit like below
# Completed on Thu July 6 18:50:55 2020
# Generated by iptables-save v1.2.8 on Thu July 6 18:50:55 2020
*nat
:PREROUTING ACCEPT [388:45962]
:POSTROUTING ACCEPT [25:11595]
:OUTPUT ACCEPT [25:11595]
-A PREROUTING -p tcp -m tcp –dport 1025 -j REDIRECT –to-ports 25
COMMIT
# Completed on Thu July 6 18:50:55 2020
[root@nick ~]# iptables -L -n | grep 1025
ACCEPT tcp — 0.0.0.0/0 0.0.0.0/0 tcp dpt:1025 state NEW
[root@nick ~]# iptables -L -n -t nat| grep 1025
REDIRECT tcp — 0.0.0.0/0 0.0.0.0/0 tcp dpt:1025 redir ports 25
Note:
You will need to run telnet from outside the host as you cant NAT to localhost locally. 🙂
[root@nick1 ~]# telnet 192.168.86.111 1025
Trying 192.168.86.111…
Connected to localhost.
Escape character is ‘^]’.
220 nick.ansible.com ESMTP Postfix
How to rebuild a drive that’s fallen out of a software raid
Now I know nobody uses this kind of raid technology anymore, but it was one of the cool things I learned from my mentor at the time, when I first started my career centuries ago. I happen to find this in my archives and thought I would write up to share.
There is another way to do this as using mdadm & sfdisk. When I find time I will share how to do that as well.
1.First thing you want to do is check to see drive has fallen out of the raid by running the following command below
md2 : active raid1 hda3[0] hdc3[1]
524096 blocks [2/2] [UU]
md1 : active raid1 hda2[0] hdc2[1]
524096 blocks [2/2] [UU]
md0 : active raid1 hda1[0]
78994304 blocks [2/1] [U_] *You notice this one is showing a drive has fallen out*
Note: If you see this, take notice to the one with [U_] this line means that the drive has fallen out of the raid.
1. To enter it back in run the lines below, based on the drive assignments in the above paritions that are good.
How to rebuild a failed drive in software if you replaced the drive:
• cat /proc/mdstat
md2 : active raid1 hda3[0] hdc3[1]
524096 blocks [2/2] [UU]
md1 : active raid1 hda2[0] hdc2[1]
524096 blocks [2/2] [UU]
md0 : active raid1 hda1[0]
78994304 blocks [2/1] [U_]
2. recreate the paritions on the new drive by doing the following, using the same mirror drive designations from /proc/mdstat.
3. Next check the partition by running
Disk /dev/hdc: 81.9 GB, 81964302336 bytes
16 heads, 63 sectors/track, 158816 cylinders
Units = cylinders of 1008 * 512 = 516096 bytes
Device Boot Start End Blocks Id System
/dev/hdc1 * 1 156735 78994408+ fd Linux raid autodetect
/dev/hdc2 156736 157775 524160 fd Linux raid autodetect
/dev/hdc3 157776 158815 524160 fd Linux raid autodetect
Disk /dev/hda: 81.9 GB, 81964302336 bytes
16 heads, 63 sectors/track, 158816 cylinders
Units = cylinders of 1008 * 512 = 516096 bytes
Device Boot Start End Blocks Id System
/dev/hda1 * 1 156735 78994408+ fd Linux raid autodetect
/dev/hda2 156736 157775 524160 fd Linux raid autodetect
/dev/hda3 157776 158815 524160 fd Linux raid autodetect
———————————————————————
Filesystem Size Used Avail Use% Mounted on
/dev/md0 75G 11G 60G 16% /
none 251M 0 251M 0% /dev/shm
/dev/md1 496M 8.1M 463M 2% /tmp
4. Next you want it rebuild the partitions on the new drive so run the following, you will need to update your drive designation according to your drive assignment.
Note: the primary partition should match the new drive designation ‘dev/md0 /dev/hdc1’.