Category: Linux
How to Deploy LVM’s with Ansible
Provisioning-LVM-Filesystems:
This role is designed to use ansible-merge-vars module. An Ansible plugin to merge all variables in context with a certain suffix (lists or dicts only) and create a new variable that contains the result of this merge. This is an Ansible action plugin, which is basically an Ansible module that runs on the machine running Ansible rather than on the host that Ansible is provisioning.
Benefits: Configuring disks into LVM
Note: This post assumes you have already ansible installed and running.
Install ansible-merge-vars module:
1. root@KVM-test-box:~# pip install ansible_merge_vars
Requirement already satisfied: ansible_merge_vars in
/usr/local/lib/python3.8/dist-packages (5.0.0)
By default, Ansible will look for action plugins in an action_plugins folder adjacent to the running playbook. For more information on this, or to change the location where ansible looks for action plugin.
from ansible_merge_vars import ActionModule
Role Setup:
Once the plugin has been setup, you now you will want to setup a role.
Now we will create a task that will merge variable names associated with a list and then itemise the list for variables we will pass to provision the filesystem via the inventory/host_var or group_var
– name: Merge VG variables
merge_vars:
suffix_to_merge: vgs__to_merge
merged_var_name: merged_vgs
expected_type: ‘list’
– name: Merge LV variables
merge_vars:
suffix_to_merge: lvs__to_merge
merged_var_name: merged_lvs
expected_type: ‘list’
– name: Merge FS variables
merge_vars:
suffix_to_merge: fs__to_merge
merged_var_name: merged_fs
expected_type: ‘list’
– name: Merge MOUNT variables
merge_vars:
suffix_to_merge: mnt__to_merge
merged_var_name: merged_mnt
expected_type: ‘list’
– name: Create VGs
lvg:
vg: “{{ item.vg }}”
pvs: “{{ item.pvs }}”
with_items: “{{ merged_vgs }}”
– name: Create LVs
lvol:
vg: “{{ item.vg }}”
lv: “{{ item.lv }}”
size: “{{ item.size }}”
pvs: “{{ item.pvs | default(omit) }}”
shrink: no
with_items: “{{ merged_lvs }}”
– name: Create FSs
filesystem:
dev: “{{ item.dev }}”
fstype: “{{ item.fstype }}”
with_items: “{{ merged_fs }}”
– name: Mount FSs
mount:
path: “{{ item.path }}”
src: “{{ item.src }}”
state: mounted
fstype: “{{ item.fstype }}”
opts: “{{ item.opts | default(‘defaults’) }}”
dump: “{{ item.dump | default(‘1’) }}”
passno: “{{ item.passno | default(‘2’) }}”
with_items: “{{ merged_mnt }}”
Note: Now this currently task has no safe guards for /dev/sda or checks to ensure the disk is wiped properly in order for the disks to be added to the volume group. I have created such safe guards for others. But for the purposes of this blog post this is basics. If you want to my help you can contact me via email or the ticketing system.
Now what we are going to do is define our inventory file with what file lvm we want to crave out.
Setup inventory:
1.Go inside your inventory/host_var or group_var file and create a file for testserver1
- .nano inventory/host_var/testserver1
2. save the file.
Definitions of the variables above:
vgs__to_merge: This section is the creation volume/physical groups
– vg: vg_vmguest (this is the volume group name)
pvs: /dev/sdb (this is the physical assigned to the above volume group
– vg: vg_sl_storage (This the second volume name)
pvs: /dev/sdc (This is the second physical disk assigned to the above
volume
*You can add as many as you like*
lvs__to_merge: This section is the logical Volume creations
– vg: vg_vmguest (this is the volume group created)
lv: lv_vg_vmguest (this is the logical volume that is attached to above vg
size: 100%FREE (this says please use the whole disk)
shrink: no (this is needed to so the disk space is used correctly)
– vg: vg_sl_storage (this is the second volume created)
lv: lv_vg_sl_storage (this is the second lvm created attached to above vg)
size: 100%FREE (this is use the whole disk)
shrink: no (this is needed so the disk space is properly used)
fs__to_merge: This section formats the lvm
– dev: /dev/vg_vmguest/lv_vg_vmguest (lvm name)
fstype: ext4 (file system you want to format with)
– dev: /dev/vg_sl_storage/lv_vg_sl_storage (2nd lvm name)
fstype: ext4 (file system you want to format with)
mnt__to_merge: This section will create the path,mount, and add to fstab
– path: /vmguests (path you want created for mount)
src: /dev/vg_vmguest/lv_vg_vmguest (lvm you want to mount)
fstype: ext4 (this is for fstab adding)
– path: /sl_storage (this is second path to create)
src: /dev/vg_sl_storage/lv_vg_sl_storage (second lvm you want to mount)
fstype: ext4 (to add to fstab)
Running your playbook:
cd ansible/
Example: of justdofs.yml
– hosts: all
gather_facts: yes
any_errors_fatal: true
roles:
– role: provision-fs
Command:
ansible/$ ansible-playbook -i inventory/hosts justdofs.yml -u root -k –limit=’testservernick1′
Example of successful play:
ntailor@test-box:~/ansible/computelab$ ansible-playbook –i inventory/hosts justdofs.yml -u root -k –limit=’testservernick1‘
SSH password:
PLAY [all] *******************************************************************************************************************************************************************************************************
TASK [provision-fs : Merge VG variables] *************************************************************************************************************************************************************************
ok: [testservernick1]
TASK [provision-fs : Merge LV variables] *************************************************************************************************************************************************************************
ok: [testservernick1]
TASK [provision-fs : Merge FS variables] *************************************************************************************************************************************************************************
ok: [testservernick1]
TASK [provision-fs : Merge MOUNT variables] **********************************************************************************************************************************************************************
ok: [testservernick1]
TASK [provision-fs : Create VGs] *********************************************************************************************************************************************************************************
ok: [testservernick1] => (item={‘vg’: ‘vg_vmguest‘, ‘pvs‘: ‘/dev/sdb‘})
ok: [testservernick1] => (item={‘vg’: ‘vg_sl_storage‘, ‘pvs‘: ‘/dev/sdc‘})
TASK [provision-fs : Create LVs] *********************************************************************************************************************************************************************************
ok: [testservernick1] => (item={‘vg’: ‘vg_vmguest‘, ‘lv’: ‘lv_vg_vmguest‘, ‘size’: ‘100%FREE’, ‘shrink’: False})
ok: [testservernick1] => (item={‘vg’: ‘vg_sl_storage‘, ‘lv’: ‘lv_vg_sl_storage‘, ‘size’: ‘100%FREE’, ‘shrink’: False})
TASK [provision-fs : Create FSs] *********************************************************************************************************************************************************************************
ok: [testservernick1] => (item={‘dev’: ‘/dev/vg_vmguest/lv_vg_vmguest‘, ‘fstype‘: ‘ext4’})
ok: [testservernick1] => (item={‘dev’: ‘/dev/vg_sl_storage/lv_vg_sl_storage‘, ‘fstype‘: ‘ext4’})
TASK [provision-fs : Mount FSs] **********************************************************************************************************************************************************************************
ok: [testservernick1] => (item={‘path’: ‘/vmguests‘, ‘src‘: ‘/dev/vg_vmguest/lv_vg_vmguest‘, ‘fstype‘: ‘ext4’})
ok: [testservernick1] => (item={‘path’: ‘/sl_storage‘, ‘src‘: ‘/dev/vg_sl_storage/lv_vg_sl_storage‘, ‘fstype‘: ‘ext4’})
PLAY RECAP *******************************************************************************************************************************************************************************************************
testservernick1 : ok=8 changed=0 unreachable=0 failed=0 skipped=0 rescued=0 ignored=0
HOW TO CHECK CPU, MEMORY, & DISKS THRESHHOLDS on an ARRAY of HOSTS.
So I was tinkering around as usual. I thought this will come in handy for other engineers
If you a large cluster of servers that can suddenly over night loose all its MEM,CPU,DISK due to the nature of your businesses. Its difficult to monitor that from a GUI and on an array of hosts more often than not.
Cloud Scenario……
Say you find a node that is dying because too many clients are using resources and you need migrate instances off to another node, only you don’t know which nodes have the needed resources without having to go look at all the nodes individually.
This tends be every engineers pain point. So I decide to come up with quick easy solution for emergency situations, where you don’t have time to sifting through alert systems that only show you data on a per host basis, that tend to load very slowly.
This bash script will check the CPU, MEM, DISK MOUNTS (including NFS) and tell which ones are okay and which ones are
CPU – calculated by the = 100MaxThrottle – Cpu-idle = CPU-usage
note: it also creates a log /opt/cpu.log on each host
MEM – calculate by Total Mem / Used Memory * 100 = Percentage of Used Memory
note: it also creates a log /opt/mem.log on each host
Disk – Any mount that reaches the warn threshold… COMPLAIN
Now, itemised the bash script so you can just comment out item you don’t want to use at the bottom of the script if you wanted to say just check CPU/MEM
#Written By Nick Tailor
#!/bin/bash
now=`date -u -d”+8 hour” +’%Y-%m-%d %H:%M:%S’`
#cpu use threshold
cpu_warn=’75’
#disk use threshold
disk_warn=’80’
#—cpu
item_cpu () {
cpu_idle=`top -b -n 1 | grep Cpu | awk ‘{print $8}’|cut -f 1 -d “.”`
cpu_use=`expr 100 – $cpu_idle`
echo “now current cpu utilization rate of $cpu_use $(hostname) as on $(date)” >> /opt/cpu.log
if [ $cpu_use -gt $cpu_warn ]
then
echo “cpu warning!!! $cpu_use Currently HIGH $(hostname)”
else
echo “cpu ok!!! $cpu_use% use Currently LOW $(hostname)”
fi
}
#—mem
item_mem () {
#MB units
LOAD=’80.00′
mem_free_read=`free -h | grep “Mem” | awk ‘{print $4+$6}’`
MEM_LOAD=`free -t | awk ‘FNR == 2 {printf(“%.2f%”), $3/$2*100}’`
echo “Now the current memory space remaining ${mem_free_read} GB $(hostname) as on $(date)” >> /opt/mem.log
if [[ $MEM_LOAD > $LOAD ]]
then
echo “$MEM_LOAD not good!! MEM USEAGE is HIGH – Free-MEM-${mem_free_read}GB $(hostname)”
else
echo “$MEM_LOAD ok!! MEM USAGE is beLOW 80% – Free-MEM-${mem_free_read}GB $(hostname)”
fi
}
#—disk
item_disk () {
df -H | grep -vE ‘^Filesystem|tmpfs|cdrom’ | awk ‘{ print $5 ” ” $1 }’ | while read output;
do
echo $output
usep=$(echo $output | awk ‘{ print $1}’ | cut -d’%’ -f1 )
partition=$(echo $output | awk ‘{ print $2 }’ )
if [ $usep -ge $disk_warn ]; then
echo “AHH SHIT!, MOVE SOME VOLUMES IDIOT…. \”$partition ($usep%)\” on $(hostname) as on $(date)”
fi
done
}
item_cpu
item_mem
#item_disk – This is so you can comment out whole sections of the script without having to do the whole section by individual lines.
Now the cool part.
Now if you have a centrally managed jump host that allows you to get out from your estate. Ideally you would want to setup ssh keys on the hosts and ensure you have sudo permissions on the those hosts.
We want to loop this script through an array of hosts and have it run and then report back all the findings in once place. This is extremely handy if your in resource crunch.
This assumes you have SSH KEYS SETUP & SUDO for your user setup.
Create the script
Next
Server1
Server2
Server3
Server4
Run your forloop with ssh keys and sudo already setup.
Logfile – cpumem.status.DEV – will be the log file that has all the info
Output:
cpu ok!!! 3% use Currently dev1.nicktailor.com
17.07% ok!! MEM USAGE is beLOW 80% – Free-MEM-312.7GB dev1.nicktailor.com
5% /dev/mapper/VolGroup00-root
3% /dev/sda2
5% /dev/sda1
1% /dev/mapper/VolGroup00-var_log
72% 192.168.1.101:/data_1
28% 192.168.1.102:/data_2
80% 192.168.1.103:/data_3
AHH SHIT!, MOVE SOME VOLUMES IDIOT…. “192.168.1.104:/data4 (80%)” on dev1.nicktailor.com as on Fri Apr 30 11:55:16 EDT 2021
Okay so now I’m gonna show you a dirty way to do it, because im just dirty. So say your in horrible place that doesn’t use keys, because they’re waiting to be hacked by password. 😛
DIRTY WAY – So this assumes you have sudo permissions on the hosts.
Note: I do not recommend doing this way if you are a newb. Doing it this way will basically log your password in the bash history and if you don’t know how to clean up after yourself, well………………….you’re going to get owned.
I’m only showing you this because some cyber security “folks” believe that not using keys is easier to deal with in some parallel realities iv visited… You can do the exact same thing above, without keys. But leave massive trail behind you. Hence why you should use secure keys with passwords.
Not Recommended for Newbies:
Forloop AND passing your ssh password inside it.
Log file – cpumem.status.DEV – will be the log file that has all the info
Output:
cpu ok!!! 3% use Currently dev1.nicktailor.com
17.07% ok!! MEM USAGE is beLOW 80% – Free-MEM-312.7GB dev1.nicktailor.com
5% /dev/mapper/VolGroup00-root
3% /dev/sda2
5% /dev/sda1
1% /dev/mapper/VolGroup00-var_log
72% 192.168.1.101:/data_1
28% 192.168.1.102:/data_2
80% 192.168.1.103:/data_3
AHH SHIT!, MOVE SOME VOLUMES IDIOT…. “192.168.1.104:/data4 (80%)” on dev1.nicktailor.com as on Fri Apr 30 11:55:16 EDT 2021
How to deploy Open-AKC(Authorized Key Chain)
What is OpenAKC?
OpenAKC is an open-source authentication gateway, dynamic SSH key manager, and privileged access management tool for Linux. It completely rethinks how SSH trust is managed across an estate.
As a centralised trust management platform, OpenAKC allows the authorized_keys mechanism on hosts to be completely disabled. SSH trust across your entire estate can be managed centrally by systems administration or information security staff, with rich control and monitoring features. Users and application developers can no longer add or remove trust relationships on their own, effectively enforcing any whitelist or approval process you want.
As a practical jump host solution, OpenAKC replaces the dubious mechanisms many of us have seen in production: shared private keys, dodgy sudo wrappers, and insecure AD-to-SSH bridges. It acts as a drop-in upgrade by migrating users to personal keys with self-service key management, enforcing passphrases, and providing full audit trails.
🤔 The Problems Everyone Thinks About But Never Solves
- Root access auditing – How do you give admins root while logging every keystroke per user?
- IAM without domain-joining – Joining every server to AD exposes user accounts, group memberships, and home directories to attackers who gain access.
- Uncontrolled root – Once someone sudos to root, there is zero control on what that root user can do. Multiple concurrent root sessions make logs useless.
- Limiting root capabilities – What if you could give admins root but prevent them from touching files you deem too sensitive?
- Eliminating password auth entirely – No more user/pass login vectors across the estate.
- Faster than LDAP/SSSD – Deploy this across multiple distros faster than traditional directory integration.
✅ OpenAKC solves all of these. This architecture takes a few steps to understand, but from a security standpoint it trumps anything most organisations are currently running.
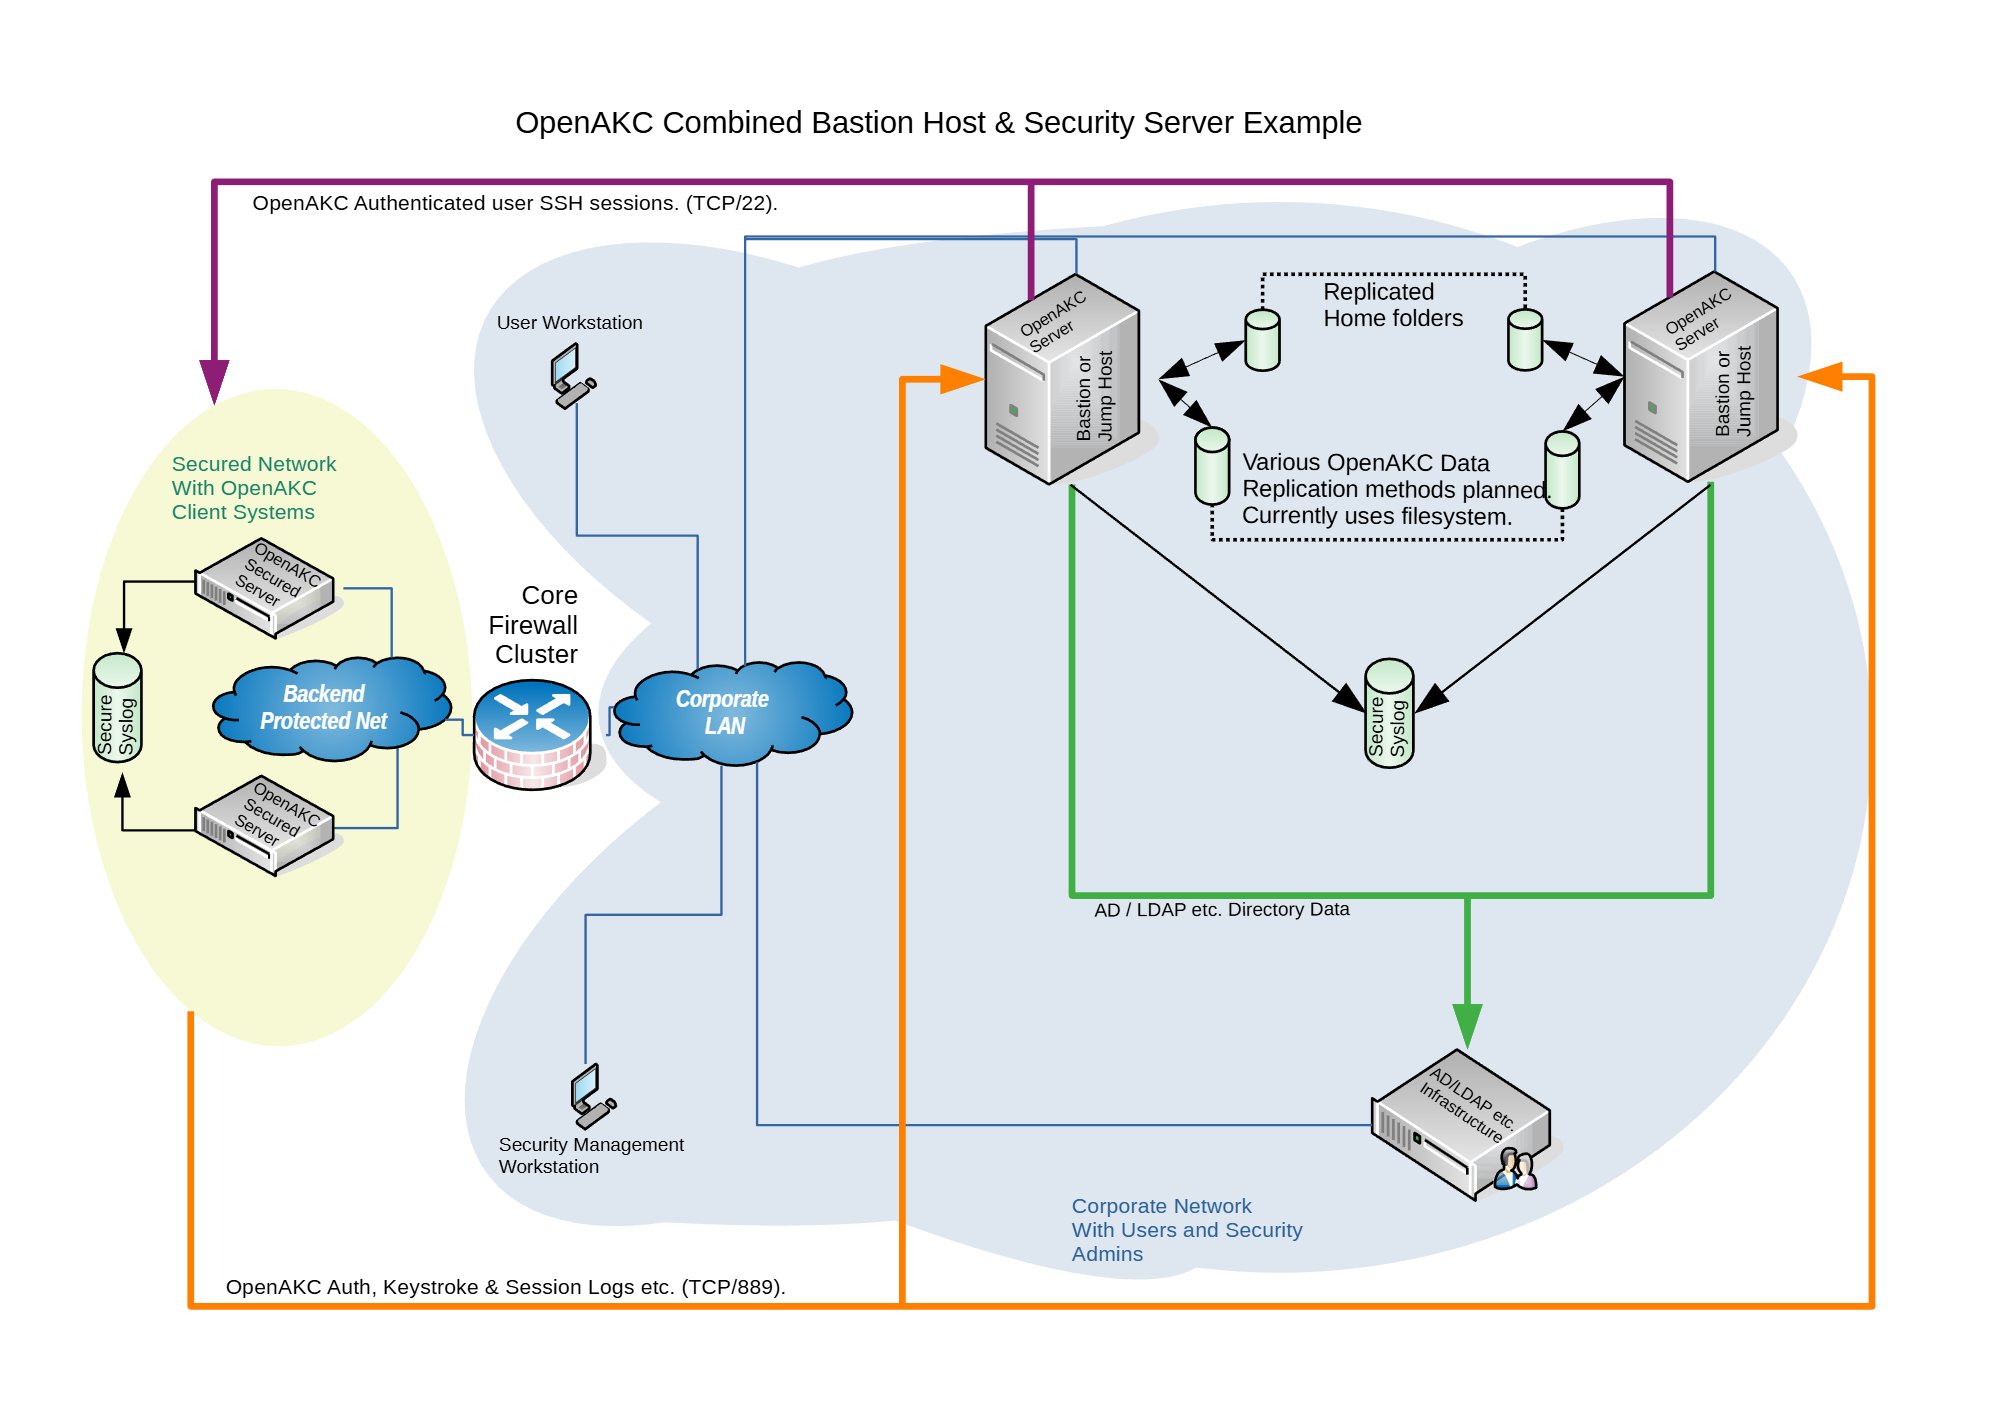
Architecture Options
OpenAKC supports two deployment architectures depending on the size of your team and estate. Both can be scaled out for redundancy.

OpenAKC Architecture Overview (source: netlore.github.io/OpenAKC)

✨ Special Features
Practical Deployment Guide
This walkthrough covers the segregated architecture (separate jump host and security server). We are deploying on CentOS 7.
⚠️ Prerequisites: Two CentOS 7 machines deployed. Active Directory configured with a user in a Linux group. Disable firewalld and selinux on your machines before proceeding.
⚠️ The original repo source code does not support newer OS’s. I have updated all the code to work with newer versions and written automations to deploy it for any environment
👤 Adding New Users
Once the infrastructure is in place, onboarding a new user takes about 60 seconds:
Add user to AD and the appropriate Linux group
SSH to the jump host and generate keys:
ssh-keygen -t rsa
Register with OpenAKC:
openakc register
Done. The user can now SSH to any machine in the estate.
OpenAKC in Action

Live demo of OpenAKC authentication and session management
This is how you set up SSH security properly. No more blind trust, no more unaudited root, no more domain-joined attack surfaces.
Special thanks to James for teaching me this while @ LSE and for the innovation behind this project.
How to add a custom tomcat installation to SystemD with ansible.
Okay so say you have a custom install of tomcat and java, which is what a lot of people do because java update and tomcat updates can bring things down. So things need to be tested before updates and standard patch cycles can end up affecting the environment.
But you want to handle the startup and stopping via systemd to be able to get status outputs and let system handle the service on reboots. This is how to do it slick.
Ansible Setup:
Role:
Setup the new role:
Main.yml
===========================================
Note: this will install the redhat tomcat version of tomcat. Do not worry we are not going to be using this tomcat. This is just so redhat automatically setups all the needed services and locations. We will then update the SystemD config for tomcat to use the custom version.
– name: Install the latest version of tomcat
package:
name: tomcat
state: latest
Note: This symlink is important as tomcat default install by redhat is inside /opt/tomcat. Update the src to the custom location of your tomcat
– name: Create symbolic link for “tomcat” in /opt
file:
src: /custom/install/tomcat
path: /opt/tomcat
force: yes
state: link
Note: This will enable tomcat to start up on reboot
– name: Enable tomcat service on startup
shell: systemctl enable tomcat
Note: This is the tomcat systemd service file that systemd uses for the default install. We are going to empty.
– name: Null tomcat.service file
shell: “>/etc/systemd/system/tomcat.service“
Note: We are now going to add our custom block for tomcat into the tomcat.service file we just emptied above using the blockinfle module. This means that this whole section will also be managed by ansible as well. Make sure you adjust the java_home if your java isn’t location inside tomcat. Along with the user,group,umask for to your custom tomcat.
– name: Edit tomcat.service for systemd
blockinfile:
dest: /etc/systemd/system/tomcat.service
insertafter:
block: |
[Unit]
Description=Apache Tomcat Web Application Container
After=syslog.target network.target
[Service]
Type=forking
Environment=JAVA_HOME=/opt/tomcat
Environment=CATALINA_PID=/opt/tomcat/temp/tomcat.pid
Environment=CATALINA_HOME=/opt/tomcat
Environment=CATALINA_BASE=/opt/tomcat
Environment=’CATALINA_OPTS=-Xms512M -Xmx1024M -server –XX:+UseParallelGC‘
Environment=’JAVA_OPTS=-Djava.awt.headless=true –Djava.security.egd=file:/dev/./urandom‘
ExecStart=/opt/tomcat/bin/startup.sh
ExecStop=/bin/kill -15 $MAINPID
User=tomcat
Group=tomcat
UMask=
RestartSec=10
Restart=always
[Install]
WantedBy=multi-user.target
Note: This will then reload the custom tomcat via systemd
– name: Start tomcat service with Systemd
systemd:
name: tomcat
daemon_reload: yes
Note: This will then check to see if the new tomcat is service running and out to the ansible playbook log.
– name: get service facts
service_facts:
– name: Check to see if tomcat is running
debug:
var: ansible_facts.services[“tomcat.service“]
Ansibe playbook log:
[root@nickansible]# ansible-playbook –i inventory/DEV/hosts justtomcatrole.yml –limit ‘nicktestvm‘ -k
SSH password:
PLAY [all] ************************************************************************************************************************************************************************************************
TASK [AddTomCatSystemD : Create symbolic link for “tomcat” in /opt] ***************************************************************************************************************************************
changed: nicktestvm]
TASK [AddTomCatSystemD : Enable tomcat service on startup] ************************************************************************************************************************************************
changed: nicktestvm]
TASK [AddTomCatSystemD : Null tomcat.service file] ********************************************************************************************************************************************************
changed: nicktestvm]
TASK [AddTomCatSystemD : Edit tomcat.service for systemd] *************************************************************************************************************************************************
changed: nicktestvm]
TASK [AddTomCatSystemD : Start tomcat service with Systemd] ***********************************************************************************************************************************************
ok: nicktestvm]
TASK [AddTomCatSystemD : get service facts] ***************************************************************************************************************************************************************
ok: nicktestvm]
TASK [AddTomCatSystemD : Check to see if tomcat is running] ***********************************************************************************************************************************************
ok: nicktestvm] => {
“ansible_facts.services[\”tomcat.service\”]”: {
“name”: “tomcat.service“,
“source”: “systemd“,
“state”: “running”,
“status”: “enabled”
}
}
PLAY RECAP ************************************************************************************************************************************************************************************************
nicktestvm : ok=7 changed=4 unreachable=0 failed=0 skipped=0 rescued=0 ignored=0
==========================
[root@nicktestvm ~]# cat /etc/systemd/system/tomcat.service
# BEGIN ANSIBLE MANAGED BLOCK
[Unit]
Description=Apache Tomcat Web Application Container
After=syslog.target network.target
[Service]
Type=forking
Environment=JAVA_HOME=/opt/tomcat
Environment=CATALINA_PID=/opt/tomcat/temp/tomcat.pid
Environment=CATALINA_HOME=/opt/tomcat
Environment=CATALINA_BASE=/opt/tomcat
Environment=’CATALINA_OPTS=-Xms512M -Xmx1024M -server -XX:+UseParallelGC’
Environment=’JAVA_OPTS=-Djava.awt.headless=true -Djava.security.egd=file:/dev/./urandom’
ExecStart=/opt/tomcat/bin/startup.sh
ExecStop=/bin/kill -15 $MAINPID
User=tomcat
Group=tomcat
UMask=0028
RestartSec=10
Restart=always
[Install]
WantedBy=multi-user.target
# END ANSIBLE MANAGED BLOCK
SystemD Status:
root@nicktestvm ~]# systemctl status tomcat
● tomcat.service – Apache Tomcat Web Application Container
Loaded: loaded (/etc/systemd/system/tomcat.service; enabled; vendor preset: disabled)
Active: active (running) since Thu 2020-12-24 05:11:21 GMT; 21h ago
Process: 6333 ExecStop=/bin/kill -15 $MAINPID (code=exited, status=0/SUCCESS)
Process: 6353 ExecStart=/opt/tomcat/bin/startup.sh (code=exited, status=0/SUCCESS)
Main PID: 6363 (java)
CGroup: /system.slice/tomcat.service
└─6363 /usr/local/java/java -Djava.util.logging.config.file=/opt/tomcat/conf/logging.properties -Djava.util.logging.manager=org.apache.juli.ClassLoaderLogManager -server -Xms1…
Dec 24 05:11:21 nicktestvm systemd[1]: Starting Apache Tomcat Web Application Container…
Dec 24 05:11:21 nicktestvm startup.sh[6353]: Existing PID file found during start.
Dec 24 05:11:21 nicktestvm startup.sh[6353]: Removing/clearing stale PID file.
Dec 24 05:11:21 nicktestvm systemd[1]: Started Apache Tomcat Web Application Container.
How to check if ports are open on an array of servers
Okay now there is a whole bunch of ways you can do this. This is just the way I played around with to save myself a bunch of time, using NCAT. Also previously known as NETCAT.
1.Ensure your Jumphost can ssh to all your newely deployed machines. Either you will use a root password or ssh key of some sort.
Note (ensure you have this install on all the new servers)
portcheckscriptnick.sh – this will check to see if your new server can talk to all the hosts below and check to see if those ports are up or down on each
============================
#!/bin/bash
host=”nick1 nick2 nick3 nick4″
for host in $host; do
for port in 22 53 67 68
do
if ncat -z $host $port
then
echo port $port $host is up
else
echo port $port $host is down
fi
done
done
========================================
Example:
Server1
Server2
Server3
Server4
6.Run the following below check the servers and see if each server can communicate with the hosts and ports necessary. If you see the are down. Then you will need to check the firewalls to see why the host is unable to communicate.
• for HOST in $(cat server.txt) ; do ssh root@$HOST “bash -s” < portcheckscriptnick.sh ; echo $HOST ; done 2>&1 | tee -a port.status
Note: the file port.status will be created on the jump host and you can simply look through to see if any ports were down on whichever hosts.
This is what the script looks like on one host if its working properly
[root@nick ~]# ./portcheckscriptnick.sh
port 22 192.168.1.11 is up
port 53 192.168.1.11 is down
port 67 192.168.1.11 is down
port 68 192.168.1.11 is down
This is what it will look like when you run against your array of new hosts from your jumpbox
[root@nick ~]# for HOST in $(cat servers.txt) ; do ssh root@$HOST “bash -s” < portcheckscriptnick.sh ; echo $HOST ; done
root@192.168.1.11’s password:
port 22 nick1 is up
port 53 nick1 is down
port 67 nick1 is down
port 68 nick1 is down
port 22 nick2 is up
port 53 nick2 is down
port 67 nick2 is down
port 68 nick2 is down
How to setup SMTP port redirect with IPTABLES and NAT
RedHat/Centos
Okay its really easy to do. You will need to add the following in /etc/sysctl.conf
Note: these are kernel parameter changes
kernel.sysrq = 1
net.ipv4.tcp_syncookies=1
net/ipv4/ip_forward=1 (important)
net.ipv4.conf.all.route_localnet=1 (important)
net.ipv4.conf.default.send_redirects = 0
net.ipv4.conf.all.send_redirects = 0
It will probably look something like the rules below.
EXAMPLE
# Generated by iptables-save v1.2.8 on Thu July 6 18:50:55 2020
*filter
:INPUT ACCEPT [0:0]
:FORWARD ACCEPT [0:0]
:OUTPUT ACCEPT [2211:2804881]
:RH-Firewall-1-INPUT – [0:0]
-A INPUT -j RH-Firewall-1-INPUT
-A FORWARD -j RH-Firewall-1-INPUT
-A RH-Firewall-1-INPUT -i lo -j ACCEPT
-A RH-Firewall-1-INPUT -p icmp -m icmp –icmp-type 255 -j ACCEPT
-A RH-Firewall-1-INPUT -p esp -j ACCEPT
-A RH-Firewall-1-INPUT -p ah -j ACCEPT
-A RH-Firewall-1-INPUT -m state –state RELATED,ESTABLISHED -j ACCEPT
-A RH-Firewall-1-INPUT -p tcp -m tcp –dport 1025-m state –state NEW -j ACCEPT (make sure to have open)
-A RH-Firewall-1-INPUT -p tcp -m tcp –dport 443 -m state –state NEW -j ACCEPT
-A RH-Firewall-1-INPUT -p tcp -m tcp –dport 8443 -m state –state NEW -j ACCEPT
-A RH-Firewall-1-INPUT -p tcp -m tcp –dport 25 -m state –state NEW -j ACCEPT (make sure to have open)
-A RH-Firewall-1-INPUT -p tcp -m tcp –dport 80 -m state –state NEW -j ACCEPT
-A RH-Firewall-1-INPUT -p tcp -m tcp –dport 21 -m state –state NEW -j ACCEPT
-A RH-Firewall-1-INPUT -p tcp -m tcp –dport 22 -m state –state NEW -j ACCEPT
-A RH-Firewall-1-INPUT -p tcp -m tcp –dport 106 -m state –state NEW -j ACCEPT
-A RH-Firewall-1-INPUT -p tcp -m tcp –dport 143 -m state –state NEW -j ACCEPT
-A RH-Firewall-1-INPUT -p tcp -m tcp –dport 465 -m state –state NEW -j ACCEPT
-A RH-Firewall-1-INPUT -p tcp -m tcp –dport 993 -m state –state NEW -j ACCEPT
-A RH-Firewall-1-INPUT -p tcp -m tcp –dport 995 -m state –state NEW -j ACCEPT
-A RH-Firewall-1-INPUT -p tcp -m tcp –dport 8222 -m state –state NEW -j ACCEPT
-A RH-Firewall-1-INPUT -j REJECT –reject-with icmp-host-prohibited
COMMIT
#ADD this section with another Commit like below
# Completed on Thu July 6 18:50:55 2020
# Generated by iptables-save v1.2.8 on Thu July 6 18:50:55 2020
*nat
:PREROUTING ACCEPT [388:45962]
:POSTROUTING ACCEPT [25:11595]
:OUTPUT ACCEPT [25:11595]
-A PREROUTING -p tcp -m tcp –dport 1025 -j REDIRECT –to-ports 25
COMMIT
# Completed on Thu July 6 18:50:55 2020
[root@nick ~]# iptables -L -n | grep 1025
ACCEPT tcp — 0.0.0.0/0 0.0.0.0/0 tcp dpt:1025 state NEW
[root@nick ~]# iptables -L -n -t nat| grep 1025
REDIRECT tcp — 0.0.0.0/0 0.0.0.0/0 tcp dpt:1025 redir ports 25
Note:
You will need to run telnet from outside the host as you cant NAT to localhost locally. 🙂
[root@nick1 ~]# telnet 192.168.86.111 1025
Trying 192.168.86.111…
Connected to localhost.
Escape character is ‘^]’.
220 nick.ansible.com ESMTP Postfix
How to rebuild a drive that’s fallen out of a software raid
Now I know nobody uses this kind of raid technology anymore, but it was one of the cool things I learned from my mentor at the time, when I first started my career centuries ago. I happen to find this in my archives and thought I would write up to share.
There is another way to do this as using mdadm & sfdisk. When I find time I will share how to do that as well.
1.First thing you want to do is check to see drive has fallen out of the raid by running the following command below
md2 : active raid1 hda3[0] hdc3[1]
524096 blocks [2/2] [UU]
md1 : active raid1 hda2[0] hdc2[1]
524096 blocks [2/2] [UU]
md0 : active raid1 hda1[0]
78994304 blocks [2/1] [U_] *You notice this one is showing a drive has fallen out*
Note: If you see this, take notice to the one with [U_] this line means that the drive has fallen out of the raid.
1. To enter it back in run the lines below, based on the drive assignments in the above paritions that are good.
How to rebuild a failed drive in software if you replaced the drive:
• cat /proc/mdstat
md2 : active raid1 hda3[0] hdc3[1]
524096 blocks [2/2] [UU]
md1 : active raid1 hda2[0] hdc2[1]
524096 blocks [2/2] [UU]
md0 : active raid1 hda1[0]
78994304 blocks [2/1] [U_]
2. recreate the paritions on the new drive by doing the following, using the same mirror drive designations from /proc/mdstat.
3. Next check the partition by running
Disk /dev/hdc: 81.9 GB, 81964302336 bytes
16 heads, 63 sectors/track, 158816 cylinders
Units = cylinders of 1008 * 512 = 516096 bytes
Device Boot Start End Blocks Id System
/dev/hdc1 * 1 156735 78994408+ fd Linux raid autodetect
/dev/hdc2 156736 157775 524160 fd Linux raid autodetect
/dev/hdc3 157776 158815 524160 fd Linux raid autodetect
Disk /dev/hda: 81.9 GB, 81964302336 bytes
16 heads, 63 sectors/track, 158816 cylinders
Units = cylinders of 1008 * 512 = 516096 bytes
Device Boot Start End Blocks Id System
/dev/hda1 * 1 156735 78994408+ fd Linux raid autodetect
/dev/hda2 156736 157775 524160 fd Linux raid autodetect
/dev/hda3 157776 158815 524160 fd Linux raid autodetect
———————————————————————
Filesystem Size Used Avail Use% Mounted on
/dev/md0 75G 11G 60G 16% /
none 251M 0 251M 0% /dev/shm
/dev/md1 496M 8.1M 463M 2% /tmp
4. Next you want it rebuild the partitions on the new drive so run the following, you will need to update your drive designation according to your drive assignment.
Note: the primary partition should match the new drive designation ‘dev/md0 /dev/hdc1’.
How to add a new SCSI LUN while server is Live
REDHAT/CENTOS:
In order to get wwn ids from a server:
Or:
Run this to find the new disks after you have added them to your VM
Note: rescan-scsi-bus.sh is part of the sg3-utils package
# That’s it, unless you want to fix the name from mpath(something) to something else
• vi /etc/multipath_bindings
# Go into the multipath consolde and re add the multipath device with your new shortcut name (nickdsk2 in this case)
• add map nickdsk2
Note: Not going to lie, sometimes you could do all this and still need a reboot, majority of the time this should work. But what do i know…haha
How to figure out switch and port via tcpdump
Okay if you have ever worked in a place where their network was complete choas with no documentation or network maps to help you figure out where something resides.
You can sometimes use tcpdump to help you figure out where the server is sitting by using tcpdump.
Syntax
tcpdump -nn -v -i <NIC_INTERFACE> -s 1500 -c 1 ‘ether[20:2] == 0x2000’
Example:
root@ansible:~ # tcpdump –nn -v –i eth0 -s 1500 -c 1 ‘ether[20:2] == 0x2000’
tcpdump: listening on eth3, link-type EN10MB (Ethernet), capture size 1500 bytes
03:25:22.146564 CDPv2, ttl: 180s, checksum: 692 (unverified), length 370
Device-ID (0x01), length: 11 bytes: ‘switch-sw02‘
Address (0x02), length: 13 bytes: IPv4 (1) 192.168.1.15
Port-ID (0x03), length: 15 bytes: ‘Ethernet0/1‘
Capability (0x04), length: 4 bytes: (0x00000028): L2 Switch, IGMP snooping
Version String (0x05), length: 220 bytes:
Cisco Internetwork Operating System Software
IOS ™ C2950 Software (C2950-I6Q4L2-M), Version 12.1(14)EA1a, RELEASE SOFTWARE (fc1)
Copyright (c) 1986-2003 by cisco Systems, Inc.
Compiled Tue 02-Sep-03 03:33 by Nicola tesla
Platform (0x06), length: 18 bytes: ‘cisco WS-C2950T-24’
Protocol-Hello option (0x08), length: 32 bytes:
VTP Management Domain (0x09), length: 6 bytes: ‘ecomrd‘
Duplex (0x0b), length: 1 byte: full
AVVID trust bitmap (0x12), length: 1 byte: 0x00
AVVID untrusted ports CoS (0x13), length: 1 byte: 0x00
1 packets captured
2 packets received by filter
0 packets dropped by kernel
root@ansible:~ #
Written by Nick Tailor
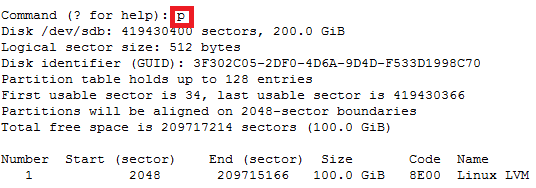
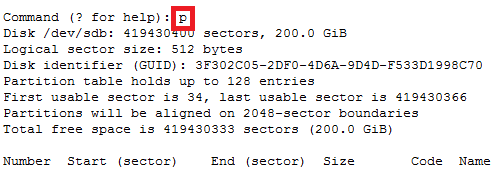
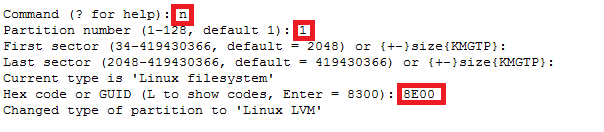
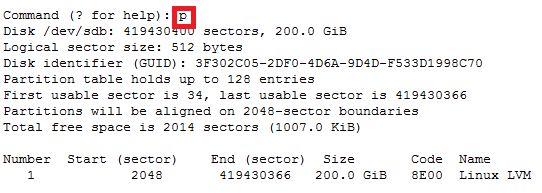
How to increase disk size on virtual scsi drive using gpart
Power ON VM guest after editing disk size.
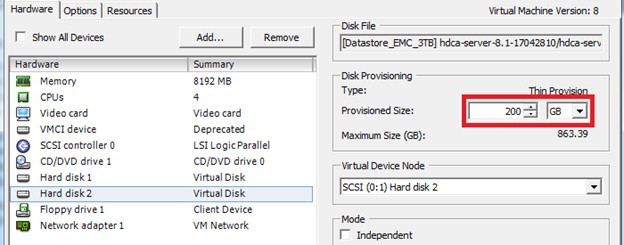

ls -d /sys/block/sd*/device/scsi_device/* |awk -F ‘[/]’ ‘{print $4,”- SCSI”,$7}’
service crond stop
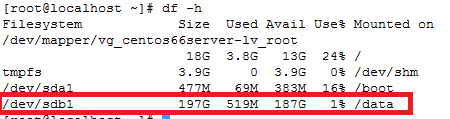
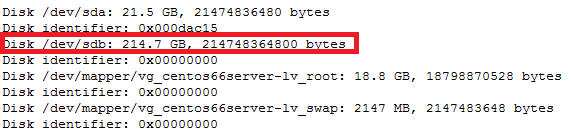
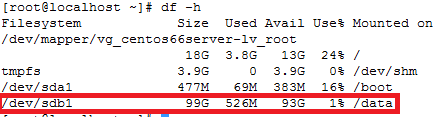
Note: If you observe “Device is busy” error then make sure that your current session is not in /data partition.
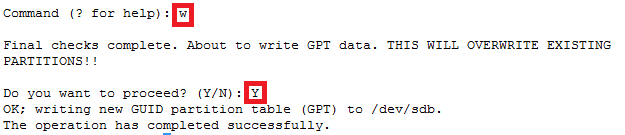
For GPT partition type
In this case parted -l command will give below for “sdb” disk partition
*****************************************************
Model: VMware Virtual disk (scsi)
Disk /dev/sdb: 215GB
Sector size (logical/physical): 512B/512B
Partition Table: gpt
Number Start End Size File system Name Flags
1 1049kB 215GB 215GB ext4 Linux LVM lvm
*****************************************************