Category: Terraform
Deploying Production-Grade Systems on Oracle Cloud Infrastructure (OCI) with Terraform
Launching a virtual machine is easy. Running secure, reliable, production-grade systems is not. This guide shows how to deploy enterprise-ready compute infrastructure on Oracle Cloud Infrastructure (OCI) using Terraform, with a focus on security, fault tolerance, and long-term operability.
What “Production-Grade” Actually Means
A production environment is defined by predictability, not convenience. Production systems must survive failures, scale safely, and be observable at all times.
- Private networking by default
- No public SSH access
- Replaceable compute instances
- Persistent storage separated from OS
- Infrastructure defined as code
Target Architecture Overview
- Private VCN and subnet with NAT gateway for outbound access
- Network Security Groups (NSGs) with explicit rules
- Flex compute shape
- Detached block storage with iSCSI attachment
- SSH key authentication only
This architecture is suitable for:
- SaaS backends
- Internal APIs
- Databases
- AI / ML inference nodes
- HPC control or login nodes
Terraform: Provider Configuration
terraform {
  required_version = ">= 1.6"

  required_providers {
    oci = {
      source  = "oracle/oci"
      version = ">= 5.0.0"
    }
  }
}

provider "oci" {
  tenancy_ocid     = var.tenancy_ocid
  user_ocid        = var.user_ocid
  fingerprint      = var.fingerprint
  private_key_path = var.private_key_path
  region           = var.region
}
This ensures reproducible deployments and enforces secure API-based authentication.
Variables
variable "tenancy_ocid" {
  description = "OCID of the tenancy"
  type        = string
}

variable "user_ocid" {
  description = "OCID of the user calling the API"
  type        = string
}

variable "fingerprint" {
  description = "Fingerprint of the API signing key"
  type        = string
}

variable "private_key_path" {
  description = "Path to the private key for API authentication"
  type        = string
}

variable "region" {
  description = "OCI region identifier"
  type        = string
}

variable "compartment_ocid" {
  description = "OCID of the compartment for resources"
  type        = string
}

variable "image_ocid" {
  description = "OCID of the compute image (e.g., Oracle Linux 8)"
  type        = string
}

variable "ssh_public_key" {
  description = "Path to SSH public key file"
  type        = string
}

variable "allowed_cidr" {
  description = "CIDR block allowed to access instances (e.g., VPN range)"
  type        = string
  default     = "10.0.0.0/16"
}
Data Sources
data "oci_identity_availability_domains" "ads" {
  compartment_id = var.tenancy_ocid
}

locals {
  availability_domain = data.oci_identity_availability_domains.ads.availability_domains[0].name
}
This retrieves the list of availability domains in your region. We select the first AD for simplicity, but production deployments should consider multi-AD placement.
Virtual Cloud Network (VCN)
resource "oci_core_vcn" "prod_vcn" {
  cidr_blocks    = ["10.0.0.0/16"]
  display_name   = "prod-vcn"
  dns_label      = "prodvcn"
  compartment_id = var.compartment_ocid
}
A /16 CIDR allows future expansion without redesign. VCNs act as the first isolation boundary for production systems.
Internet Gateway
resource "oci_core_internet_gateway" "igw" {
  compartment_id = var.compartment_ocid
  vcn_id         = oci_core_vcn.prod_vcn.id
  display_name   = "prod-igw"
  enabled        = true
}
The internet gateway enables outbound connectivity for the NAT gateway. It does not expose private instances directly.
NAT Gateway
resource "oci_core_nat_gateway" "nat_gw" {
  compartment_id = var.compartment_ocid
  vcn_id         = oci_core_vcn.prod_vcn.id
  display_name   = "prod-nat-gw"
  block_traffic  = false
}
The NAT gateway allows private subnet instances to reach the internet for package updates and external API calls without exposing inbound access.
Route Tables
resource "oci_core_route_table" "private_rt" {
  compartment_id = var.compartment_ocid
  vcn_id         = oci_core_vcn.prod_vcn.id
  display_name   = "private-route-table"

  route_rules {
    destination       = "0.0.0.0/0"
    destination_type  = "CIDR_BLOCK"
    network_entity_id = oci_core_nat_gateway.nat_gw.id
  }
}
All outbound traffic from the private subnet routes through the NAT gateway. This ensures instances can reach external resources without being directly accessible.
Private Subnet (No Public IPs)
resource "oci_core_subnet" "private_subnet" {
  cidr_block                 = "10.0.1.0/24"
  vcn_id                     = oci_core_vcn.prod_vcn.id
  compartment_id             = var.compartment_ocid
  display_name               = "private-subnet"
  prohibit_public_ip_on_vnic = true
  route_table_id             = oci_core_route_table.private_rt.id
  dns_label                  = "private"
}
Instances in this subnet are never reachable from the internet. Access must go through a bastion, VPN, or private load balancer.
Network Security Groups (NSG)
resource "oci_core_network_security_group" "app_nsg" {
  compartment_id = var.compartment_ocid
  vcn_id         = oci_core_vcn.prod_vcn.id
  display_name   = "app-nsg"
}

# Allow SSH from internal network only
resource "oci_core_network_security_group_security_rule" "allow_ssh" {
  network_security_group_id = oci_core_network_security_group.app_nsg.id
  direction                 = "INGRESS"
  protocol                  = "6" # TCP

  source      = var.allowed_cidr
  source_type = "CIDR_BLOCK"

  tcp_options {
    destination_port_range {
      min = 22
      max = 22
    }
  }
}

# Allow HTTPS from internal network
resource "oci_core_network_security_group_security_rule" "allow_https" {
  network_security_group_id = oci_core_network_security_group.app_nsg.id
  direction                 = "INGRESS"
  protocol                  = "6" # TCP

  source      = var.allowed_cidr
  source_type = "CIDR_BLOCK"

  tcp_options {
    destination_port_range {
      min = 443
      max = 443
    }
  }
}

# Allow all outbound traffic
resource "oci_core_network_security_group_security_rule" "allow_egress" {
  network_security_group_id = oci_core_network_security_group.app_nsg.id
  direction                 = "EGRESS"
  protocol                  = "all"

  destination      = "0.0.0.0/0"
  destination_type = "CIDR_BLOCK"
}

# Allow ICMP for path MTU discovery
resource "oci_core_network_security_group_security_rule" "allow_icmp" {
  network_security_group_id = oci_core_network_security_group.app_nsg.id
  direction                 = "INGRESS"
  protocol                  = "1" # ICMP

  source      = "10.0.0.0/16"
  source_type = "CIDR_BLOCK"

  icmp_options {
    type = 3
    code = 4
  }
}
NSGs provide service-level firewalling and are preferred over subnet-wide security lists. These rules allow SSH and HTTPS only from your internal network, while permitting all outbound traffic.
Compute Instance (Flex Shape)
resource "oci_core_instance" "prod_instance" {
  availability_domain = local.availability_domain
  compartment_id      = var.compartment_ocid
  display_name        = "prod-app-01"
  shape               = "VM.Standard.E4.Flex"

  shape_config {
    ocpus         = 2
    memory_in_gbs = 16
  }

  create_vnic_details {
    subnet_id        = oci_core_subnet.private_subnet.id
    assign_public_ip = false
    nsg_ids          = [oci_core_network_security_group.app_nsg.id]
    hostname_label   = "prod-app-01"
  }

  source_details {
    source_type             = "image"
    source_id               = var.image_ocid
    boot_volume_size_in_gbs = 50
  }

  metadata = {
    ssh_authorized_keys = file(var.ssh_public_key)
  }

  preserve_boot_volume = true
}
Flex shapes allow independent scaling of CPU and memory, ensuring predictable performance without overpaying for unused resources. Setting preserve_boot_volume = true protects the boot volume if the instance is accidentally terminated.
Persistent Block Storage
resource "oci_core_volume" "data_volume" {
  availability_domain = local.availability_domain
  compartment_id      = var.compartment_ocid
  display_name        = "prod-data-vol"
  size_in_gbs         = 200
  vpus_per_gb         = 10 # Balanced performance tier
}

resource "oci_core_volume_attachment" "data_attach" {
  attachment_type = "paravirtualized"
  instance_id     = oci_core_instance.prod_instance.id
  volume_id       = oci_core_volume.data_volume.id
  display_name    = "prod-data-attachment"
}
Separating OS and data ensures instances are disposable while data remains protected. Paravirtualized attachments are simpler than iSCSI and work automatically on Oracle Linux.
Post-Deployment: Mounting the Block Volume
After Terraform applies, SSH into the instance and mount the volume:
# Find the attached volume (usually /dev/sdb)
lsblk

# Create filesystem (first time only)
sudo mkfs.xfs /dev/sdb

# Create mount point and mount
sudo mkdir -p /data
sudo mount /dev/sdb /data

# Add to fstab for persistence across reboots
echo '/dev/sdb /data xfs defaults,_netdev,nofail 0 2' | sudo tee -a /etc/fstab
The _netdev and nofail options ensure the system boots even if the volume is temporarily unavailable.
Outputs
output "instance_private_ip" {
  description = "Private IP address of the compute instance"
  value       = oci_core_instance.prod_instance.private_ip
}

output "instance_id" {
  description = "OCID of the compute instance"
  value       = oci_core_instance.prod_instance.id
}

output "vcn_id" {
  description = "OCID of the VCN"
  value       = oci_core_vcn.prod_vcn.id
}

output "volume_id" {
  description = "OCID of the data volume"
  value       = oci_core_volume.data_volume.id
}
Security & Operational Checklist
- ✓ No public SSH access
- ✓ Key-based authentication only
- ✓ Private networking with NAT for outbound
- ✓ Explicit NSG rules (no default allow)
- ✓ Persistent storage with separate lifecycle
- ✓ Infrastructure fully defined in code
- ✓ Boot volume preservation enabled
What to Add Next
- Bastion Service – OCI’s managed bastion for secure SSH access without VPN
- Site-to-Site VPN – Connect to on-premises networks
- OCI Load Balancer – For multi-instance deployments
- Monitoring and Alerting – OCI Monitoring service with custom alarms
- Dynamic Groups and IAM policies – Instance principals for secure API access
- Cloud-init or Ansible – OS hardening and application deployment
- CI/CD pipelines – GitOps workflow for Terraform changes
- Volume backups – Scheduled backup policies for data protection
Example terraform.tfvars
tenancy_ocid     = "ocid1.tenancy.oc1..aaaaaaaaexample"
user_ocid        = "ocid1.user.oc1..aaaaaaaaexample"
fingerprint      = "aa:bb:cc:dd:ee:ff:00:11:22:33:44:55:66:77:88:99"
private_key_path = "~/.oci/oci_api_key.pem"
region           = "eu-frankfurt-1"
compartment_ocid = "ocid1.compartment.oc1..aaaaaaaaexample"
image_ocid       = "ocid1.image.oc1.eu-frankfurt-1.aaaaaaaaexample"
ssh_public_key   = "~/.ssh/id_rsa.pub"
allowed_cidr     = "10.0.0.0/16"
Nick Tailor’s Thoughts
Production infrastructure is not about clicking faster. It is about repeatability, security, and recovery. OCI combined with Terraform provides an extremely strong foundation when engineered correctly from day one.
If you treat infrastructure as software, production becomes predictable.
The complete code from this guide is available as a ready-to-use Terraform module. Clone it, update your variables, and run terraform apply to deploy.
How to Deploy Another VPC in AWS with Scalable EC2’s for HA using Terraform
So we are going to do this a bit different than the other post. As the other post is just deploying one instance in an existing VPC.
This one is more fun. The structure we will use this time will allow you to scale your ec2 instances very cleanly. If you are using git repos to push out changes. Then having a main.tf for your instance is much simpler to manage at scale.
File structure:
terraform-project/
├── main.tf <– Your main configuration file
├── variables.tf <– Variables file that has the inputs to pass
├── outputs.tf <– Outputs file
├── security_group.tf <– File containing security group rules
└── modules/
└── instance/
├── main.tf <- this file contains your ec2 instances
└── variables.tf <- variable file that defines we will pass for the module in main.tf to use
Explaining the process:
Main.tf
provider “aws“ {
region = “us-west-2”
}
resource “aws_key_pair“ “my-nick-test-key” {
key_name = “my-nick-test-key”
public_key = file(“${path.module}/terraform-aws-key.pub”)
}
resource “aws_vpc“ “vpc2” {
cidr_block = “10.0.0.0/16”
}
resource “aws_subnet“ “newsubnet“ {
vpc_id = aws_vpc.vpc2.id
cidr_block = “10.0.1.0/24”
map_public_ip_on_launch = true
}
module “web_server“ {
source = “./module/instance”
ami_id = var.ami_id
instance_type = var.instance_type
key_name = var.key_name_instance
subnet_id = aws_subnet.newsubnet.id
instance_count = 2 // Specify the number of instances you want
security_group_id = aws_security_group.newcpanel.id
}
Variables.tf
variable “ami_id“ {
description = “The AMI ID for the instance”
default = “ami-0913c47048d853921” // Amazon Linux 2 AMI ID
}
variable “instance_type“ {
description = “The instance type for the instance”
default = “t2.micro“
}
variable “key_name_instance“ {
description = “The key pair name for the instance”
default = “my-nick-test-key”
}
Security_group.tf
resource “aws_security_group“ “newcpanel“ {
name = “newcpanel“
description = “Allow inbound traffic”
vpc_id = aws_vpc.vpc2.id
// POP3 TCP 110
ingress {
from_port = 110
to_port = 110
protocol = “tcp“
cidr_blocks = [“0.0.0.0/0”]
}
// Custom TCP 20
ingress {
from_port = 20
to_port = 20
protocol = “tcp“
cidr_blocks = [“0.0.0.0/0”]
}
// Custom TCP 587
ingress {
from_port = 587
to_port = 587
protocol = “tcp“
cidr_blocks = [“0.0.0.0/0”]
}
// DNS (TCP) TCP 53
ingress {
from_port = 53
to_port = 53
protocol = “tcp“
cidr_blocks = [“0.0.0.0/0”]
}
// SMTPS TCP 465
ingress {
from_port = 465
to_port = 465
protocol = “tcp“
cidr_blocks = [“0.0.0.0/0”]
}
// HTTPS TCP 443
ingress {
from_port = 443
to_port = 443
protocol = “tcp“
cidr_blocks = [“0.0.0.0/0”]
}
// DNS (UDP) UDP 53
ingress {
from_port = 53
to_port = 53
protocol = “udp“
cidr_blocks = [“0.0.0.0/0”]
}
// IMAP TCP 143
ingress {
from_port = 143
to_port = 143
protocol = “tcp“
cidr_blocks = [“0.0.0.0/0”]
}
// IMAPS TCP 993
ingress {
from_port = 993
to_port = 993
protocol = “tcp“
cidr_blocks = [“0.0.0.0/0”]
}
// Custom TCP 21
ingress {
from_port = 21
to_port = 21
protocol = “tcp“
cidr_blocks = [“0.0.0.0/0”]
}
// Custom TCP 2086
ingress {
from_port = 2086
to_port = 2086
protocol = “tcp“
cidr_blocks = [“0.0.0.0/0”]
}
// Custom TCP 2096
ingress {
from_port = 2096
to_port = 2096
protocol = “tcp“
cidr_blocks = [“0.0.0.0/0”]
}
// HTTP TCP 80
ingress {
from_port = 80
to_port = 80
protocol = “tcp“
cidr_blocks = [“0.0.0.0/0”]
}
// SSH TCP 22
ingress {
from_port = 22
to_port = 22
protocol = “tcp“
cidr_blocks = [“0.0.0.0/0”]
}
// POP3S TCP 995
ingress {
from_port = 995
to_port = 995
protocol = “tcp“
cidr_blocks = [“0.0.0.0/0”]
}
// Custom TCP 2083
ingress {
from_port = 2083
to_port = 2083
protocol = “tcp“
cidr_blocks = [“0.0.0.0/0”]
}
// Custom TCP 2087
ingress {
from_port = 2087
to_port = 2087
protocol = “tcp“
cidr_blocks = [“0.0.0.0/0”]
}
// Custom TCP 2095
ingress {
from_port = 2095
to_port = 2095
protocol = “tcp“
cidr_blocks = [“0.0.0.0/0”]
}
// Custom TCP 2082
ingress {
from_port = 2082
to_port = 2082
protocol = “tcp“
cidr_blocks = [“0.0.0.0/0”]
}
}
output “newcpanel_sg_id“ {
value = aws_security_group.newcpanel.id
description = “The ID of the security group ‘newcpanel‘”
}
Outputs.tf
output “public_ips“ {
value = module.web_server.public_ips
description = “List of public IP addresses for the instances.”
}
Okay so now we want to create the scalable ec2
We create a modules/instance directory and inside here define the instances as resources
modules/instance/main.tf
resource “aws_instance“ “Tailor-Server” {
count = var.instance_count // Control the number of instances with a variable
ami = var.ami_id
instance_type = var.instance_type
subnet_id = var.subnet_id
key_name = var.key_name
vpc_security_group_ids = [var.security_group_id]
tags = {
Name = format(“Tailor-Server%02d”, count.index + 1) // Naming instances with a sequential number
}
root_block_device {
volume_type = “gp2”
volume_size = 30
delete_on_termination = true
}
}
Modules/instance/variables.tf
Each variable serves as an input that can be set externally when the module is called, allowing for flexibility and reusability of the module across different environments or scenarios.
So here we defining it as a list of items we need to pass for the module to work. We will later provide the actual parameter to pass to the variables being called in the main.tf
Cheat sheet:
ami_id: Specifies the Amazon Machine Image (AMI) ID that will be used to launch the EC2 instances. The AMI determines the operating system and software configurations that will be loaded onto the instances when they are created.
instance_type: Determines the type of EC2 instance to launch. This affects the computing resources available to the instance (CPU, memory, etc.).
Type: It is expected to be a string that matches one of AWS’s predefined instance types (e.g., t2.micro, m5.large).
key_name: Specifies the name of the key pair to be used for SSH access to the EC2 instances. This key should already exist in the AWS account.
subnet_id: Identifies the subnet within which the EC2 instances will be launched. The subnet is part of a specific VPC (Virtual Private Cloud).
instance_names: A list of names to be assigned to the instances. This helps in identifying the instances within the AWS console or when querying using the AWS CLI.
security_group_Id: Specifies the ID of the security group to attach to the EC2 instances. Security groups act as a virtual firewall for your instances to control inbound and outbound traffic.
variable “ami_id“ {}
variable “instance_type“ {}
variable “key_name“ {}
variable “subnet_id“ {}
variable “instance_names“ {
type = list(string)
description = “List of names for the instances to create.”
}
variable “security_group_id“ {
description = “Security group ID to assign to the instance”
type = string
}
variable “instance_count“ {
description = “The number of instances to create”
type = number
default = 1 // Default to one instance if not specified
}
Time to deploy your code: I didnt bother showing the plan here just the apply
my-terraform-vpc$ terraform apply
Do you want to perform these actions?
Terraform will perform the actions described above.
Only ‘yes’ will be accepted to approve.
Enter a value: yes
aws_subnet.newsubnet: Destroying… [id=subnet-016181a8999a58cb4]
aws_subnet.newsubnet: Destruction complete after 1s
aws_subnet.newsubnet: Creating…
aws_subnet.newsubnet: Still creating… [10s elapsed]
aws_subnet.newsubnet: Creation complete after 11s [id=subnet-0a5914443d2944510]
module.web_server.aws_instance.Tailor-Server[1]: Creating…
module.web_server.aws_instance.Tailor-Server[0]: Creating…
module.web_server.aws_instance.Tailor-Server[1]: Still creating… [10s elapsed]
module.web_server.aws_instance.Tailor-Server[0]: Still creating… [10s elapsed]
module.web_server.aws_instance.Tailor-Server[0]: Still creating… [20s elapsed]
module.web_server.aws_instance.Tailor-Server[1]: Still creating… [20s elapsed]
module.web_server.aws_instance.Tailor-Server[1]: Still creating… [30s elapsed]
module.web_server.aws_instance.Tailor-Server[0]: Still creating… [30s elapsed]
module.web_server.aws_instance.Tailor-Server[0]: Still creating… [40s elapsed]
module.web_server.aws_instance.Tailor-Server[1]: Still creating… [40s elapsed]
module.web_server.aws_instance.Tailor-Server[1]: Still creating… [50s elapsed]
module.web_server.aws_instance.Tailor-Server[0]: Still creating… [50s elapsed]
module.web_server.aws_instance.Tailor-Server[0]: Creation complete after 52s [id=i-0d103937dcd1ce080]
module.web_server.aws_instance.Tailor-Server[1]: Still creating… [1m0s elapsed]
module.web_server.aws_instance.Tailor-Server[1]: Still creating… [1m10s elapsed]
module.web_server.aws_instance.Tailor-Server[1]: Creation complete after 1m12s [id=i-071bac658ce51d415]
Apply complete! Resources: 3 added, 0 changed, 1 destroyed.
Outputs:
newcpanel_sg_id = “sg-0df86c53b5de7b348”
public_ips = [
“34.219.34.165”,
“35.90.247.94”,
]
Results:
VPC successful:

EC2 successful:

Security-Groups:


Key Pairs:

Ec2 assigned SG group:

How to deploy an EC2 instance in AWS with Terraform
- How to install terraform
- How to configure your aws cli
- How to steup your file structure
- How to deploy your instance
- You must have an AWS account already setup
- You have an existing VPC
- You have existing security groups
Depending on which machine you like to use. I use varied distros for fun.
For this we will use Ubuntu 22.04
How to install terraform
- Once you are logged into your linux jump box or whatever you choose to manage.
wget -O- https://apt.releases.hashicorp.com/gpg | sudo gpg –dearmor -o /usr/share/keyrings/hashicorp-archive-keyring.gpg
echo “deb [signed-by=/usr/share/keyrings/hashicorp-archive-keyring.gpg] https://apt.releases.hashicorp.com $(lsb_release -cs) main” | sudo tee /etc/apt/sources.list.d/hashicorp.list
sudo apt update && sudo apt install terraform
ThanosJumpBox:~/myterraform$ terraform -v
Terraform v1.8.2
on linux_amd64
+ provider registry.terraform.io/hashicorp/aws v5.47.
- Okay next you want to install the awscli
sudo apt update
sudo apt install awscli
2. Okay Now you need to go into your aws and create a user and aws cli key
- Log into your aws console
- Go to IAM
- Under users create a user called Terrform-thanos
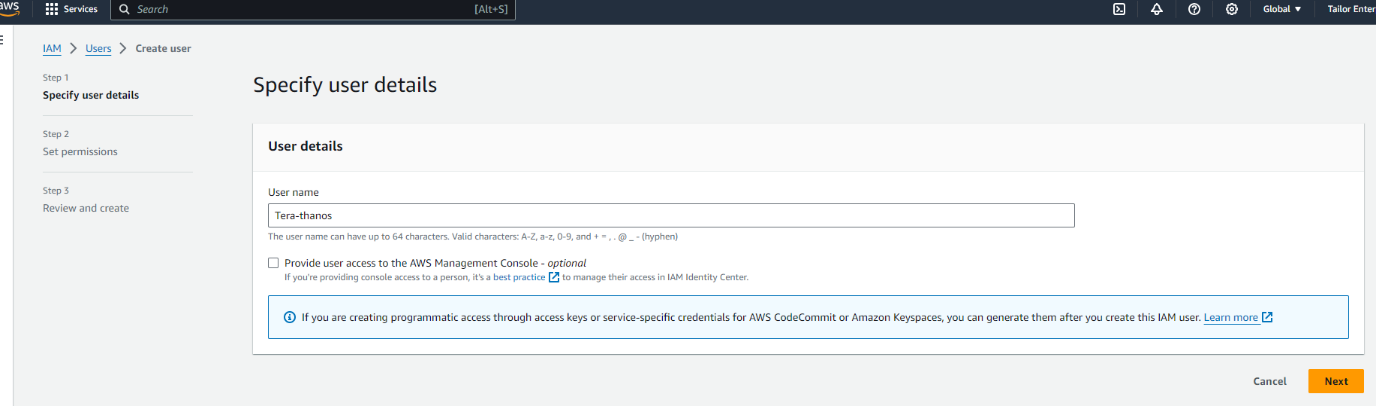
Next you want to either create a group or add it to an existing. To make things easy for now we are going to add it administrator group
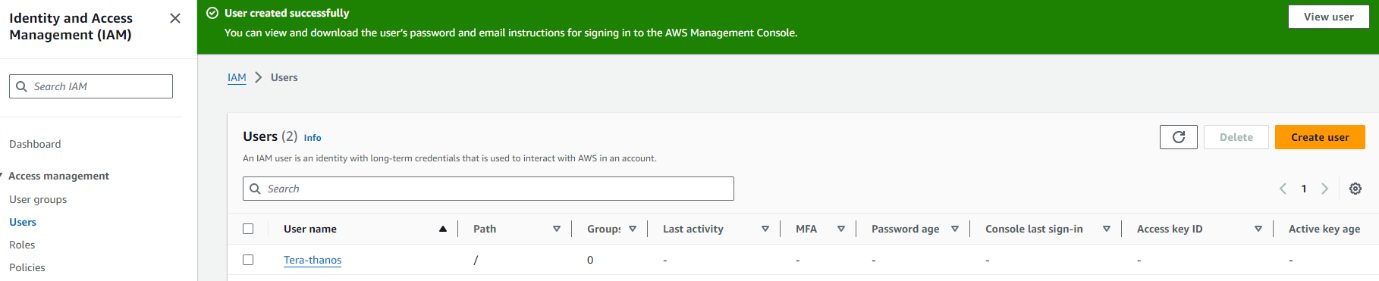
Next click on the new user and create the ACCESS KEY
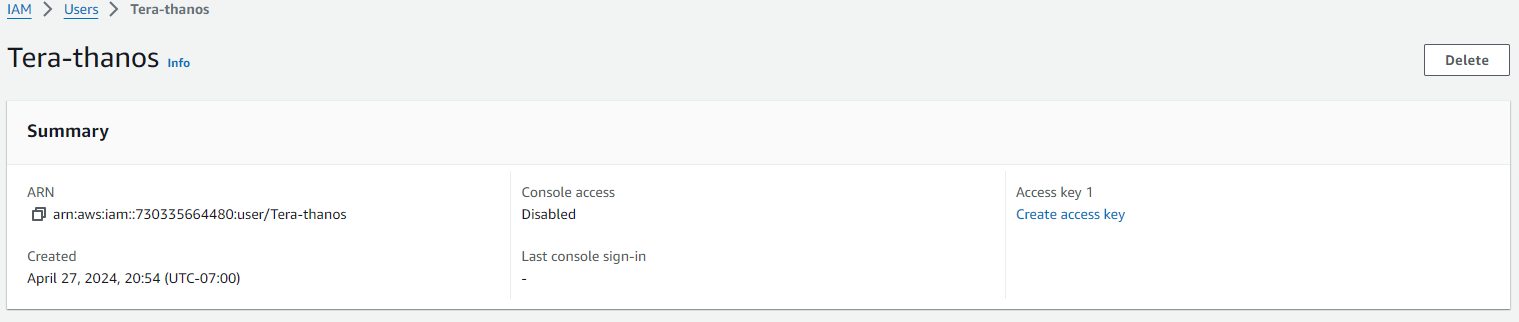
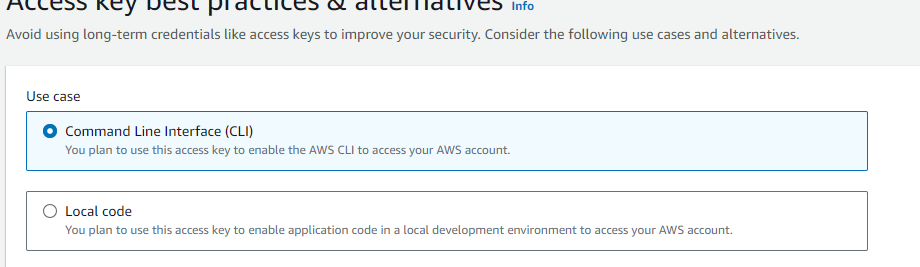
Next select the use case for the key
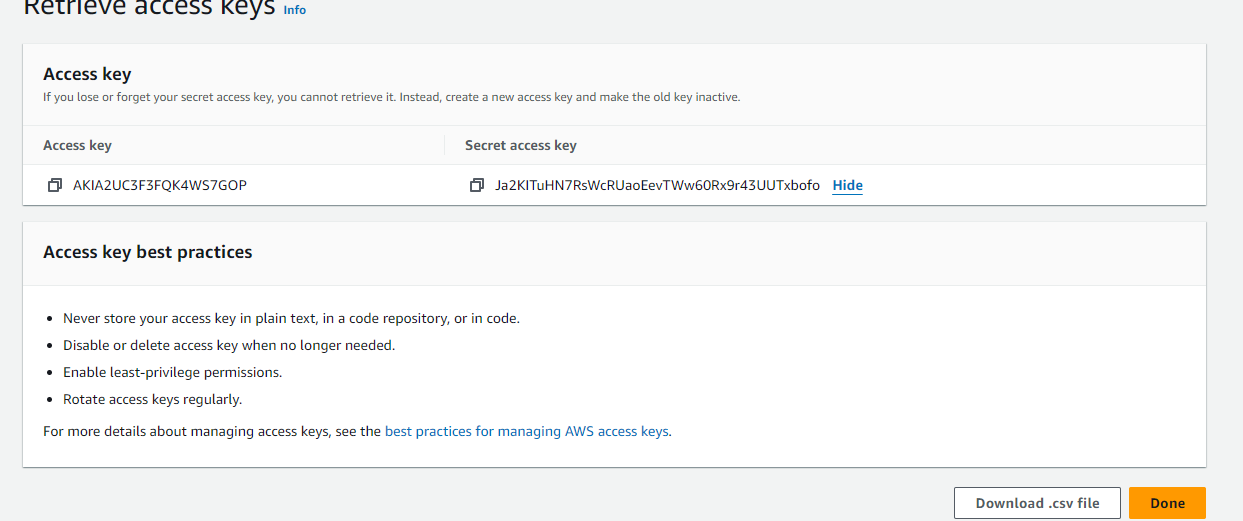
Once you create the ACCESS-KEY you will see the key and secret
Copy these to a text pad and save them somewhere safe.
Next you we going to create the RSA key pair
- Go under EC2 Dashboard
- Then Network & ecurity
- Then Key Pairs
- Create a new key pair and give it a name

Now configure your Terrform to use the credentials
AWS Access Key ID [****************RKFE]:
AWS Secret Access Key [****************aute]:
Default region name [us-west-1]:
Default output format [None]:
So a good terraform file structure to use in work environment would be
my-terraform-project/
├── main.tf
├── variables.tf
├── outputs.tf
├── provider.tf
├── modules/
│ ├── vpc/
│ │ ├── main.tf
│ │ ├── variables.tf
│ │ └── outputs.tf
│ └── ec2/
│ ├── main.tf
│ ├── variables.tf
│ └── outputs.tf
├── environments/
│ ├── dev/
│ │ ├── main.tf
│ │ ├── variables.tf
│ │ └── outputs.tf
│ ├── prod/
│ │ ├── main.tf
│ │ ├── variables.tf
│ │ └── outputs.tf
├── terraform.tfstate
├── terraform.tfvars
└── .gitignore
That said for the purposes of this post we will keep it simple. I will be adding separate posts to deploy vpc’s, autoscaling groups, security groups etc.
This would also be very easy to display if you VSC to connect to your
linux machine
|
mkdir myterraform cd myterraform touch main.tf outputs.tf variables.tf |
So we are going to create an Instance as follows
Main.tf
provider “aws” {
region = var.region
}
resource “aws_instance” “my_instance” {
ami = “ami-0827b6c5b977c020e“ # Use a valid AMI ID for your region
instance_type = “t2.micro“ # Free Tier eligible instance type
key_name = “” # Ensure this key pair is already created in your AWS account
subnet_id = “subnet-0e80683fe32a75513“ # Ensure this is a valid subnet in your VPC
vpc_security_group_ids = [“sg-0db2bfe3f6898d033“] # Ensure this is a valid security group ID
tags = {
Name = “thanos-lives”
}
root_block_device {
volume_type = “gp2“ # General Purpose SSD, which is included in the Free Tier
volume_size = 30 # Maximum size covered by the Free Tier
}
Outputs.tf
output “instance_ip_addr” {
value = aws_instance.my_instance.public_ip
description = “The public IP address of the EC2 instance.”
}
output “instance_id” {
value = aws_instance.my_instance.id
description = “The ID of the EC2 instance.”
}
output “first_security_group_id” {
value = tolist(aws_instance.my_instance.vpc_security_group_ids)[0]
description = “The first Security Group ID associated with the EC2 instance.”
}
Variables.tf
variable “region” {
description = “The AWS region to create resources in.”
default = “us-west-1”
}
variable “ami_id” {
description = “The AMI ID to use for the server.”
}
Terraform.tfsvars
region = “us-west-1”
ami_id = “ami-0827b6c5b977c020e“ # Replace with your chosen AMI ID
Deploying your code:
Initializing the backend…
Initializing provider plugins…
– Reusing previous version of hashicorp/aws from the dependency lock file
– Using previously-installed hashicorp/aws v5.47.0
Terraform has been successfully initialized!
You may now begin working with Terraform. Try running “terraform plan” to see
any changes that are required for your infrastructure. All Terraform commands
should now work.
If you ever set or change modules or backend configuration for Terraform,
rerun this command to reinitialize your working directory. If you forget, other
commands will detect it and remind you to do so if necessary.
thanosjumpbox:~/my-terraform$ terraform$
thanosjumpbox:~/my-terraform$ terraform$ terraform plan
Terraform used the selected providers to generate the following execution plan. Resource actions are indicated with the following symbols:
+ create
Terraform will perform the following actions:
# aws_instance.my_instance will be created
+ resource “aws_instance” “my_instance” {
+ ami = “ami-0827b6c5b977c020e”
+ arn = (known after apply)
+ associate_public_ip_address = (known after apply)
+ availability_zone = (known after apply)
+ cpu_core_count = (known after apply)
+ cpu_threads_per_core = (known after apply)
+ disable_api_stop = (known after apply)
+ disable_api_termination = (known after apply)
+ ebs_optimized = (known after apply)
+ get_password_data = false
+ host_id = (known after apply)
+ host_resource_group_arn = (known after apply)
+ iam_instance_profile = (known after apply)
+ id = (known after apply)
+ instance_initiated_shutdown_behavior = (known after apply)
+ instance_lifecycle = (known after apply)
+ instance_state = (known after apply)
+ instance_type = “t2.micro“
+ ipv6_address_count = (known after apply)
+ ipv6_addresses = (known after apply)
+ key_name = “nicktailor-aws”
+ monitoring = (known after apply)
+ outpost_arn = (known after apply)
+ password_data = (known after apply)
+ placement_group = (known after apply)
+ placement_partition_number = (known after apply)
+ primary_network_interface_id = (known after apply)
+ private_dns = (known after apply)
+ private_ip = (known after apply)
+ public_dns = (known after apply)
+ public_ip = (known after apply)
+ secondary_private_ips = (known after apply)
+ security_groups = (known after apply)
+ source_dest_check = true
+ spot_instance_request_id = (known after apply)
+ subnet_id = “subnet-0e80683fe32a75513”
+ tags = {
+ “Name” = “Thanos-lives”
}
+ tags_all = {
+ “Name” = “Thanos-lives”
}
+ tenancy = (known after apply)
+ user_data = (known after apply)
+ user_data_base64 = (known after apply)
+ user_data_replace_on_change = false
+ vpc_security_group_ids = [
+ “sg-0db2bfe3f6898d033”,
]
+ root_block_device {
+ delete_on_termination = true
+ device_name = (known after apply)
+ encrypted = (known after apply)
+ iops = (known after apply)
+ kms_key_id = (known after apply)
+ tags_all = (known after apply)
+ throughput = (known after apply)
+ volume_id = (known after apply)
+ volume_size = 30
+ volume_type = “gp2”
}
}
Plan: 1 to add, 0 to change, 0 to destroy.
Changes to Outputs:
+ first_security_group_id = “sg-0db2bfe3f6898d033”
+ instance_id = (known after apply)
+ instance_ip_addr = (known after apply)
─────────────────────────────────────────────────────────────────────────────────────────────────────────────────────────────────────────────
Note: You didn’t use the -out option to save this plan, so Terraform can’t guarantee to take exactly these actions if you run “terraform
apply” now.
Terraform used the selected providers to generate the following execution plan. Resource actions are indicated with the following symbols:
+ create
Terraform will perform the following actions:
# aws_instance.my_instance will be created
+ resource “aws_instance” “my_instance” {
+ ami = “ami-0827b6c5b977c020e”
+ arn = (known after apply)
+ associate_public_ip_address = (known after apply)
+ availability_zone = (known after apply)
+ cpu_core_count = (known after apply)
+ cpu_threads_per_core = (known after apply)
+ disable_api_stop = (known after apply)
+ disable_api_termination = (known after apply)
+ ebs_optimized = (known after apply)
+ get_password_data = false
+ host_id = (known after apply)
+ host_resource_group_arn = (known after apply)
+ iam_instance_profile = (known after apply)
+ id = (known after apply)
+ instance_initiated_shutdown_behavior = (known after apply)
+ instance_lifecycle = (known after apply)
+ instance_state = (known after apply)
+ instance_type = “t2.micro“
+ ipv6_address_count = (known after apply)
+ ipv6_addresses = (known after apply)
+ key_name = “nicktailor-aws”
+ monitoring = (known after apply)
+ outpost_arn = (known after apply)
+ password_data = (known after apply)
+ placement_group = (known after apply)
+ placement_partition_number = (known after apply)
+ primary_network_interface_id = (known after apply)
+ private_dns = (known after apply)
+ private_ip = (known after apply)
+ public_dns = (known after apply)
+ public_ip = (known after apply)
+ secondary_private_ips = (known after apply)
+ security_groups = (known after apply)
+ source_dest_check = true
+ spot_instance_request_id = (known after apply)
+ subnet_id = “subnet-0e80683fe32a75513”
+ tags = {
+ “Name” = “Thanos-lives”
}
+ tags_all = {
+ “Name” = “Thanos-lives”
}
+ tenancy = (known after apply)
+ user_data = (known after apply)
+ user_data_base64 = (known after apply)
+ user_data_replace_on_change = false
+ vpc_security_group_ids = [
+ “sg-0db2bfe3f6898d033”,
]
+ root_block_device {
+ delete_on_termination = true
+ device_name = (known after apply)
+ encrypted = (known after apply)
+ iops = (known after apply)
+ kms_key_id = (known after apply)
+ tags_all = (known after apply)
+ throughput = (known after apply)
+ volume_id = (known after apply)
+ volume_size = 30
+ volume_type = “gp2”
}
}
Plan: 1 to add, 0 to change, 0 to destroy.
Changes to Outputs:
+ first_security_group_id = “sg-0db2bfe3f6898d033”
+ instance_id = (known after apply)
+ instance_ip_addr = (known after apply)
Do you want to perform these actions?
Terraform will perform the actions described above.
Only ‘yes’ will be accepted to approve.
Enter a value: yes
aws_instance.my_instance: Creating…
aws_instance.my_instance: Still creating… [10s elapsed]
aws_instance.my_instance: Still creating… [20s elapsed]
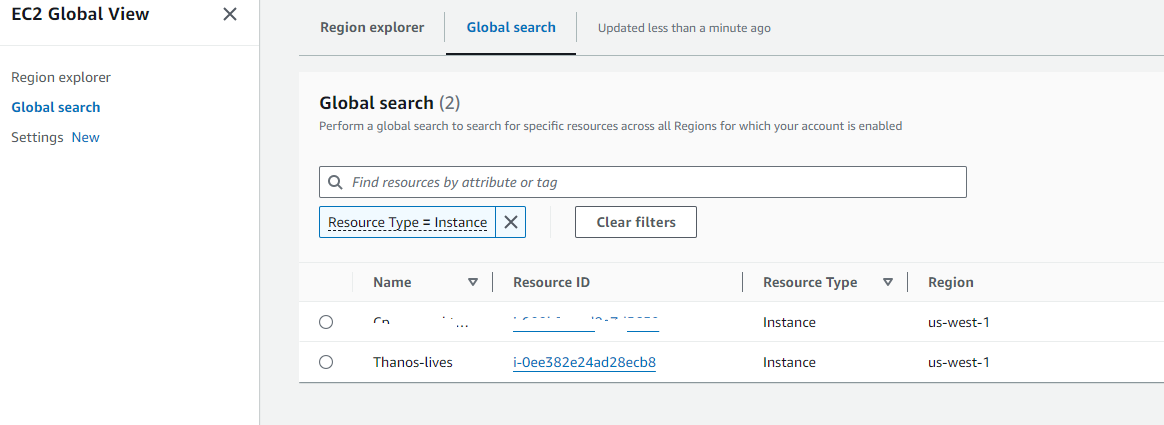
aws_instance.my_instance: Creation complete after 22s [id=i-0ee382e24ad28ecb8]
Apply complete! Resources: 1 added, 0 changed, 0 destroyed.
Outputs:
first_security_group_id = “sg-0db2bfe3f6898d033”
instance_id = “i-0ee382e24ad28ecb8”
instance_ip_addr = “50.18.90.217”
Result: