What is OpenAKC?
OpenAKC is an open-source authentication gateway, dynamic SSH key manager, and privileged access management tool for Linux. It completely rethinks how SSH trust is managed across an estate.
As a centralised trust management platform, OpenAKC allows the authorized_keys mechanism on hosts to be completely disabled. SSH trust across your entire estate can be managed centrally by systems administration or information security staff, with rich control and monitoring features. Users and application developers can no longer add or remove trust relationships on their own, effectively enforcing any whitelist or approval process you want.
As a practical jump host solution, OpenAKC replaces the dubious mechanisms many of us have seen in production: shared private keys, dodgy sudo wrappers, and insecure AD-to-SSH bridges. It acts as a drop-in upgrade by migrating users to personal keys with self-service key management, enforcing passphrases, and providing full audit trails.
🤔 The Problems Everyone Thinks About But Never Solves
- Root access auditing – How do you give admins root while logging every keystroke per user?
- IAM without domain-joining – Joining every server to AD exposes user accounts, group memberships, and home directories to attackers who gain access.
- Uncontrolled root – Once someone sudos to root, there is zero control on what that root user can do. Multiple concurrent root sessions make logs useless.
- Limiting root capabilities – What if you could give admins root but prevent them from touching files you deem too sensitive?
- Eliminating password auth entirely – No more user/pass login vectors across the estate.
- Faster than LDAP/SSSD – Deploy this across multiple distros faster than traditional directory integration.
✅ OpenAKC solves all of these. This architecture takes a few steps to understand, but from a security standpoint it trumps anything most organisations are currently running.
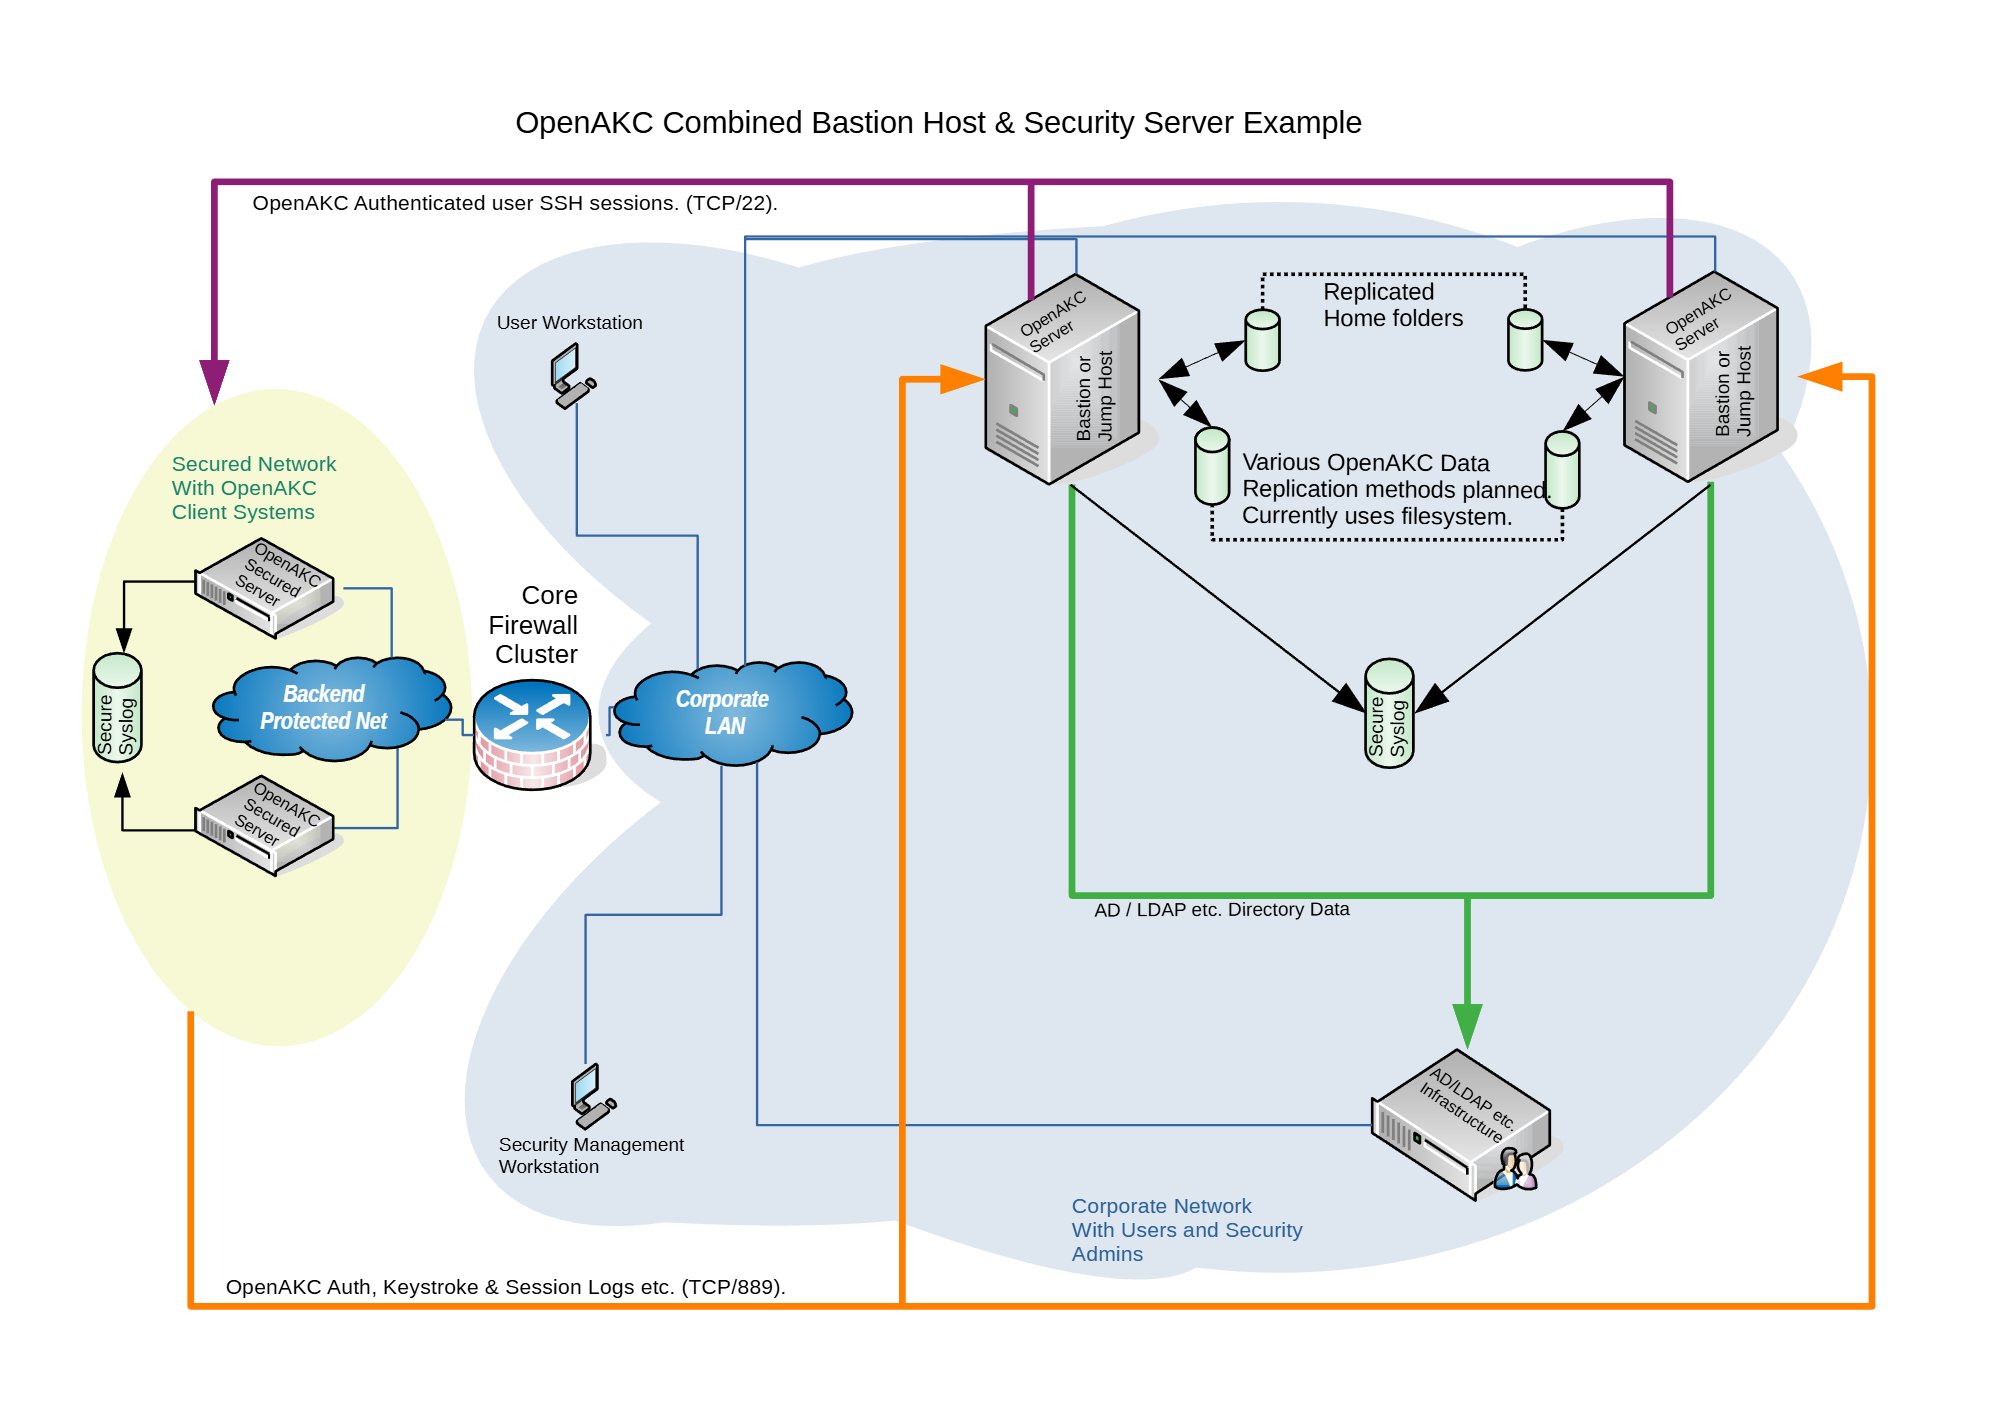
Architecture Options
OpenAKC supports two deployment architectures depending on the size of your team and estate. Both can be scaled out for redundancy.
🏠 Combined Architecture
Jump Host + Security Server on one box
Best for: Small teams where the admin team also manages security.
Single point of management with role rules and diagnostics all in one place. Only a couple of client packages to deploy and clients are brought into trust immediately. In today’s evolving threat landscape, the ability to control what even root can do is no longer optional. Military and financial environments demand this level of granular access control, and this architecture delivers it with minimal overhead.
🏢 Segregated Architecture
Separate Jump Hosts + Security Server

Best for: Large teams with multiple groups and tighter security requirements.
Security server and jump hosts are fully separated, meaning client machines are never joined to the domain. Attackers who compromise a client machine cannot query AD for users, groups, or any organisational structure. Jump hosts are disposable and easily redeployed. For military and financial institutions where root capability control, full session audit trails, and zero-trust principles are regulatory requirements, this segregated model is the gold standard.
✨ Special Features
Session Recording Incident Logging (ServiceNow, Jira) Linux Capabilities Control Time-Based Access Rules SCP File Transfer Logging Immutable File Protection Shell Override / Deny Command Whitelisting Self-Service Key Management
Practical Deployment Guide
This walkthrough covers the segregated architecture (separate jump host and security server). We are deploying on CentOS 7.
⚠️ Prerequisites: Two CentOS 7 machines deployed. Active Directory configured with a user in a Linux group. Disable firewalld and selinux on your machines before proceeding.
⚠️ The original repo source code does not support newer OS’s. I have updated all the code to work with newer versions and written automations to deploy it for any environment
Phase 1 — Security Server Setup
Join to AD, install OpenAKC server, register your admin key
1
Install AD/Kerberos Packages
yum install oddjob realmd samba samba-common oddjob-mkhomedir sssd adcli
2
Point DNS at Active Directory
Edit /etc/resolv.conf to include your AD server as a nameserver so it can resolve the necessary DNS records.
vi /etc/resolv.conf

nameserver 192.168.1.300
nameserver 192.168.1.301
3
Discover and Join the Realm
The realm name is case sensitive.
# Discover the realm
realm discover AD.NICKTAILOR.COM

# Join the domain (enter AD admin password when prompted)
realm join --user=admin ad.nicktailor.com

# Verify it worked
id nicktailor@ad.nicktailor.com
Tip: You can set use_fully_qualified_names = False in /etc/sssd/sssd.conf so you don’t need @ad.nicktailor.com when running id.
4
Add User to Sudo
usermod -aG wheel nicktailor
5
Install OpenAKC Server
# Add the OpenAKC repository
curl https://netlore.github.io/OpenAKC/repos/openakc-el7.repo \
  | sudo tee /etc/yum.repos.d/openakc.repo

# Install the server package
yum install openakc-server
6
Generate and Register Your SSH Key
Switch to your user account, generate an RSA key pair, and register it with OpenAKC.
# Switch to your user
su nicktailor

# Generate SSH keys (use a passphrase!)
ssh-keygen -t rsa

# Register the key with OpenAKC
openakc register

# Verify the public key was created
ls -al /home/nicktailor/.openakc/

# Copy the key to the security server's key store (may need root)
cp /home/nicktailor/.openakc/openakc-user-client-nicktailor--pubkey.pem \
   /var/lib/openakc/keys/
📋 Example Output (click to expand)
[nicktailor@security1 ~]$ ssh-keygen -t rsa
Generating public/private rsa key pair.
Enter file in which to save the key (/home/nicktailor/.ssh/id_rsa):
Enter passphrase (empty for no passphrase):
Enter same passphrase again:
Your identification has been saved in /home/nicktailor/.ssh/id_rsa.
Your public key has been saved in /home/nicktailor/.ssh/id_rsa.pub.
The key fingerprint is:
SHA256:udhNKEp0txzfup7IxhUwNA+VSviWP1mu/aKPA5vZb3w nicktailor@security1

[nicktailor@security1 ~]$ openakc register
OpenAKC Copyright (C) 2019-2020 A. James Lewis. Version is 1.0.0~alpha18

Passphrase is requested to ensure you own this key.
Enter passphrase:
Escalating to perform API call
Connected to OpenAKC server. Sending key registration request
OK: Request processed
7
Create Access Roles
Define who can access what, when, and how. This is where OpenAKC really shines.
# Edit the default root role
openakc editrole root@DEFAULT
Add role blocks like these:
## Per-user rule
RULE=2020/01/13 19:17,2030/01/13 20:17,user,nicktailor
DAY=any
TIM=any
SHELL=/bin/bash
CMD=any
SCP=s,^/,/data/,g
CAP=cap_linux_immutable
REC=yes
FROM=any

## Group-based rule (for all linuxusers)
RULE=2020/01/13 19:17,2030/01/13 20:17,group,linuxusers
DAY=any
TIM=any
SHELL=/bin/bash
CMD=any
SCP=s,^/,/data/,g
CAP=cap_linux_immutable
REC=yes
FROM=any
| Field |
Description |
| RULE |
Date range, type (user/group), and identity |
| DAY |
Restrict access to specific days (or any) |
| TIM |
Restrict access to specific times (or any) |
| SHELL |
Override the user’s shell on login |
| CMD |
Whitelist specific commands (or any) |
| CAP |
Drop Linux capabilities (e.g. block immutable file edits even for root) |
| REC |
Enable session recording (yes/no) |
| FROM |
Restrict source IP/hostname (or any) |
Key Insight: The CAP=cap_linux_immutable setting strips root’s ability to modify files with the immutable flag. This is just one of many Linux capabilities you can revoke. Your root users literally cannot change protected files, even as root.
8
Copy Your Key to the Jump Host
ssh-copy-id -i ~/.ssh/id_rsa.pub root@192.168.1.200
Phase 2 — Jump Host Setup
Join to AD, install OpenAKC tools, point at security server
Note: Join this server to the domain first using the same steps from Phase 1 (Steps 1-4), then continue from here.
1
Install OpenAKC Tools
# Add the repository
curl https://netlore.github.io/OpenAKC/repos/openakc-el7.repo \
  | sudo tee /etc/yum.repos.d/openakc.repo

# Install the tools package (NOT openakc-server)
yum install openakc-tools
2
Configure the Security Server Connection
vi /etc/openakc/openakc.conf

APIS="securityakc1.nicktailor.com"
PORT="889"
3
Login as Your User and Copy Key
# Switch to your user (lets SSSD create the home directory)
su nicktailor

# Copy your key from the security server
ssh-copy-id -i ~/.ssh/id_rsa.pub root@192.168.1.200
4
Verify Connectivity
[nicktailor@jumphost1 ~]$ openakc ping
OpenAKC Copyright (C) 2019-2020 A. James Lewis. Version is 1.0.0~alpha18

Connected to OpenAKC server. Sending Test Run Ping Message
Test Run Response - OK: Pong! - from server - securityakc1.nicktailor.com
✅ Success! If you see the Pong response, your jump host is talking to the security server correctly.
Phase 3 — Client Machine Setup
The easiest part. Add any machine to the estate in minutes.
This is where it gets beautiful. Got a bunch of legacy systems? Want centralised login without joining them to the domain? Want every root session tracked with keystroke logging? Here’s all you do.
1
Install OpenAKC Client
⚠️ Important: The client package is called openakc (not openakc-server or openakc-tools). If you install the wrong one it’s painful to clean up!
# Add the repo
curl https://netlore.github.io/OpenAKC/repos/openakc-el7.repo \
  | sudo tee /etc/yum.repos.d/openakc.repo

# Install the CLIENT package
yum install openakc
2
Configure the Client
vi /etc/openakc/openakc.conf

APIS="192.168.1.200"
ENABLED="yes"
PORT="889"
CACHETIME="60"
DEBUG="no"
PERMITROOT="yes"
AUDIT="yes"
QUIZ="no"
HIDE="restrict"
FAKESUDO="yes"
| Setting |
What It Does |
| PERMITROOT |
Allow root login via OpenAKC keys |
| AUDIT |
Enable full audit logging |
| QUIZ |
Prompt for ticket number on login (ServiceNow, Jira, etc.) |
| HIDE |
Restrict visibility of other users on the system |
| FAKESUDO |
Simulate sudo behaviour for compatibility |
3
That’s It. Test It.
[nicktailor@jumphost1 ~]$ ssh root@192.168.1.38
Enter passphrase for key '/home/nicktailor/.ssh/id_rsa':
OpenAKC (v1.0.0~alpha18-1.el7) - Interactive Session Initialized

[root@nickclient1 ~]#
This session is now being recorded. And notice what happens when you try to look up domain users:
[root@nickclient1 ~]# id nicktailor
id: nicktailor: no such user
🔒 Security win: The client machine has no knowledge of domain users. A compromised machine reveals nothing about your AD structure, groups, or user accounts.
👤 Adding New Users
Once the infrastructure is in place, onboarding a new user takes about 60 seconds:
1
Add user to AD and the appropriate Linux group
2
SSH to the jump host and generate keys:
ssh-keygen -t rsa
3
Register with OpenAKC:
openakc register
4
Done. The user can now SSH to any machine in the estate.
OpenAKC in Action
Live demo of OpenAKC authentication and session management
This is how you set up SSH security properly. No more blind trust, no more unaudited root, no more domain-joined attack surfaces.
Special thanks to James for teaching me this while @ LSE and for the innovation behind this project.